There are more than 35 ways to promote conferences and other events. But there is no need to try all of them at the same time, especially if you will be promoting by yourself or in a team of two or three people.
Boost Your Webinar with Facebook Promotion Tools
Summarize with
Table of contents
- Boost Your Webinar with Facebook Promotion Tools
It is much more efficient to select 5-7 instruments and concentrate all your efforts, time, and budget on them.
Convenient tool for your webinars promotion
On the MyOwnConference blog, we run a series of articles where we discuss in detail about various instruments for promotion. We hope that this will help you get even better results.
Today let’s focus on Facebook, as it contains a lot of potential participants of your events.
So, how to start the event promotion on Facebook?
Step 1: Create an event
You can create a Facebook page for any event (online or offline).
But what is it for?
The fact is, Facebook provides convenient tools for your webinar’s promotion. If you create a separate page for your event, all your participants and organizers will be able to invite their friends. When a user gets an invitation, they can view a page and specify if they are «Going» or are «Interested.»
You can create an event on Facebook in three ways: through a personal profile, a group, or a business page.
Creating an event via a personal profile is easy: All you’ve got to do is click on the «Events» tab in your newsfeed.
Facebook’s events can be in-person or virtual and cover nearly any activity. The possibilities are virtually limitless, from business meetings and sports events to fundraisers.
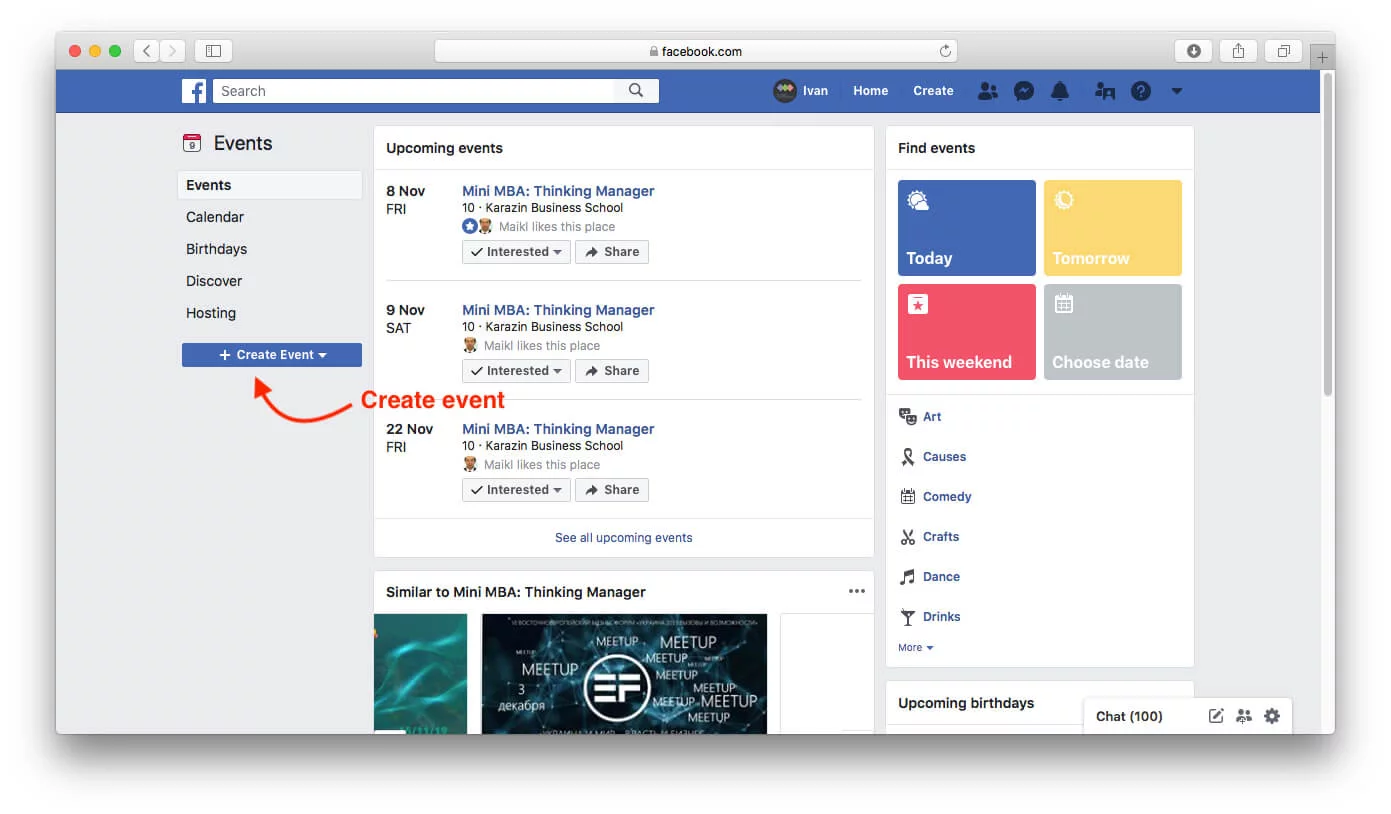
You can create private or public events. But for event promotion, it is more logical to create public events.
Please note that you cannot change the private event into the public one or vice versa later.
Add name, date and location, description, and tags. Upload a cover photo of the event.
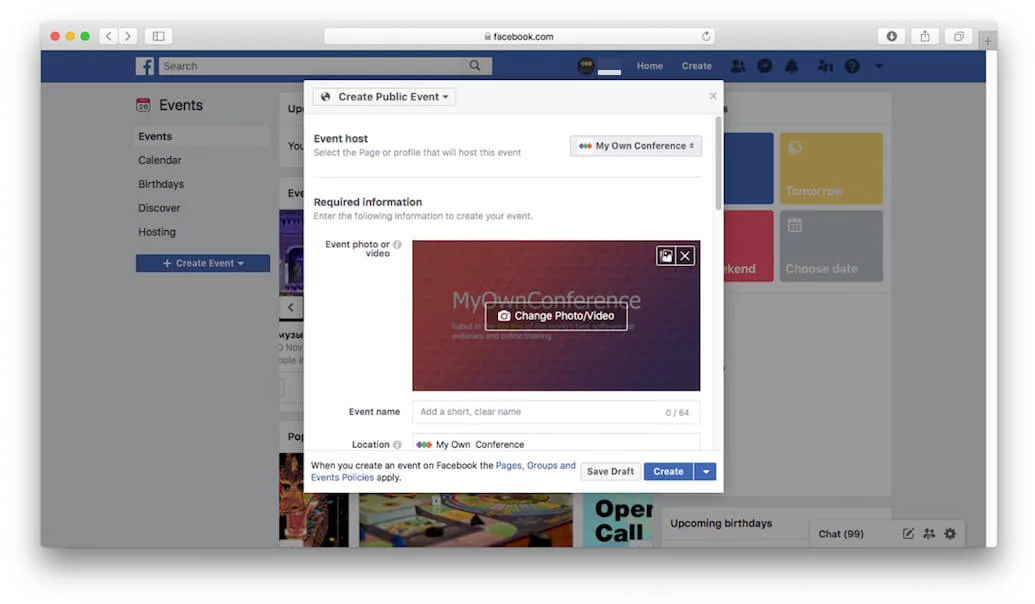
The same goes for groups and business pages, except that you need to go to your page or group to schedule an event.
To create an event within your group, just go to your group page and press the «Events» tab on the left sidebar. Then proceed to «Create event.»
For the business page event you need to be careful, as sometimes the option for «Events» will only display after you click on the three dots for more options.
In essence, it is much better to promote from your business page as business page events offer you more opportunities for advertising, analytics, and the ability to set a recurring schedule.
Step 2: Add information to the event page
The event page will often look plain and empty right after creation.
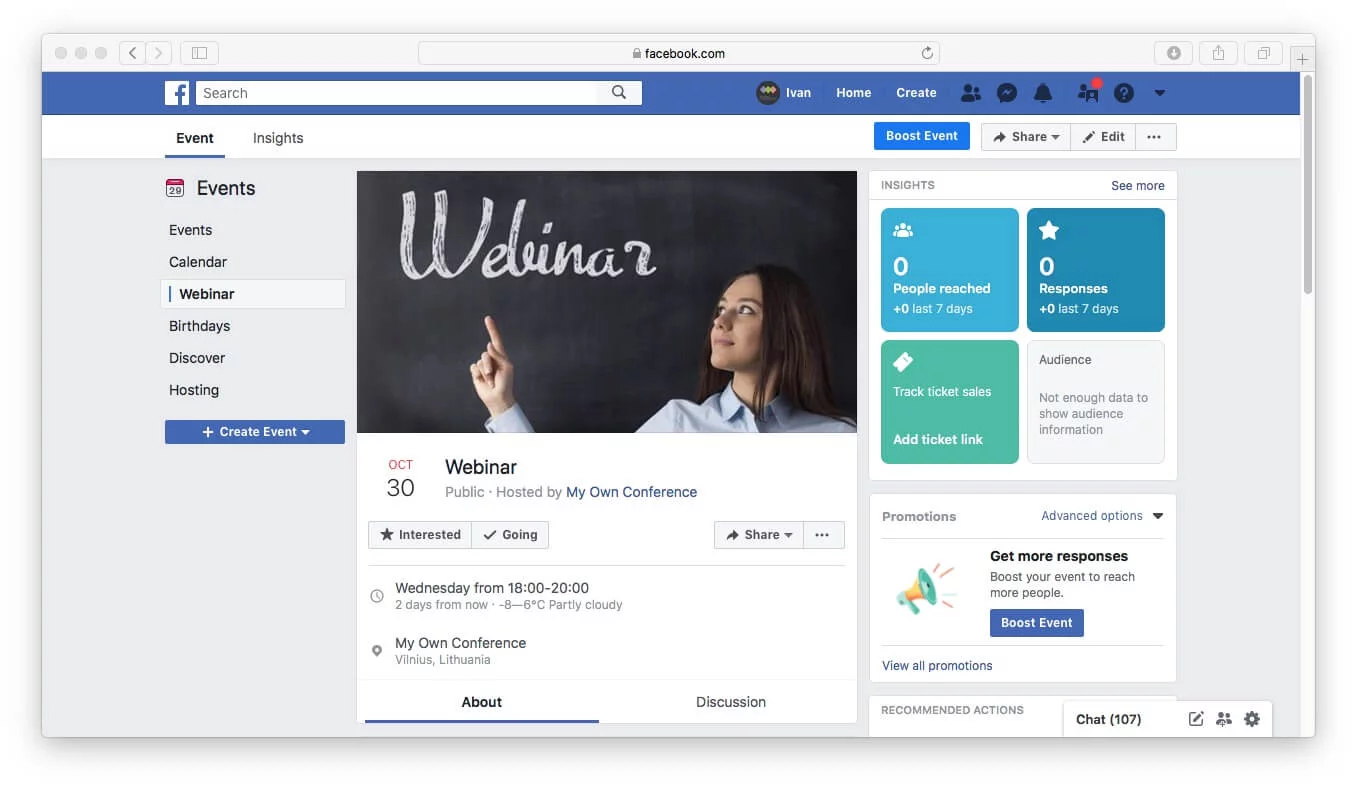
Add basic information about your webinar to this page. For example, a few posts on the event presenters, their achievements, 2-3 publications on the event’s program and benefits that participants can receive. You don’t want potential participants to be presented with an empty event page, as this would discourage them from attending. The more they are able to see before the event to spark their interest, the better for you.
In addition, you can add feedback from participants of previous events. Also, include any important information on the event such as conditions of participation, program changes, etc.
It’s a good idea to let the participants post on the event page since it’s going to increase the audience’s engagement and the event’s exposure. However, you may want to monitor the posts or even make it obligatory to approve them. There’s nothing worse than negative posts on an event that is yet to kick off. So, it’s best to be able to review posts before they go live or be active enough to delete any inappropriate post as soon as it is posted.
Step 3: Share event in your profile, page, group
Do not expect your event to get popular overnight. You need to promote it, so it can gather more participants. For example, you can place information about the event on a personal page and a brand page.
This can be done in two ways
1. Make a post with a link to the event.
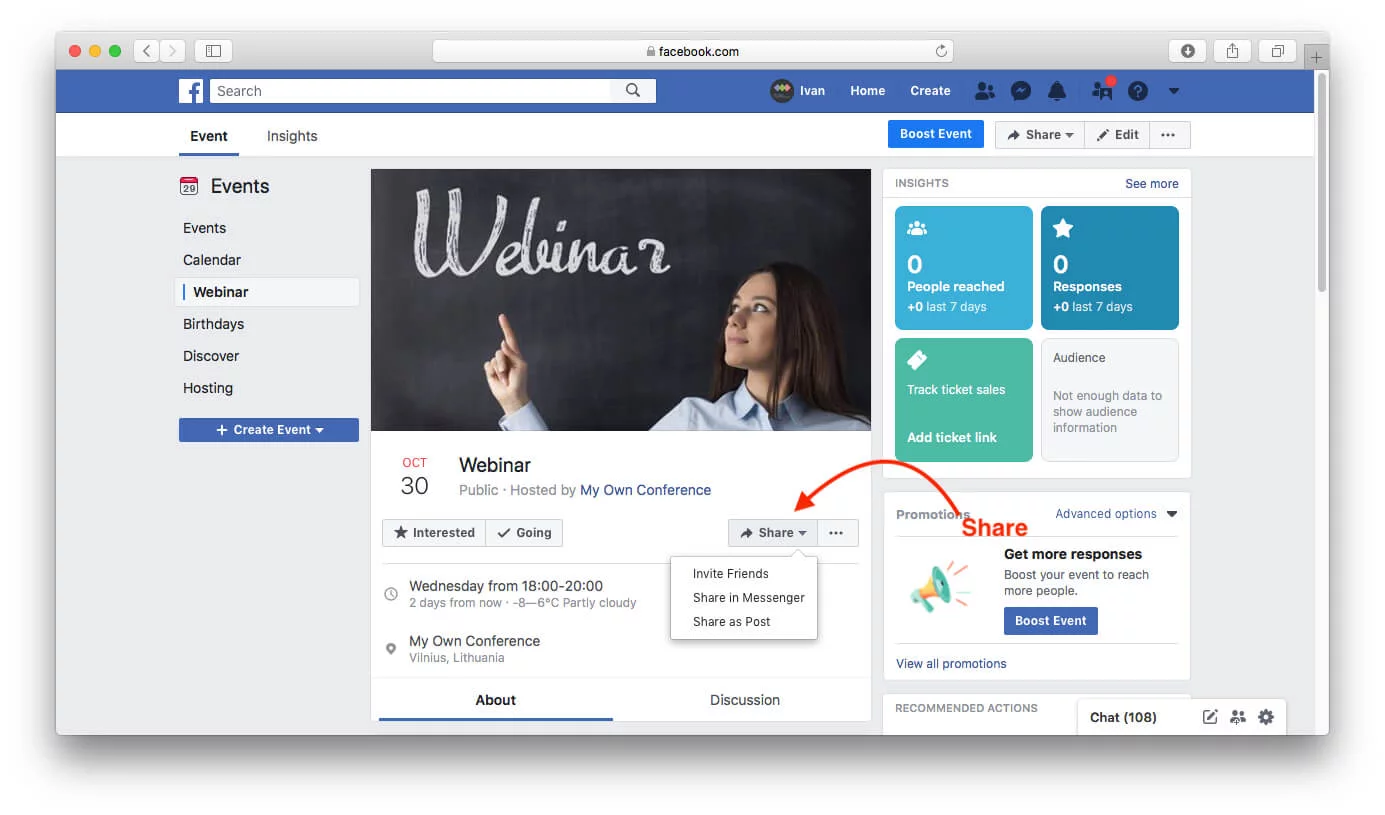
2. Go to the event page and click on «Share» then select «Invite Friends», «Share in Messenger» or «Share as Post».
Step 4: Invite your friends
The event organizers and participants can invite their Facebook friends to the event. How they do it depends on whether the event is private or public.
For private events, press on «Invite» under the cover photo and select people you want to invite.
You can send an invitation to a particular person or use the «Select All». Finish the process by clicking on «Send Invites».
For public events, press on «Share» and «Invite Friends» under the cover photo. Again, you can invite people individually, or click «Select All».
Please note that you can filter your search based on the people’s location, group memberships, as well as the previous events they visited.
It is important to note that Facebook imposes a limit on a number of friends that a user can invite to the event. One person can invite only 500 users to one event.
Step 5: Promotion of the event via ad
It is possible to get even more participants for your event using advertising. You can do it via the boost option on your event’s page or the Facebook Ads Manager.
The boost option
It is often faster and more convenient to go to the event page and click on «Boost Event».
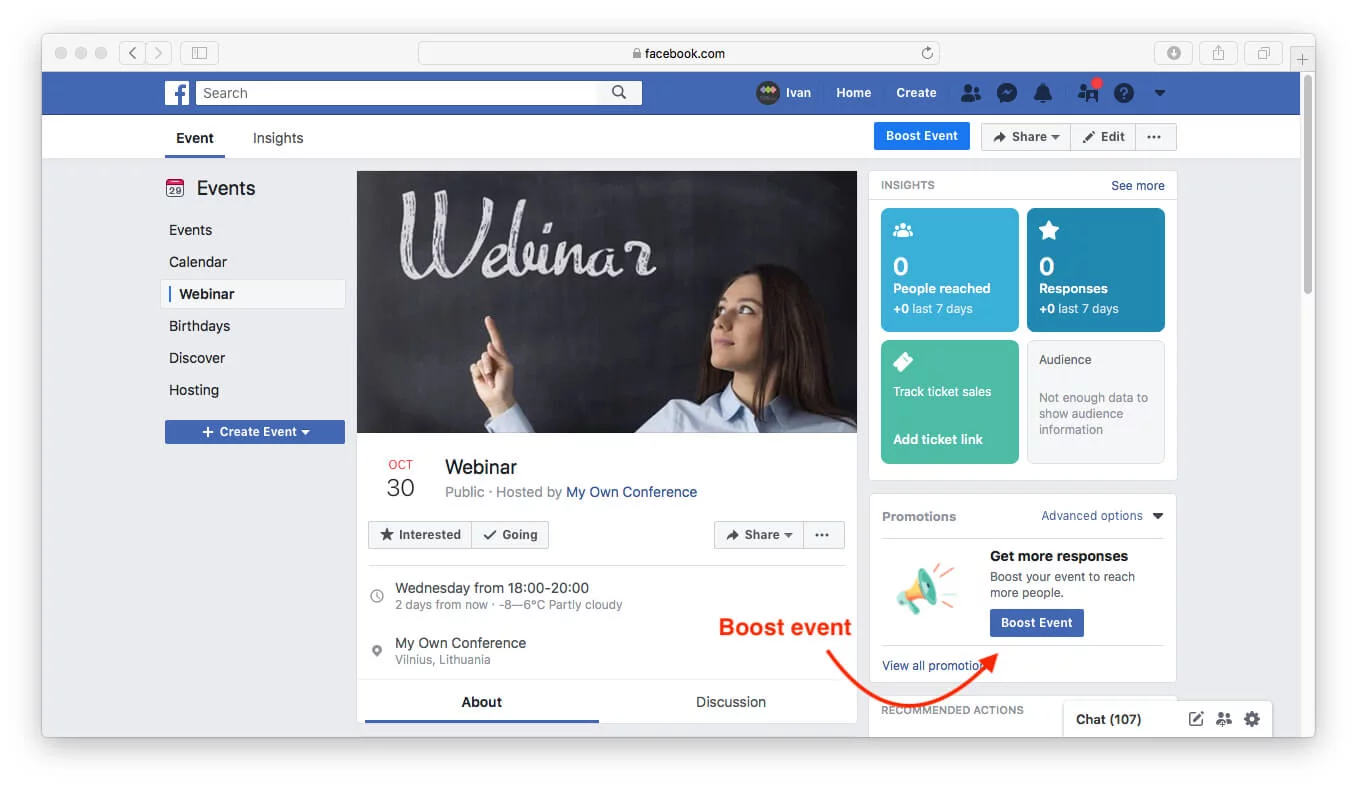
After this, you can choose one of two options. Select “Reach more people” if you want to expand your event’s visibility, or pick “Increase ticket sales” if your goal is to sell more tickets, just as the name suggests.
In the latter case, the audience will often be redirected to your ticket website rather than the event’s page, so choose wisely.
If you don’t want that to happen, you may want to work with a Facebook ticketing partner. This way your participants will be able to buy tickets directly from your event’s page.
The other option is to create a Facebook ad. To create an ad, you need to take note that there are six different types of ads on Facebook:
- Photo ads: Create interesting and high-quality photos to attract your audience to the event.
- Video ads: You can create a short video ad to promote your event. Videos have been proven to hold the attention of viewers better compared to long text.
- Carousel ads: This allows you to add up to 10 images or videos within one ad, which can be useful if you want to display that your event will have multiple days, themes, speakers or sponsors.
- Messenger ads: Facebook sends Messenger ads in-between conversations in its Mobile Messenger app.
- Collection ads: Collection ads allow you to promote different product types or services, and target specific clients.
- Slideshow ads: Here you can create a slideshow of photos, text, and animated videos for a cheaper ad option compared to a full video ad.
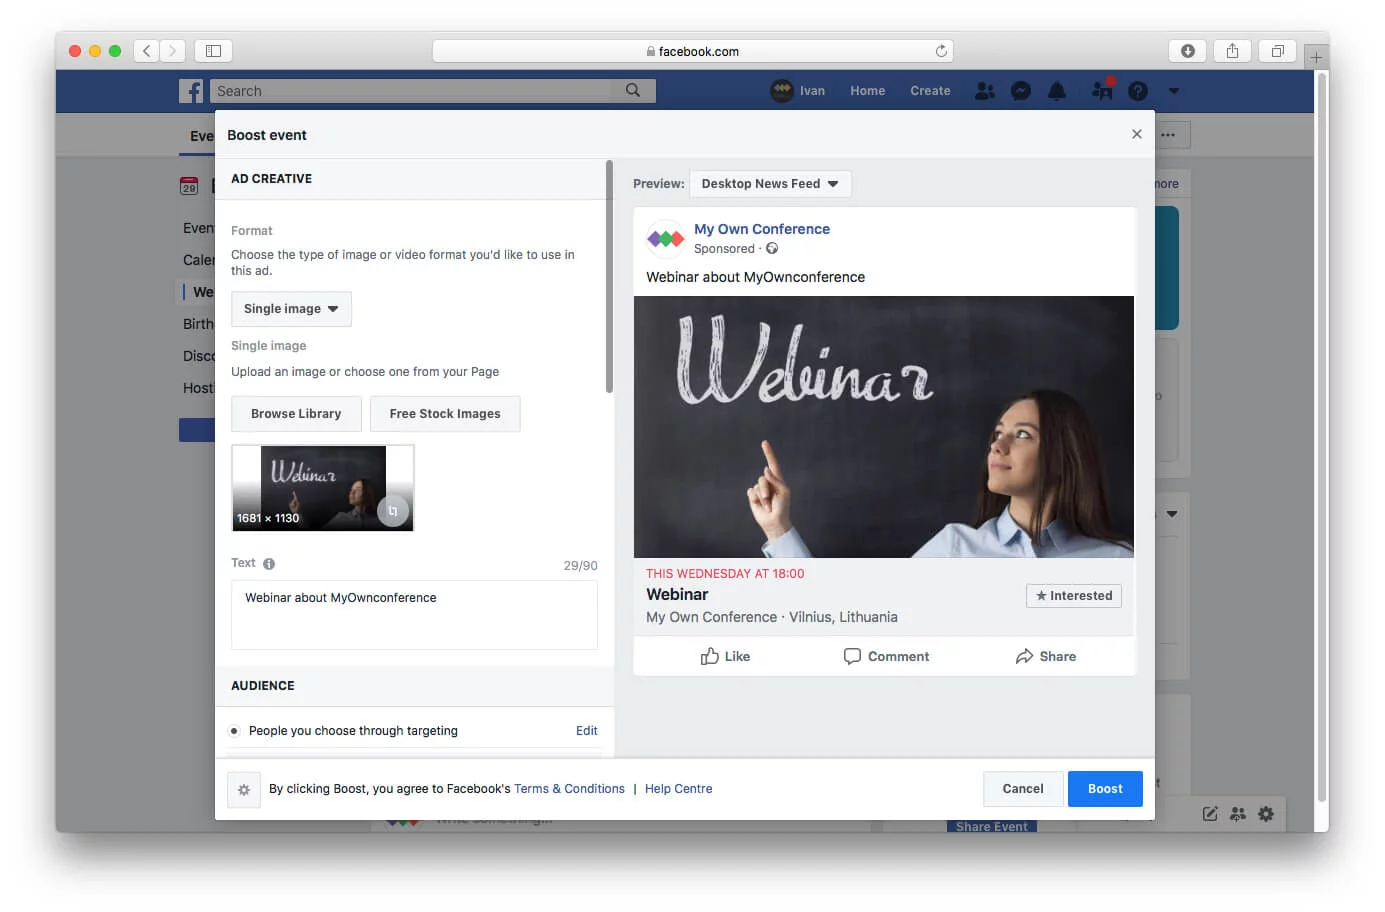
Don’t forget to target a particular audience:
- People who like your Page;
- People who like your Page, and their friends;
- Custom Audiences (based on age, gender, location, interests, etc.)
Specify the total budget, set campaign duration, and click «Boost.» After that advertising will be sent for moderation.
Facebook Ads Manager
You may also promote your event via Facebook Ads Manager.
There are two goals you can pursue: «Traffic» and «Conversions». Your choice should be motivated by how popular your product/service is.
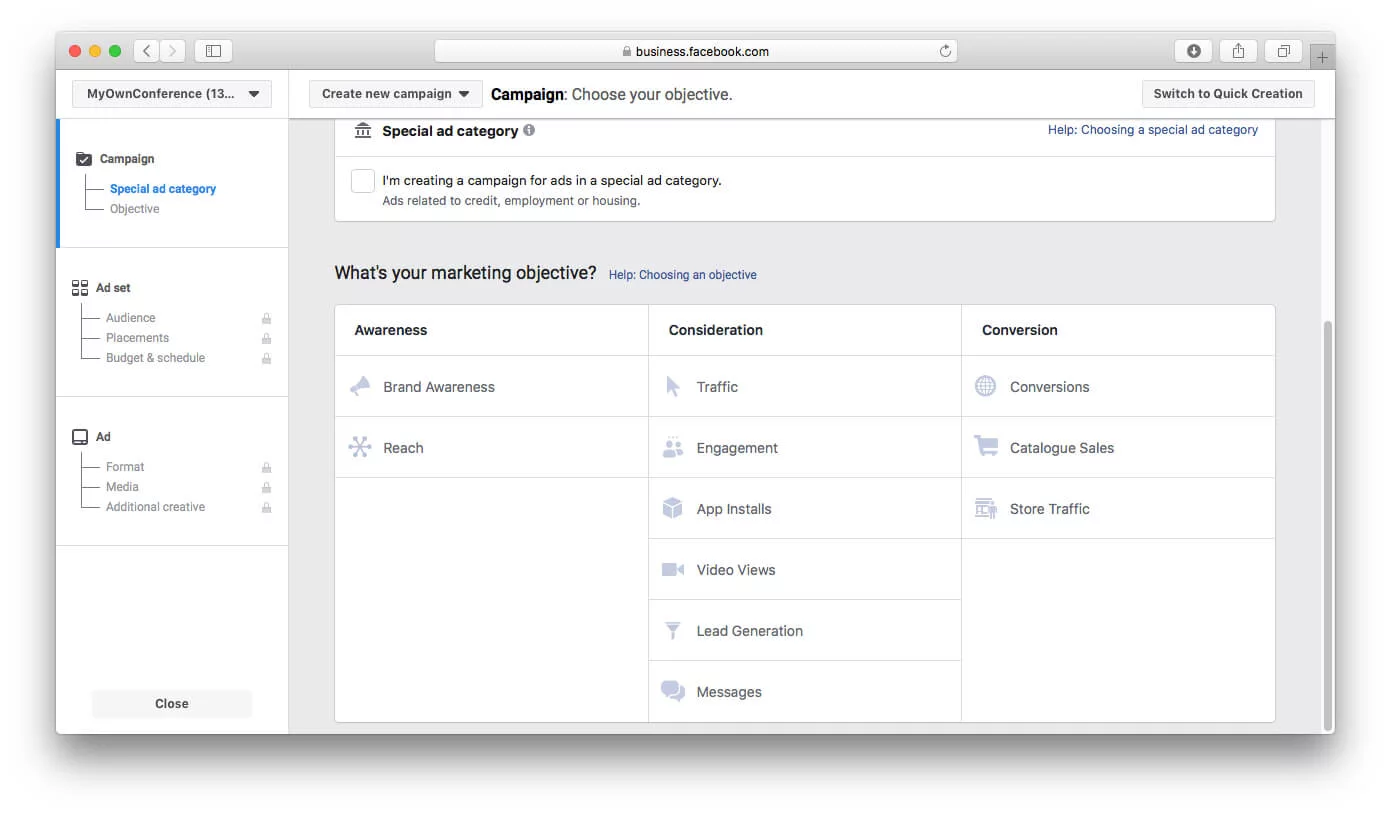
If you get at least 500 purchases per month, you may want to go with the «Conversions» objective. As a result, Facebook will target people with a behavior similar to that of your existing customers.
If your product/service is still new and relatively unknown, the «Traffic» objective may be a better fit for you. Such ads may not result in higher conversions, but they do increase brand awareness, link clicks, and blog views, aka traffic to your website/app/Facebook page.
While the newbies should be okay with simply boosting their events, the more experienced users should think about including the Ads Manager in their overall promotional strategy.
Step 6: Contact with opinion leaders
Some people on Facebook have earned the trust of a specific audience, which gives them the power to shape public opinion. That is why they are known as opinion leaders.
Find opinion leaders in the desired category, and ask them to spread awareness about your event.
Step 7: Analyze your results
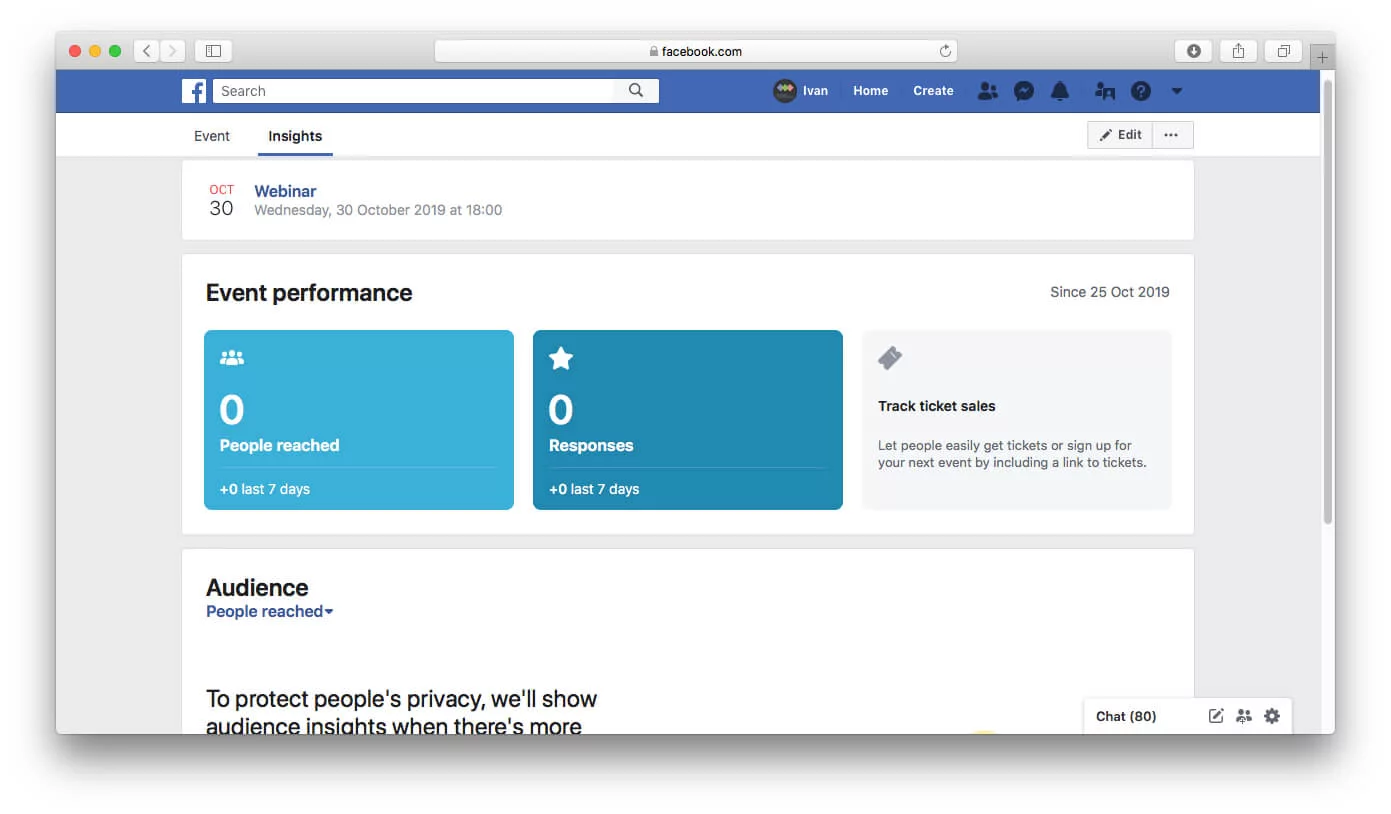
Any activity on the event promotion should be measured to understand what methods should be used in the future and what should be abandoned. On Facebook, you can view the statistics of current and previous events. Here are the event statistics you can find on Facebook:
Let’s sum up. You can promote an event on Facebook in several ways: spread the information among your friends, run targeted advertising, or make agreements with opinion leaders. The best approach is to combine all these techniques so that you can reach a wider audience and attract more people to your event.
We wish you a successful event!
Final words
In conclusion, when you bring together all the different strategies described here, starting with creating a dedicated event on Facebook and continuing with adding engaging content to the event page, sharing it effectively, using paid promotion, collaborating with influencers, and carefully reviewing the results, you create a complete plan that helps increase your webinar’s visibility and impact. When you stay consistent, keep your focus on your audience, and adjust your promotional efforts based on clear results, your event reaches more people and attracts participants who are truly interested and motivated to join on Facebook.
FAQ
Because a dedicated Facebook event gives you more visibility and interactivity, then people can mark “Going” or “Interested,” invite friends, and it gives you access to event‑analytics and promotional tools not available via a simple post.
You should include the event title, date, time, location (or format if online), description of benefits for attendees, speaker bios, past feedback or testimonials, and updates about the agenda.
You can share the event from your profile, business page, or group; you can click “Invite Friends” or “Share as Post” on the event page; and ask organizers and previous participants to invite their contacts.
Yes. When you want to reach beyond your immediate network. You can use the “Boost Event” button directly on the event page for quick promotion. Or for more precise targeting and goals, use Facebook Ads Manager, choosing objectives like “Traffic” or “Conversions” depending on your maturity level.
You use Facebook’s event analytics to monitor metrics like how many people saw the event, responded (“Interested” or “Going”), clicked links, or converted. Based on those numbers, you decide which promotional methods to scale or drop.
An expert behind the simplified online meeting and webinar software platform, MyOwnConference. In today’s flexible work environment, Dan offers invaluable life hacks, in-depth reviews, and savvy tips for organizing, promoting, and excelling in virtual conferences and webinars.


