Camera placement in the webinar recording
The recording is assembled on our side rather than captured from your screen, so its layout is something you set beforehand rather than something you arrange during the event. Three settings decide it, and they all sit on one tab.
The two settings are independent, so a recording can be laid out differently from the event it came from.
Two settings, two tabs
The live room has a camera position of its own, and it is a different setting with a different list. This page is about the recording, which is the "Record" tab. The live room is on the "General" tab, and webcam position in the webinar room covers it.
Two things make them easy to confuse. Four of the corner names are word for word identical in both lists, so the label alone never tells you which setting you are looking at, and only the tab does. And the lists are not the same length, because the live room offers a left side and a right side while the recording offers one side position only. If you are hunting for a right-hand option and cannot find it, you are on the Record tab.
Where the settings live
Open "Webinar rooms" or "Scheduled webinars" in the control panel, depending on where you created the event, click the three dots next to its name, choose "Settings" and open the "Record" tab.
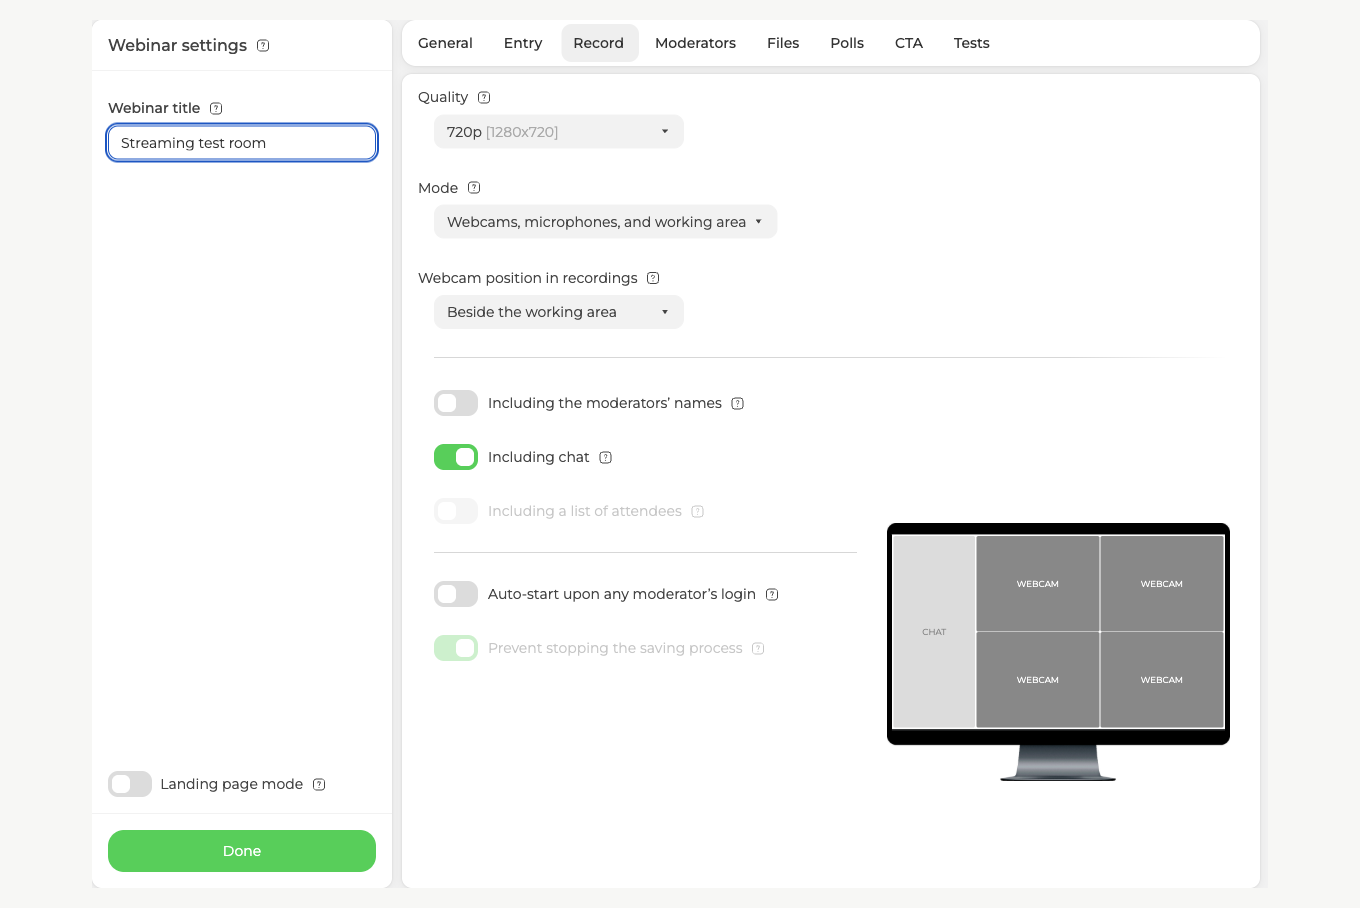
Three of the controls there shape the layout, namely "Mode", "Webcam position in recordings" and the "Including chat" toggle. "Quality" only sets the resolution, so it changes how sharp the file is rather than how it is arranged, and recording a webinar walks through the rest of the tab.
The preview on the right redraws every time you change any of them. It shows the finished recording rather than the live room, which is exactly what you want here.
First decide what gets recorded
"Mode" is the widest of the three settings, because it decides which parts of the event reach the file at all.
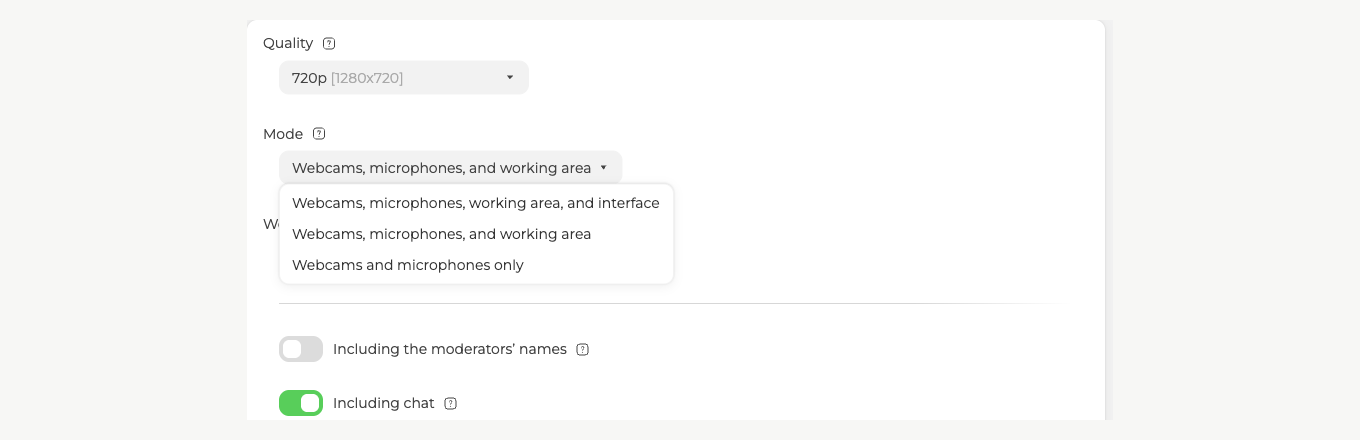
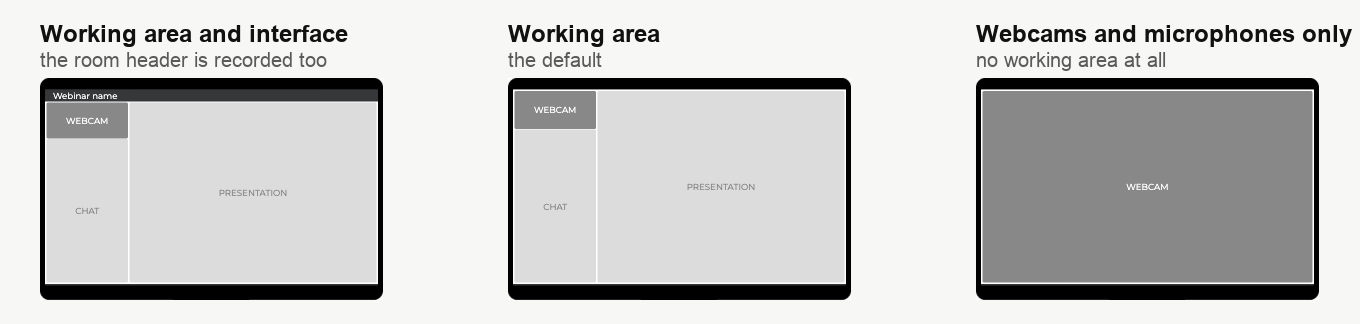
Webcams, microphones, working area, and interface records the room the way it looks, including the header strip that carries the webinar name across the top.
"Webcams, microphones, and working area" drops that header and keeps everything else. It is the tidier of the two if you plan to publish the file, since nothing in the frame announces which platform it came from.
"Webcams and microphones only" records the cameras and nothing else. There is no working area, so slides, screen sharing and the whiteboard never reach the file, and the "Including chat" toggle greys out because there is no layout left for a chat column to live in. Reach for it when the conversation is the content, as in an interview or a panel.
The camera position setting only matters in the first two, because the third has no working area to place a camera against.
Then decide where the camera sits
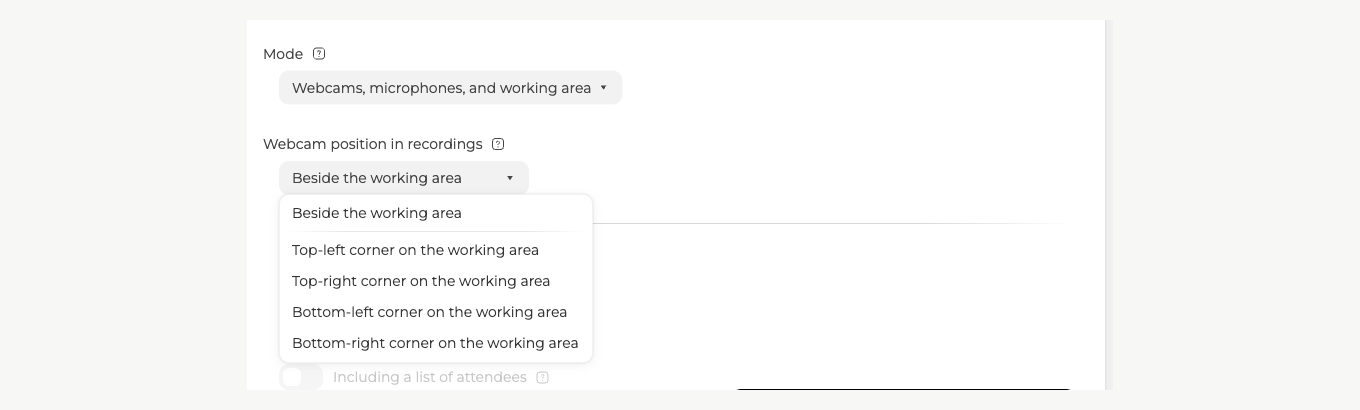
Five options, and the four corners are corners of the working area rather than of the whole frame.
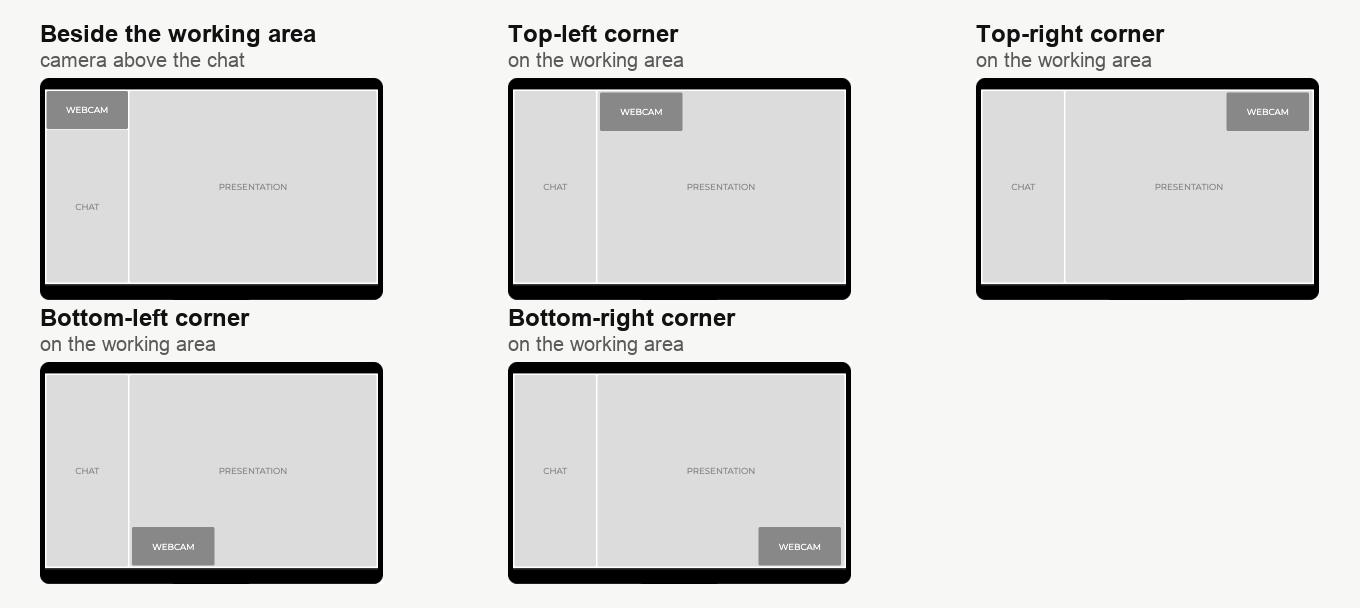
"Beside the working area" gives the camera a block of its own at the top of the left column, with the chat underneath it and the working area filling the rest. Nothing overlaps, so this is the one to choose when your slides are dense and you cannot afford to lose a corner of them.
Top-left, top-right, bottom-left and bottom-right lay the camera over the working area instead. Your material keeps its full width, and the camera covers whichever corner you picked. Note that the chat column stays where it is in all four, so the working area does not expand to the whole frame unless you also turn the chat off.
Pick the corner by looking at your own slides rather than by habit. A running title or a logo usually lives top-left, page numbers and captions usually live along the bottom, and whichever corner your template leaves empty is the one to use.
The chat decides whether the column is full
This is the pairing worth knowing about, because it is the only one that wastes part of the frame.
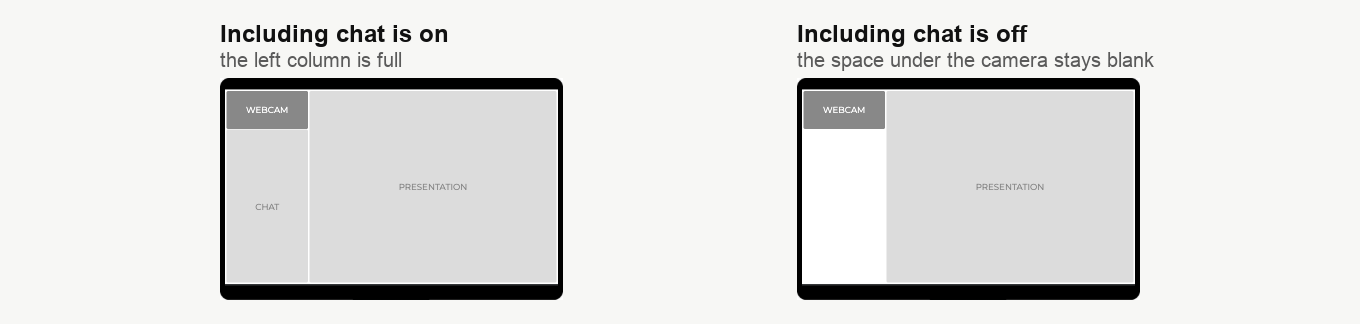
With "Including chat" on, the camera sits at the top of the left column and the chat fills everything under it. The column is full and the layout is balanced.
Turn the chat off and nothing moves in to take its place. The camera keeps its narrow block and the space underneath stays blank for the whole recording.
So if you record without the chat, move the camera into a corner. The working area then spreads across the full width and no part of the frame is left empty.
Webinar rooms and meeting rooms are laid out differently
One more setting reaches into all of this, and it lives on the "General" tab rather than on "Record".
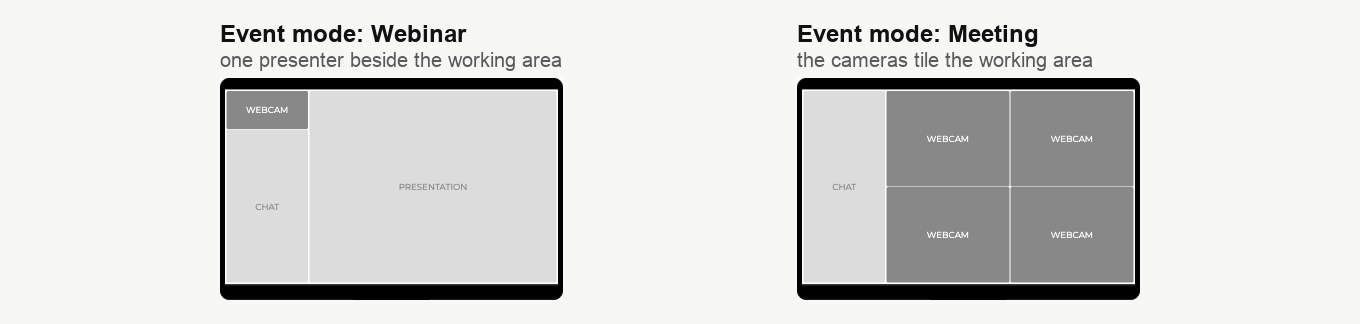
In a room whose "Event mode" is "Webinar", one presenter holds the working area and the layouts above are what you get.
In a room set to "Meeting", everyone on air is an equal participant, so the cameras tile the working area between them instead of one camera sitting beside it. The position setting still applies to the corner options, and the same event mode also decides what the "General" tab offers you for the live room, namely a webcam position in a webinar and a chat position in a meeting.
Choosing in one pass
- Recording the chat, slides that matter: "Beside the working area". Nothing is covered and the column is full.
- Not recording the chat: any corner. The working area takes the full frame.
- Publishing the file afterwards: "Webcams, microphones, and working area", so the room header stays out of it.
- An interview or a panel with no slides: "Webcams and microphones only".
Whichever you choose, change it and look at the preview before you record anything, then click "Done" to save. The settings belong to the room or the scheduled event whose settings you opened, so they apply to everything recorded there until you change them again.
If a recording does not come out the way this describes, open the online chat and tell us which of the three settings you used and what you expected instead.
Frequently asked questions
Why is the "Including chat" toggle greyed out?
Because "Mode" is set to "Webcams and microphones only", which records the cameras and nothing else. With no working area there is no layout left for a chat column to live in, and slides, screen sharing and the whiteboard do not reach the file either. The other two modes keep the working area, so the toggle is available again as soon as you pick one of them.
Does this change what my audience sees during the live webinar?
No, the live room has a camera position of its own on the "General" tab, and the two settings are independent. A recording can therefore be laid out differently from the event it came from. Webcam position in the webinar room covers the live setting.
There is no right-hand side position in the list. Is one missing?
No, the recording offers one side position only, namely "Beside the working area", which puts the camera at the top of the left column. The live room list is the one with both a left and a right side. Four of the corner names are word for word identical in both lists, so if you are hunting for a right-hand option and cannot find it, you are on the "Record" tab.
My recording has a blank space under the camera. What causes it?
That is "Beside the working area" with "Including chat" turned off, the one pairing that wastes part of the frame. With the chat on it fills everything under the camera and the column is full, but turn it off and nothing moves in to take its place, so the space stays blank for the whole recording. Move the camera into a corner instead and the working area spreads across the full width.
Do I have to set this for every webinar separately?
The settings belong to the room or the scheduled event whose settings you opened, so they apply to everything recorded there until you change them again. Another room or scheduled event has its own, which you reach the same way through the three dots next to its name. Look at the preview before you record anything, then click "Done" to save.
