Webcam position in the live webinar room
MyOwnConference lets you decide where the presenter's video sits in the webinar room. You set it in advance, while you plan the webinar in the dashboard, and it decides what presenters and attendees see once the broadcast starts. There are six positions to pick from.
Two settings, two tabs
The recording has a camera position of its own, and it is a different setting with a different list. This page is about the live room, which is the "General" tab. The recording is on the "Record" tab, and camera placement in the webinar recording covers it.
Two things make them easy to confuse. Four of the corner names are word for word identical in both lists, so the label alone never tells you which setting you are looking at, and only the tab does. And the lists are not the same length, because the live room offers a left side and a right side while the recording offers one side position only. If you are hunting for a right-hand option and cannot find it, you are on the Record tab.
Where to change the webcam position
Open your webinar dashboard, go to Rooms and open Webinar settings. The Webcam position setting is on the General tab.
It appears there only when "Event mode" on the same tab is set to "Webinar". A room set to "Meeting" puts everyone on air on equal footing, so there is no single presenter camera to place, and that slot offers you a chat position instead.
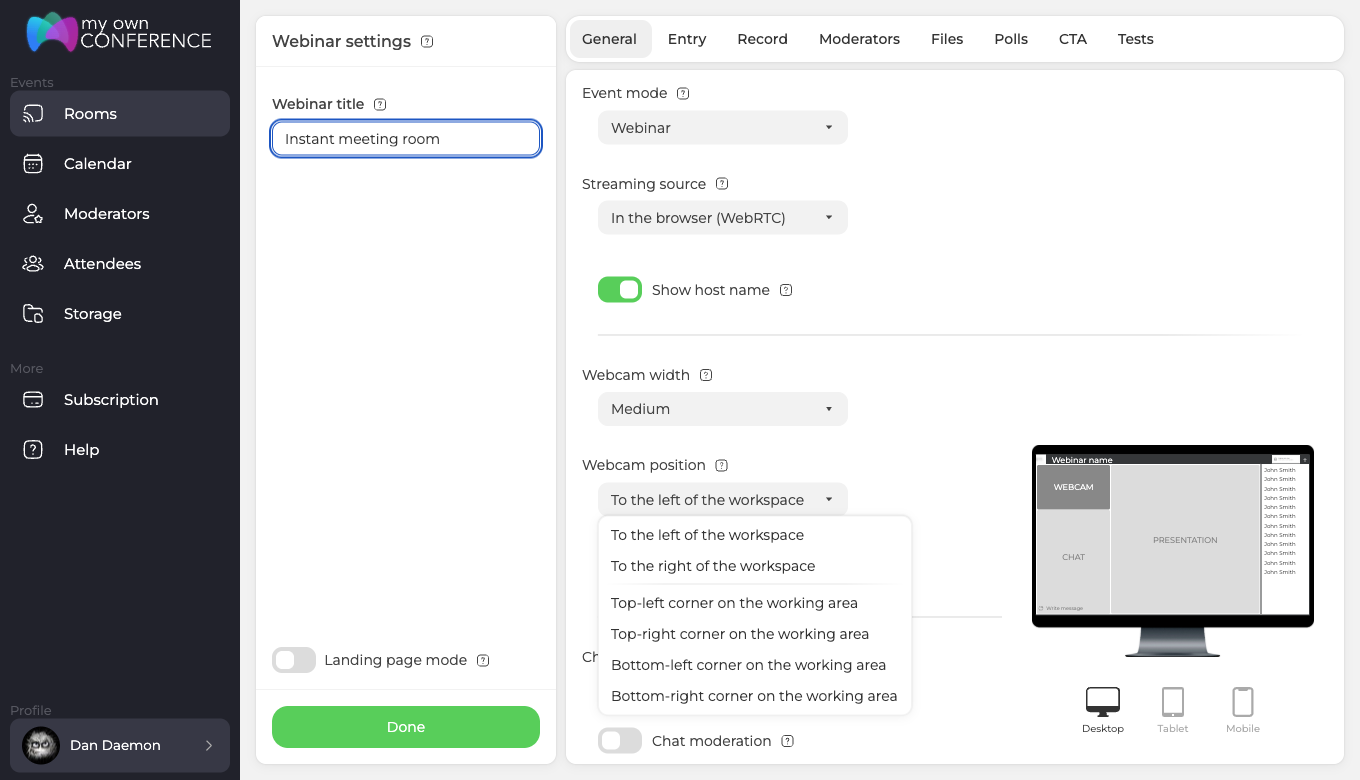
You get six options:
- To the left of the workspace
- To the right of the workspace
- Top-left corner on the working area
- Top-right corner on the working area
- Bottom-left corner on the working area
- Bottom-right corner on the working area
Choose one and save the settings. The camera takes its place automatically the next time anyone enters the webinar room.
A second setting sits directly above this one, and a third one directly below it, which is the vertical camera layout covered further down. "Webcam width" has three steps, Small, Medium and Big, and it decides how large the camera is drawn in whichever place you put it, including the four corner positions. Together the two settings run the camera from roughly a twentieth of the frame to roughly a sixth of it, which is why the platform streams two resolutions rather than one. Why the camera in a webinar runs at 360p or 480p works that out in pixels.
The six positions
To the left of the workspace
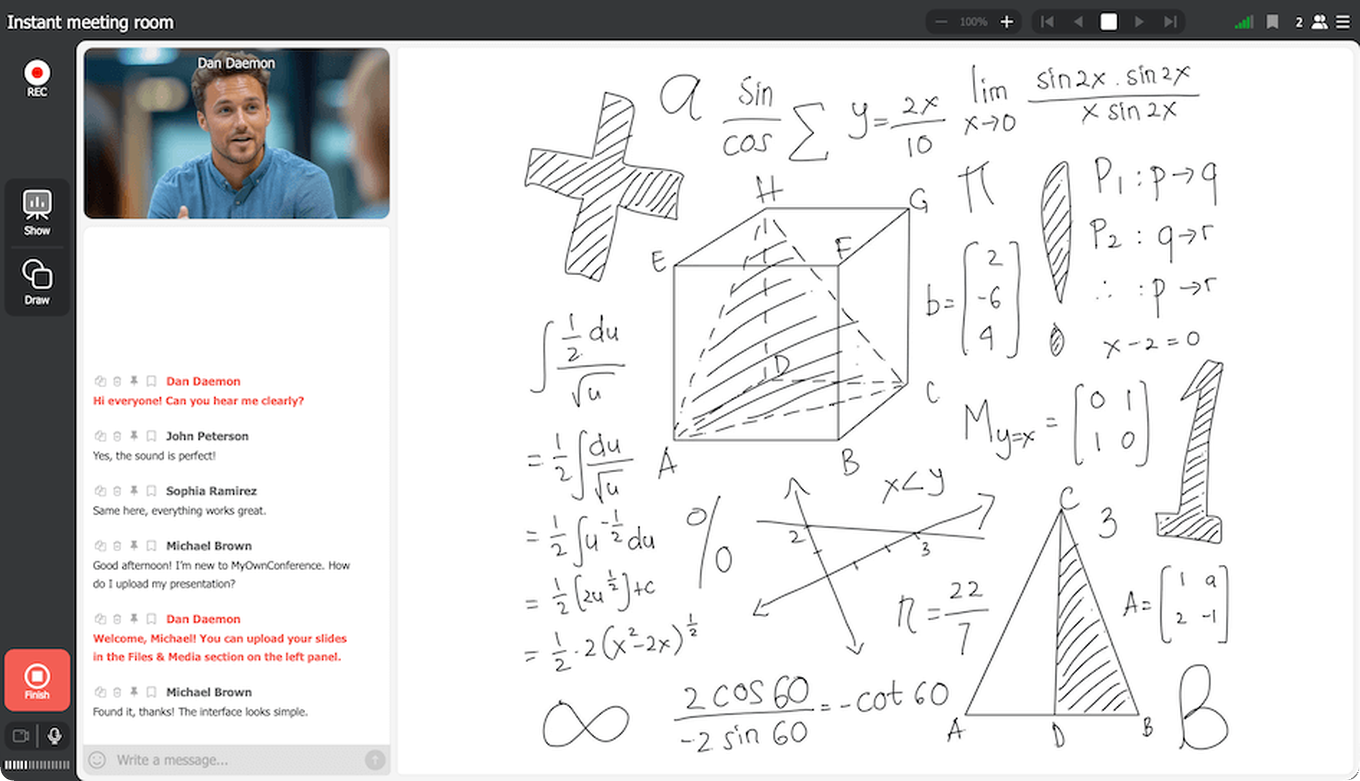
The camera is fixed on the left side of the screen, next to the chat and the toolbar, and the workspace (whiteboard, presentation or shared screen) takes the space on the right. This is the classic layout. It works well for webinars where you spend most of your time on content that needs a large area, since the camera stays visible without covering your materials.
To the right of the workspace
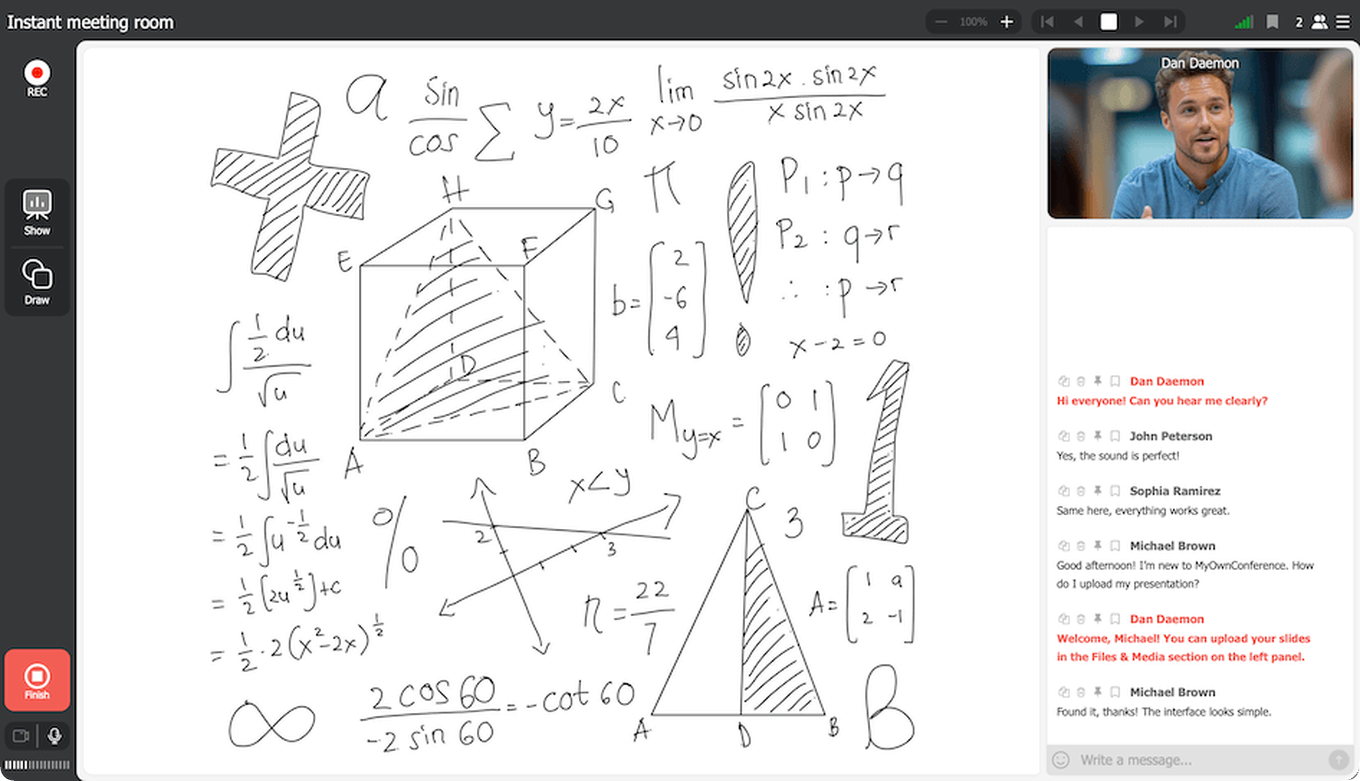
The camera sits on the right side of the screen and the workspace stays on the left, where it takes most of the room. Attendees read the chat on the left as usual and see you on the right. Pick this one when the visual focus should be on the presenter. Your materials stay uncovered here too.
Top-left corner on the working area
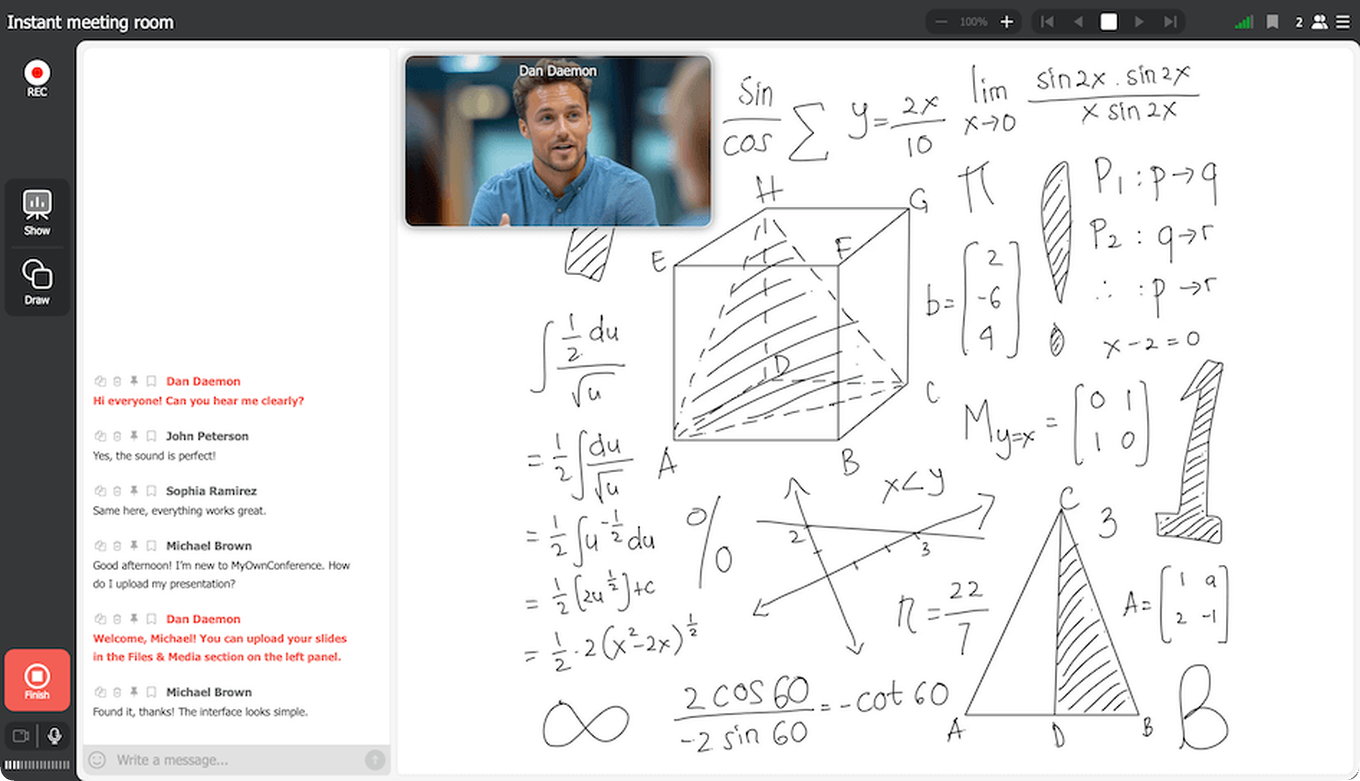
The camera is laid over the working area and pinned to its top-left corner, the shortest distance from the toolbar. It suits live explanations where the presenter is a big part of the picture. Part of your content ends up behind the camera, so check where the important elements of a slide sit before you choose this one.
Top-right corner on the working area
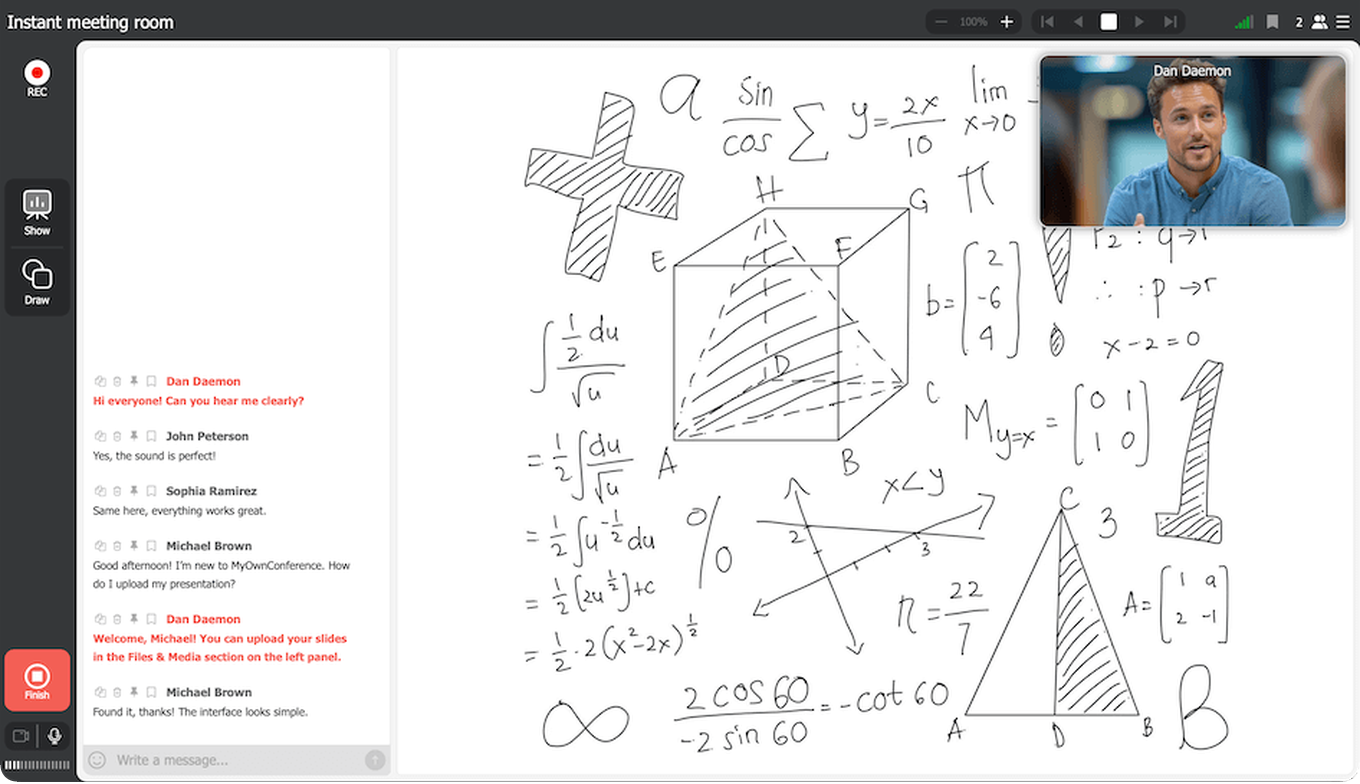
The camera sits over the working area in the top-right corner. This is the most popular choice for presentations and online lessons. It leaves the toolbar on the left free and rarely covers anything important on a slide.
Bottom-left corner on the working area
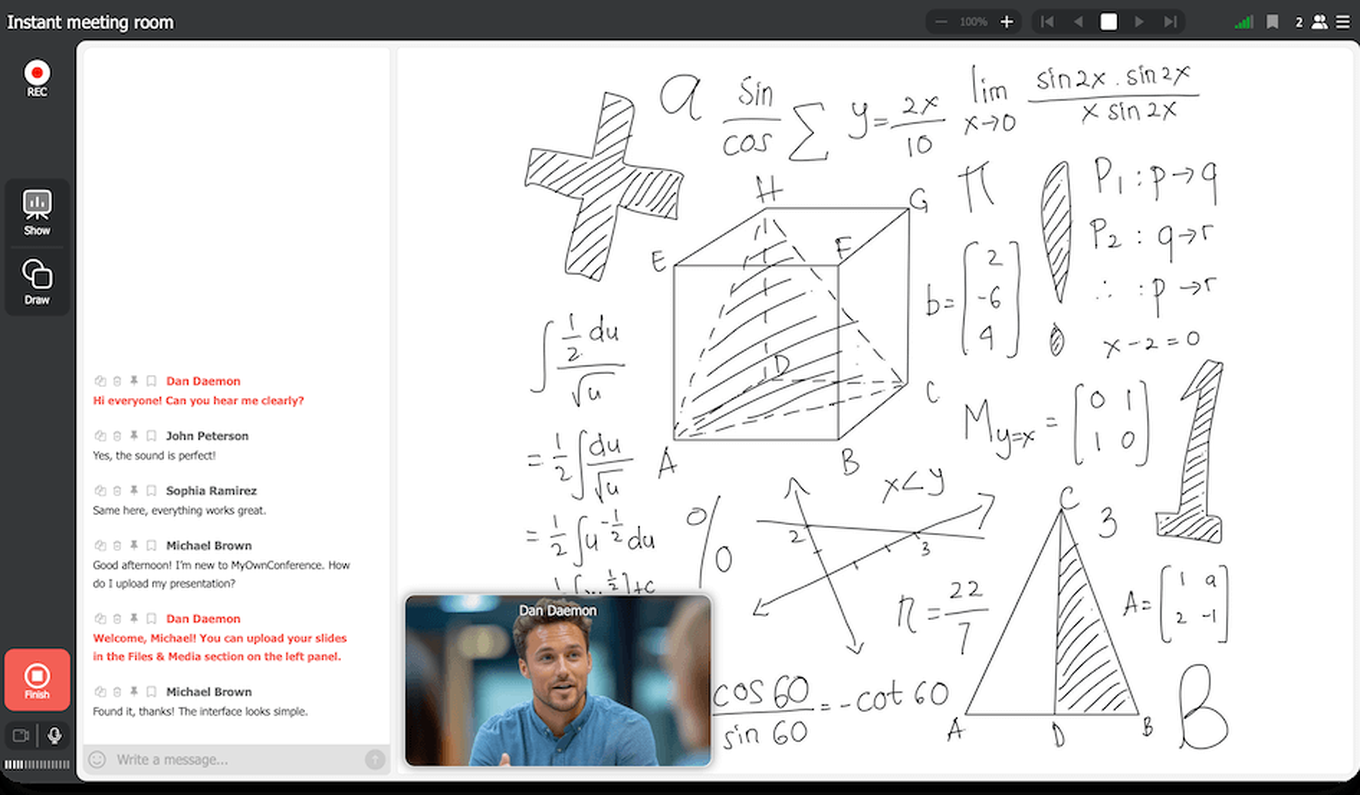
The camera is pinned to the bottom-left corner, over the workspace. It suits demonstrations where the information that matters sits at the top of the screen, and it is convenient when your controls and notes are on the right. Watch the bottom of your slides, because captions and lower panels can end up behind it.
Bottom-right corner on the working area
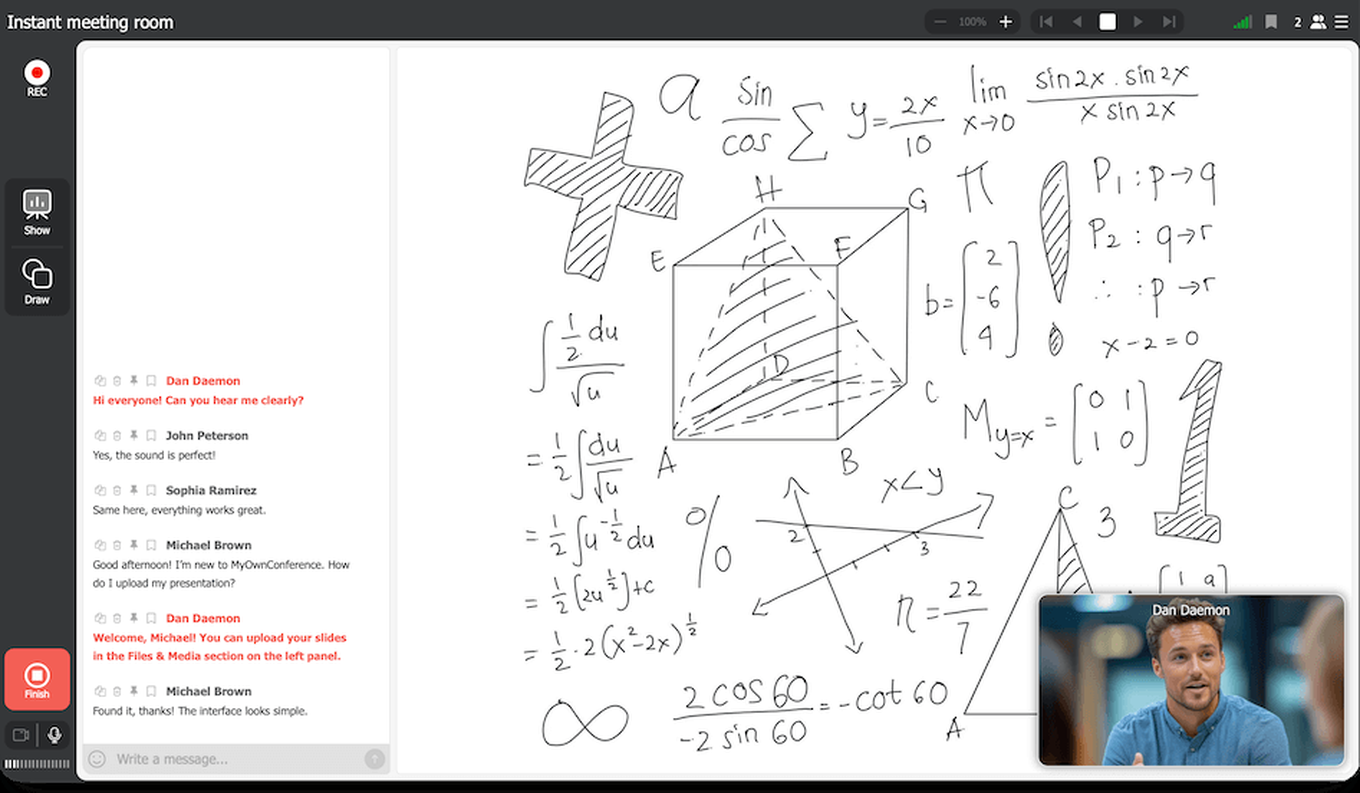
The camera sits in the bottom-right corner of the workspace. For lessons and courses this is the familiar, natural position, and it almost never covers anything important.
Vertical camera layout
The position setting decides where the camera goes. A switch directly under it, "Vertical camera layout", decides how several cameras stack once more than one person is on air.
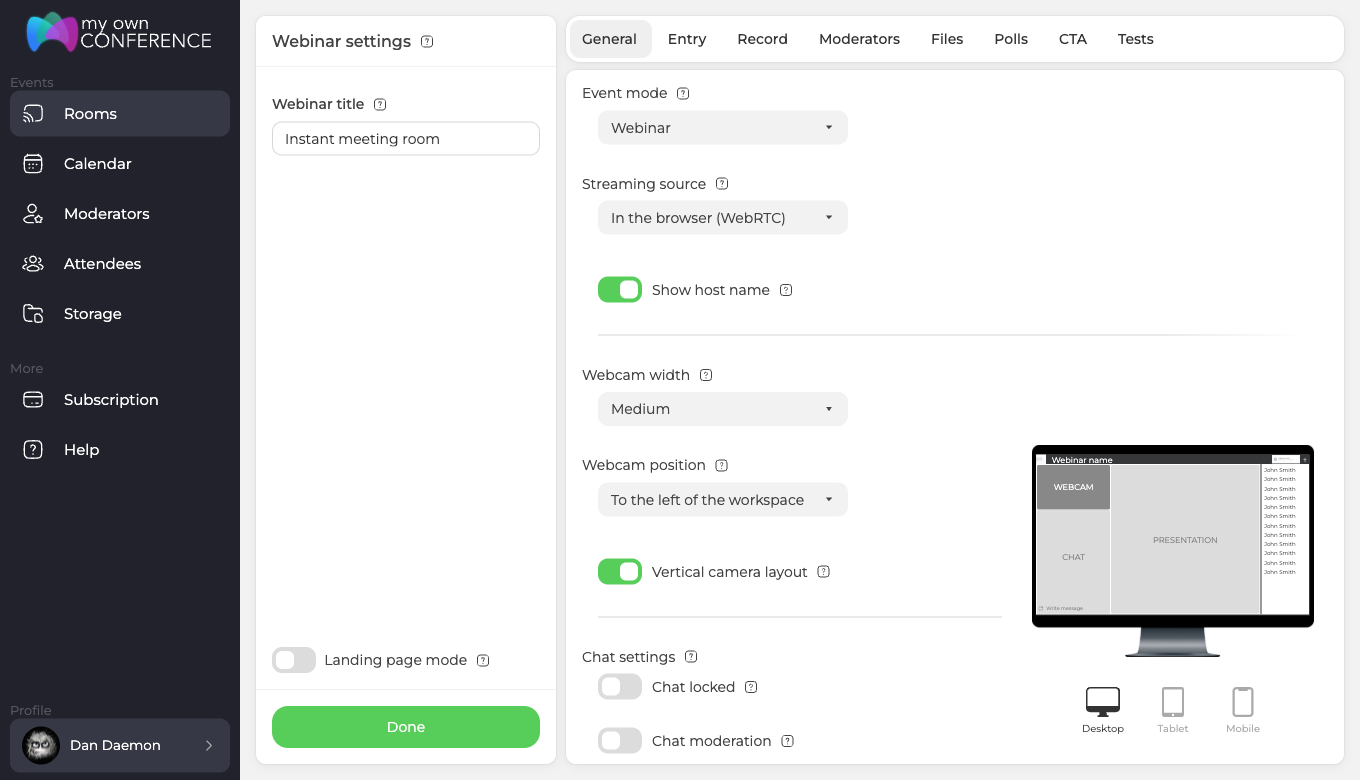
Turn it on and the cameras line up one under another instead of spreading sideways. Where that column goes depends on how many cameras there are.
- Three or more line up in a column beside the workspace.
- Two or fewer sit above the chat, sharing the same strip with it.
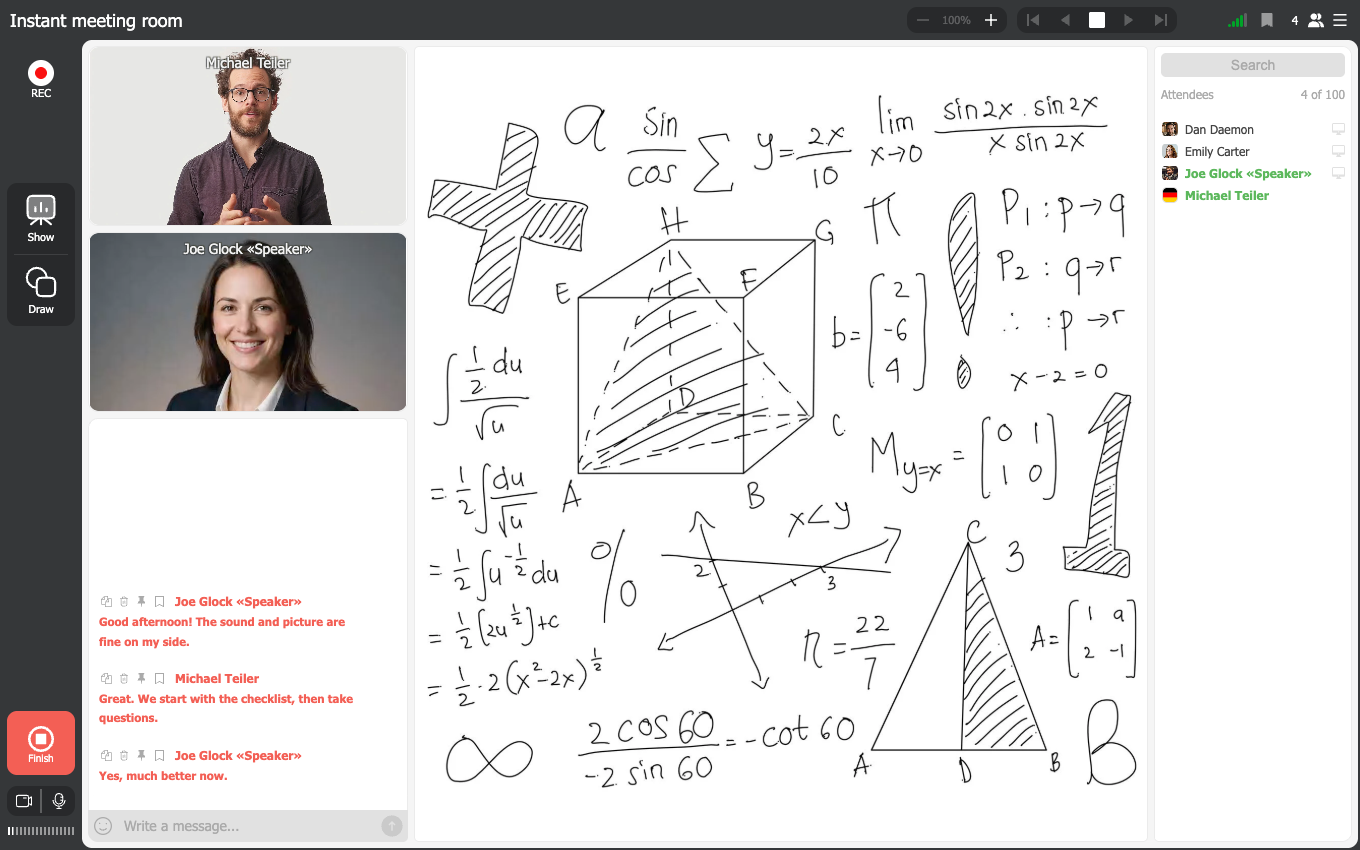
Where the chat goes
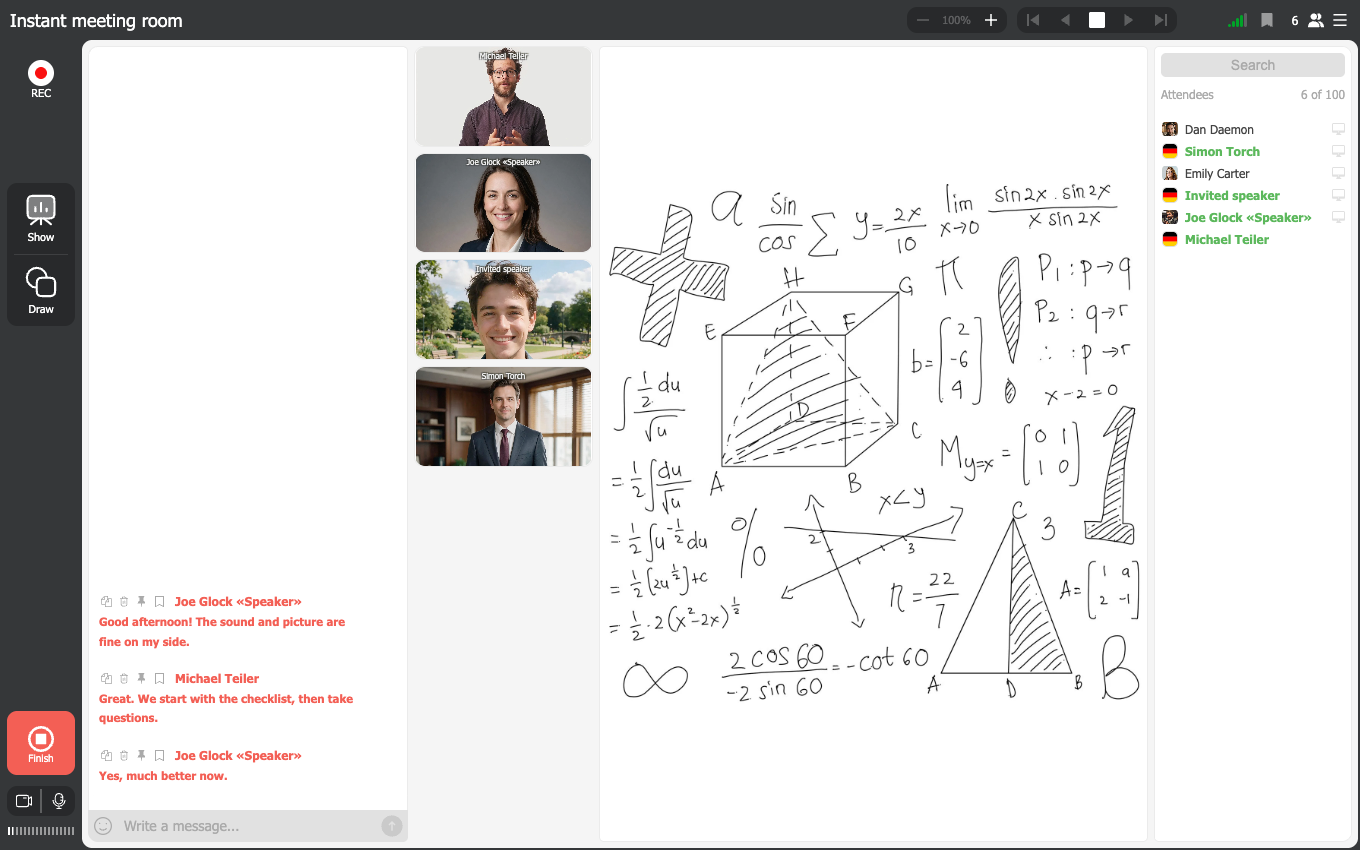
Past three cameras the column takes the height it needs, so the chat leaves its usual strip and stands beside the block of cameras. This is what happens when the camera is set beside the workspace, meaning "To the left of the workspace" or "To the right of the workspace". The four corner positions lay the camera over the working area, so they share no strip with the chat and nothing moves.
One vertical camera is what this is for
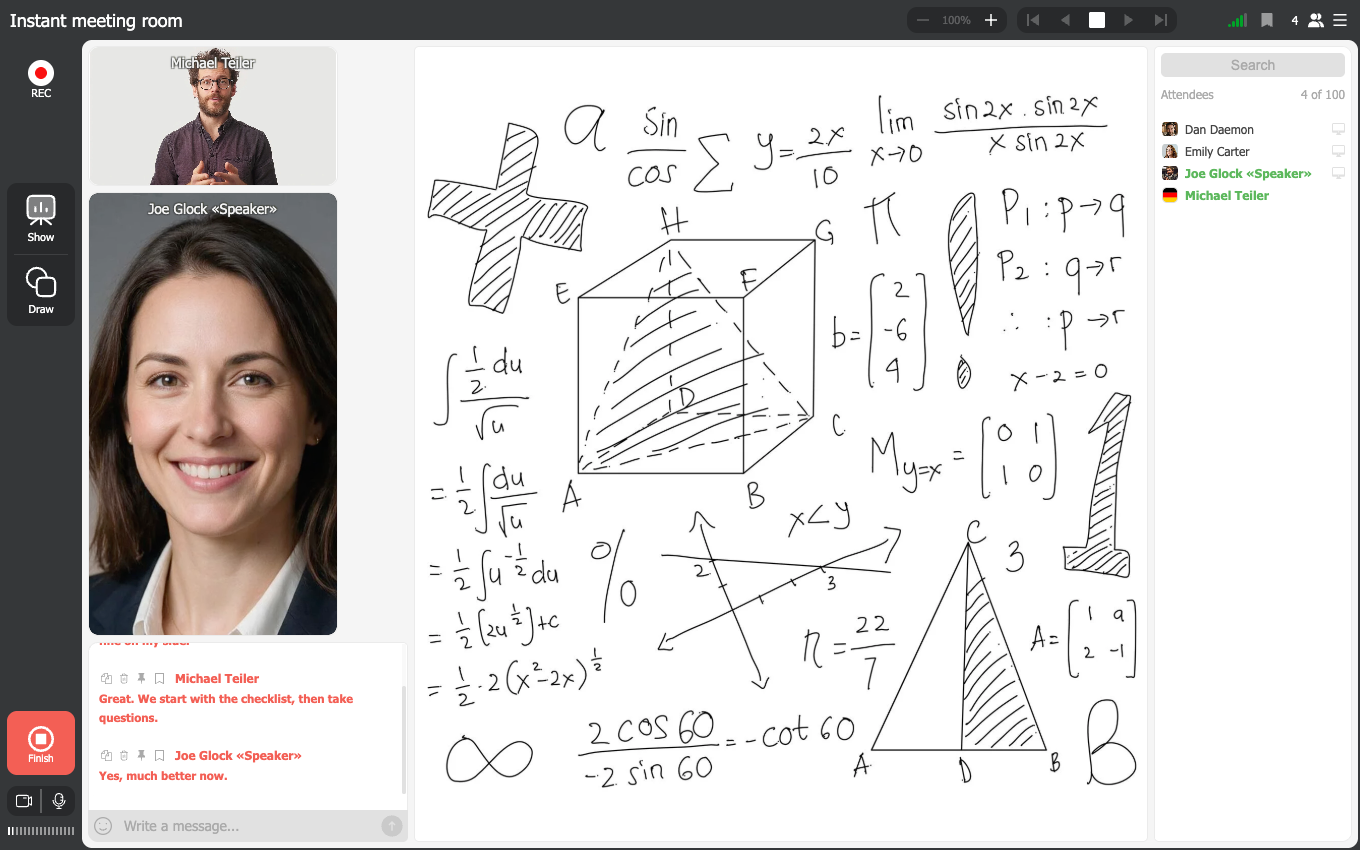
A phone held upright sends an upright picture, and this layout keeps it upright instead of trimming it to a wide tile. One such camera looks natural and reads well.
Several of them do not. Every vertical tile is tall, so a column of three eats the height of the room quickly and leaves the workspace squeezed. We built this layout around a single vertical camera, to make presenting from a phone comfortable. If three or four people are regularly on air at once, leave the switch off, because the ordinary layout uses the width of the screen better than a column uses its height.
In Meeting mode
The switch stays on the tab in "Meeting" mode, unlike the position setting above it, which belongs to "Webinar" alone. In a meeting the column appears only while a host is showing materials. Until someone shares a screen, a presentation or the whiteboard, the room keeps its usual grid of equal tiles.
Which one to choose
- For educational webinars, pick top-right or bottom-right, because those are the corners least likely to cover the material.
- For presentations and business meetings, "To the left of the workspace" and "To the right of the workspace" work well.
- For drawing or working on the interactive whiteboard, use bottom-right or top-left so that the camera stays out of the area you write in.
- For webinars built around live conversation, the positions that overlay the working area give a more dynamic picture.
Try a few of them and keep the one that fits your style of presenting and the kind of content you show.
If you are not sure which to use, our support team is a click away in the online chat.
Frequently asked questions
Why did the chat move next to the cameras?
Because the vertical column passed three cameras. Up to two, the cameras sit above the chat in the same strip. From three, the column takes that strip for itself and the chat stands beside it. You see this with "To the left of the workspace" and "To the right of the workspace", since the corner positions lay the camera over the working area and share nothing with the chat.
The camera from my phone takes up half the room. Is that normal?
Yes, and it is what the layout is for. A phone held upright sends an upright picture, and "Vertical camera layout" keeps it that way instead of trimming it to a wide tile. The mode is built around one such camera. With three or four people on air at once a column of tall tiles leaves little room for anything else, so turn the switch off and let the cameras spread sideways.
Does the vertical layout work in a meeting?
Yes. The switch stays on the "General" tab in "Meeting" mode, unlike the webcam position, which appears for "Webinar" only. In a meeting the column appears while a host is showing materials, and until then the room keeps its usual grid of equal tiles.
Can I change the webcam position once the webinar has started?
Not from inside the room, because the setting lives in the dashboard under Rooms and Webinar settings, on the "General" tab. Change it there, save the settings, and the camera takes its place automatically the next time anyone enters the webinar room. It is a setting to fix while you plan the webinar rather than during it.
My settings offer a chat position instead of a webcam position. Why?
Your room is in "Meeting" mode. The webcam position appears only when "Event mode" on the same "General" tab is set to "Webinar", because a meeting puts everyone on air on equal footing and there is no single presenter camera to place. Set "Event mode" to "Webinar" and the webcam position takes that slot back.
The list has no right-hand option. What am I looking at?
The "Record" tab, which sets the camera position for the recording and offers one side position only. The live room list is on the "General" tab, and it has both a left side and a right side. Four of the corner names are word for word identical across the two lists, so the label alone never tells you which setting you have open, and only the tab does. Camera placement in the webinar recording covers the other list.
Will the camera cover my slides?
Only in the four corner positions, which lay the camera over the working area. "To the left of the workspace" and "To the right of the workspace" put it beside the workspace instead, so your materials stay uncovered. If you want a corner, check where the important elements of a slide sit first, and watch the bottom of your slides in particular, because captions and lower panels can end up behind the camera.
Can I make the camera smaller without moving it?
Yes. "Webcam width" sits directly above the position setting and has three steps, Small, Medium and Big, and it works wherever you put the camera, including the four corner positions. Together the two settings run the camera from roughly a twentieth of the frame to roughly a sixth of it, which is why the camera in a webinar runs at 360p or 480p.
