
Everything about webinar recording
A recording keeps the material of your event and lets the people who could not attend live watch it later. Recording is switched on inside the room. The quality, the framing, the sharing and the trimming are all handled from your control panel.
Recording a webinar and watching it back
Enter the room and press the record button in the top left corner. Nothing asks you to confirm, the recording starts at once.
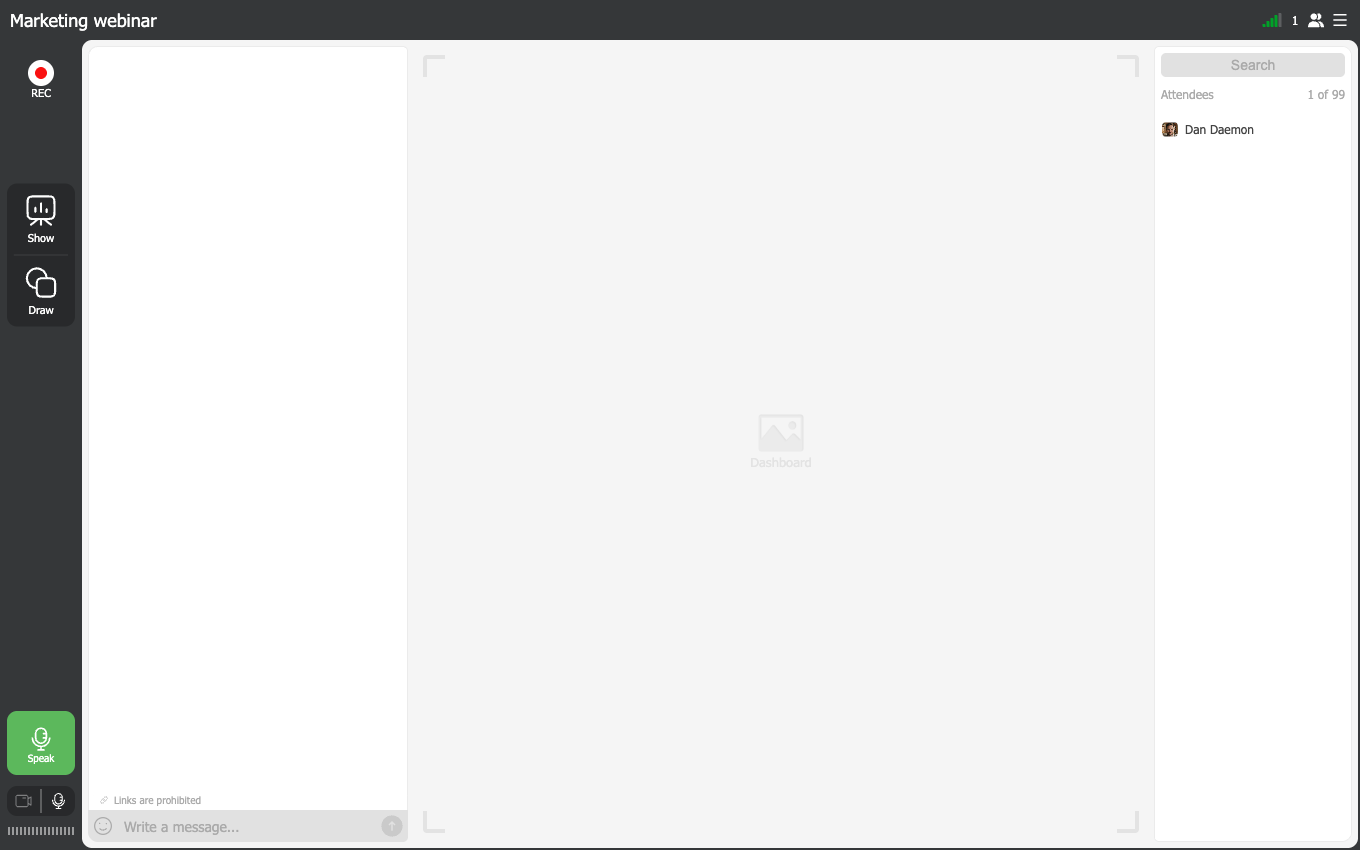
The button then becomes a stop square with a timer under it, counting what has been recorded so far. Press it again and the room asks whether you want to finish.
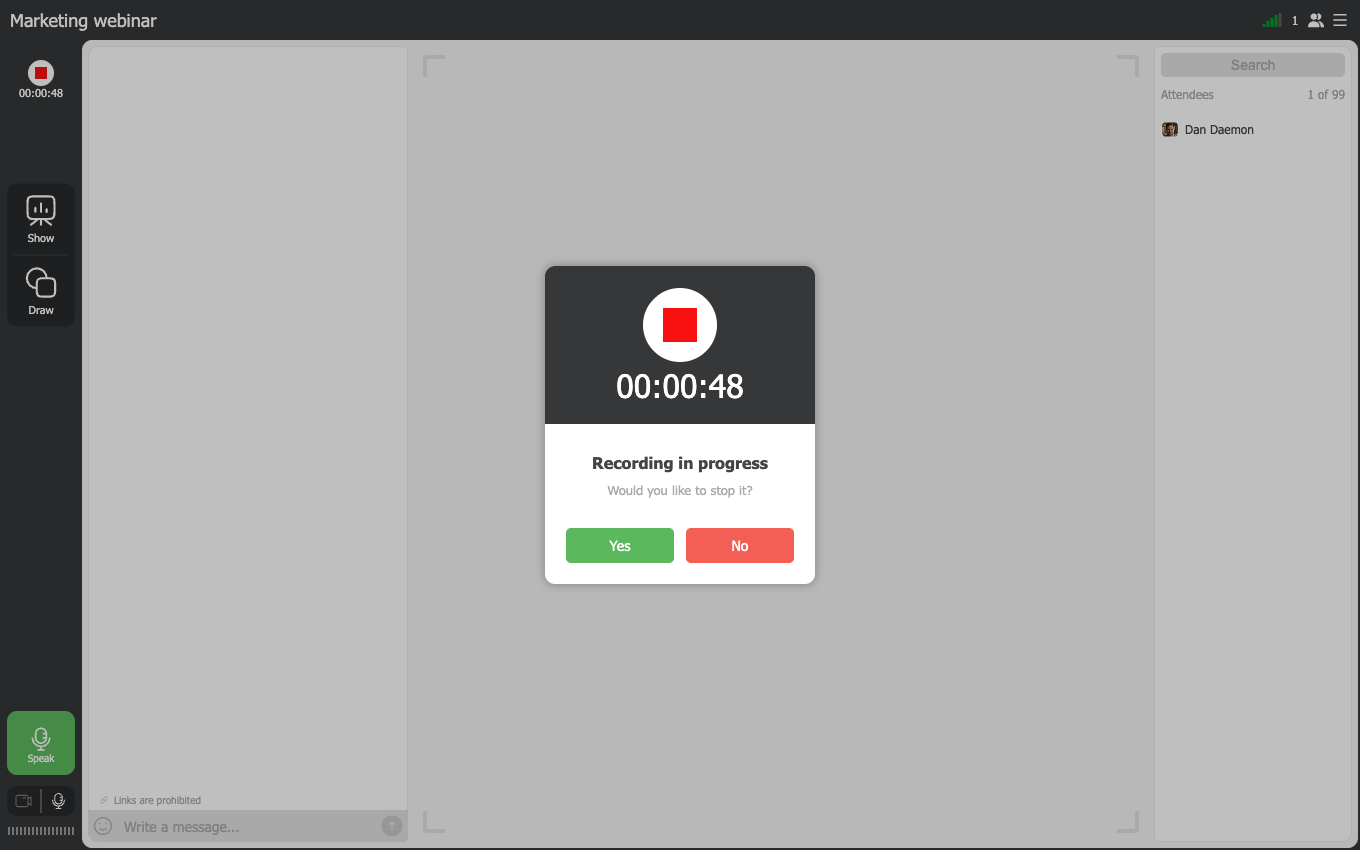
Answer "Yes" and the file is closed. Starting the recording again does not carry on with the same file, it opens a new one, so an event you stop and restart twice leaves you with three recordings rather than one.
The finished recording lands on the "Recordings" tab of the materials panel, the one the "Show" button opens. It takes the name of the room it was made in, which is why a busy room ends up with a column of identically named files.
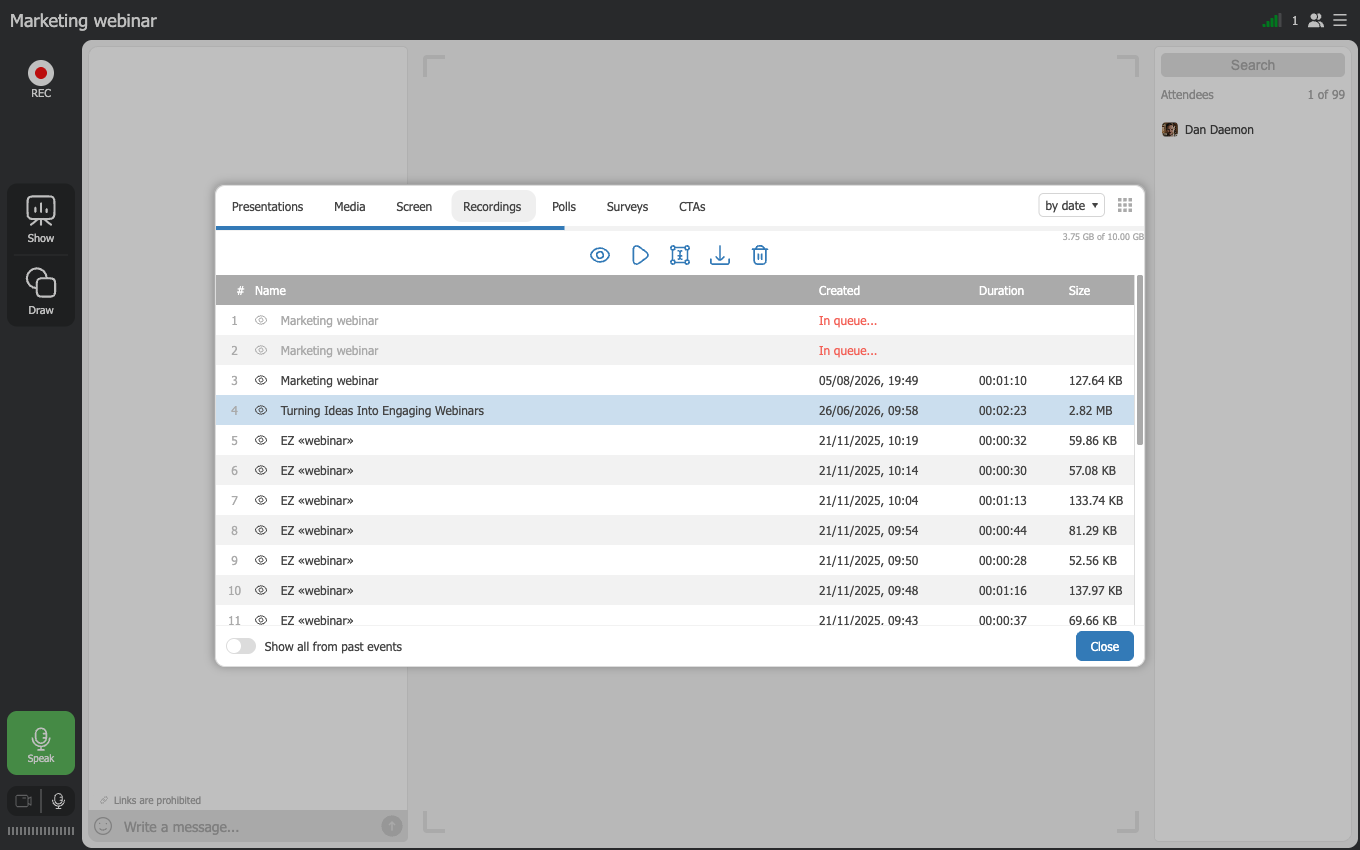
It is not watchable straight away. A new recording sits in the list marked "In queue" while it is converted, and only when that finishes do its date, length and size appear. Short recordings are ready in a minute or two, and the longer the recording, the heavier the file and the longer the wait.
Setting up the recording
You decide how a recording behaves before the event, either while you schedule a webinar or while you create a permanent room. Open the settings and go to the "Record" tab.
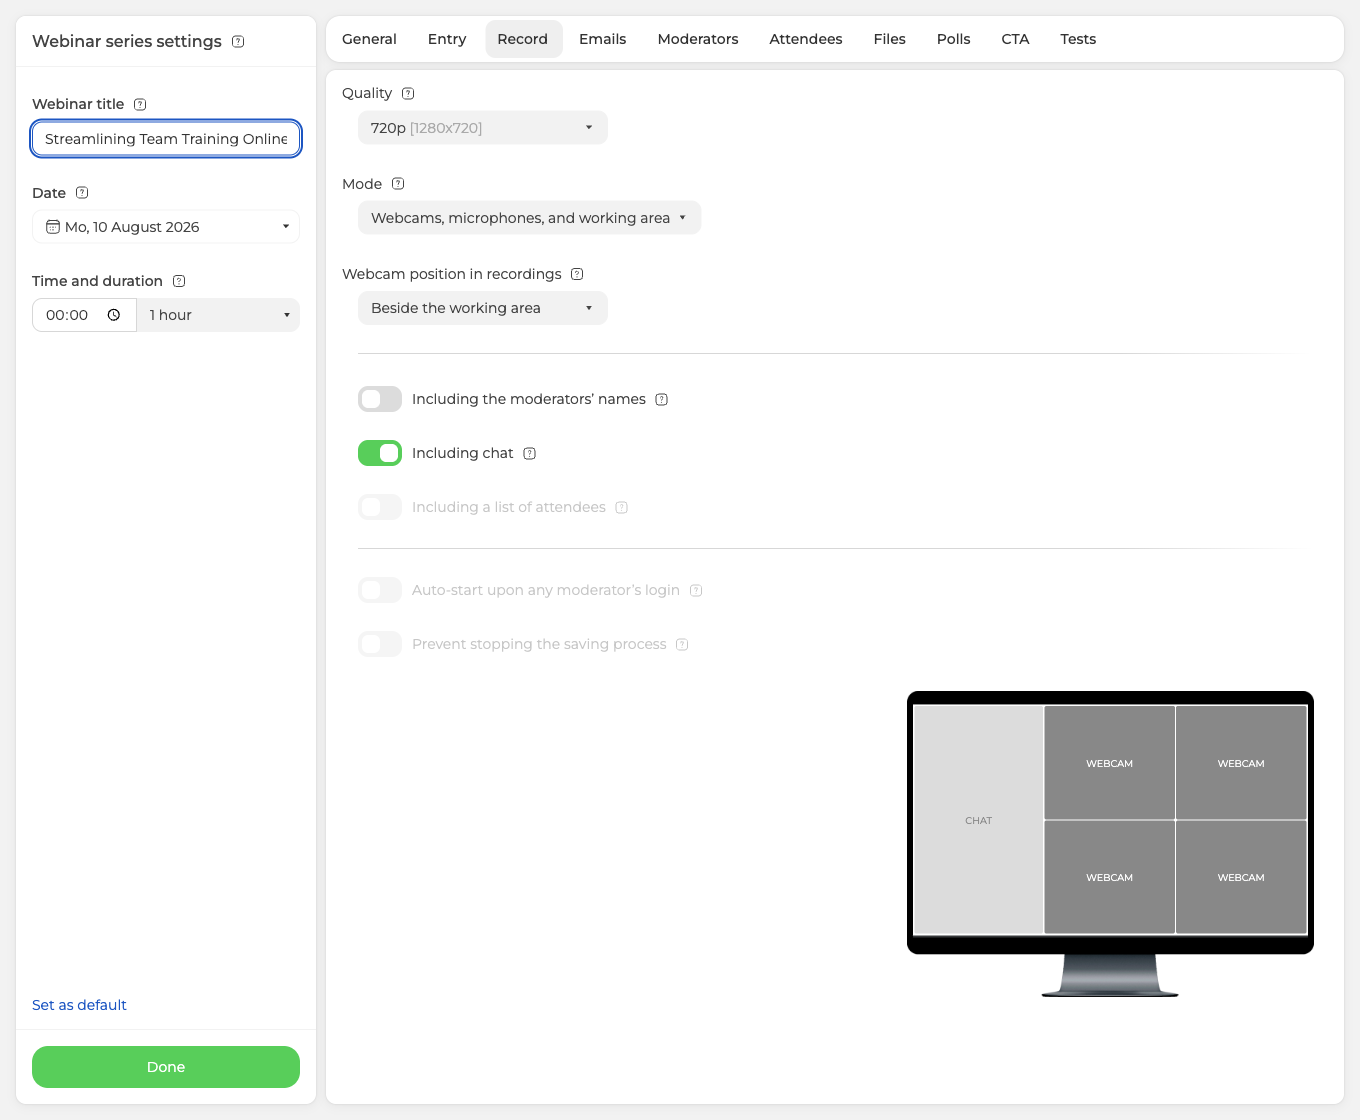
"Quality" is the resolution. The list starts at 480p and your plan sets the ceiling, so Starter and paid plans below 500 attendees reach 1080p and plans from 500 attendees reach 2160p. Quality is also what decides how long you can record before the disk fills, which how much recording time do I have left works out. A recording on the free Starter plan also stops at 20 minutes, and on any plan a single recording stops itself at ten hours.
"Mode" decides what lands in the frame, and it offers three choices rather than a free-form layout.
- "Webcams and microphones only" keeps the presenters and nothing else. No presentation, no screen sharing, no uploaded video. Picking it also drops the quality to 480p, because the frame then holds nothing but camera streams, and a camera in the browser reaches 720p at best. Stretching that picture into a 1080p or larger file adds artefacts rather than detail, which is why the higher settings switch off.
- "Webcams, microphones, and working area" adds whatever you show during the event, so your presentation and your screen sharing are in the file.
- Webcams, microphones, working area, and interface keeps the surrounding room as well.
"Webcam position in recordings" places the cameras, either beside the working area or in any of its four corners.
Three toggles then decide what else is kept. "Including chat" is yours to set freely. "Including the moderators' names" depends on "Show host name" under "General", so it greys out the moment you turn the host name off. "Including a list of attendees" needs two things at once, the interface in the frame and the attendee list switched on under "General", so it stays inactive until both are true.
The preview on the right redraws as you change any of this, which is the quickest way to see what you are about to record.
Two more toggles belong to automatic recording, "Auto-start upon any moderator's login" and "Prevent stopping the saving process". They are greyed out below the 300-attendee plans, and Automatic webinar recording covers what they do.
Sharing a recording
There are two ways to pass a recording on. Download the file, or send a link to watch it online.
Downloading the recording
Open "Storage" in your control panel, go to the "Recordings" tab, find the recording you want and open the menu at the end of its row.
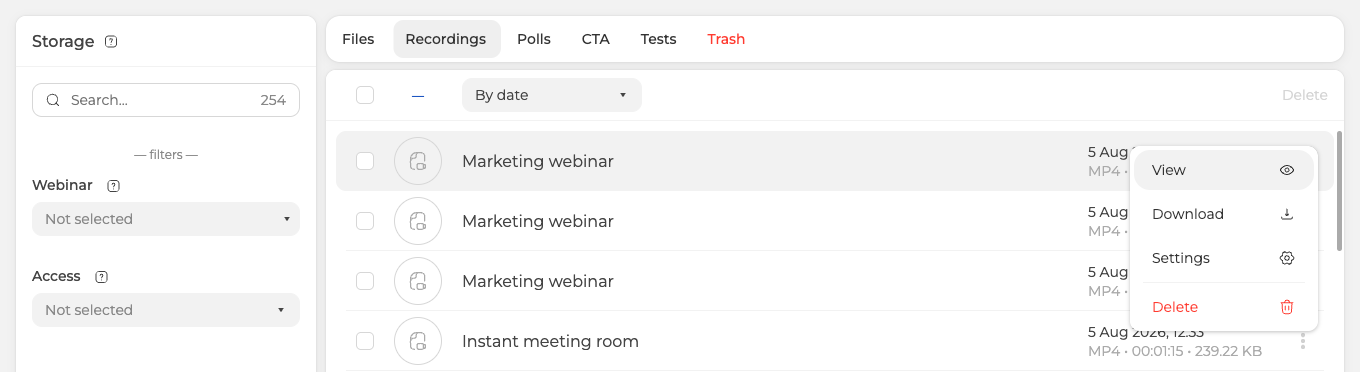
"Download" saves the MP4 to your computer. "View" opens the recording on a page of its own, which is where everything below happens. "Settings" is narrower than the name suggests, because all it does is reassign the recording to a different webinar or moderator.
Storage is the complete list rather than one event's worth, so it is the place to look when you cannot remember which webinar a recording came from. Finding a recording covers the shorter route, straight from the event itself.
Watching by link
That page has a shorter way in. On the "Rooms" page, the green recording button on a room's card opens it directly, and the three dots on the same card lead there too, through "Recordings".
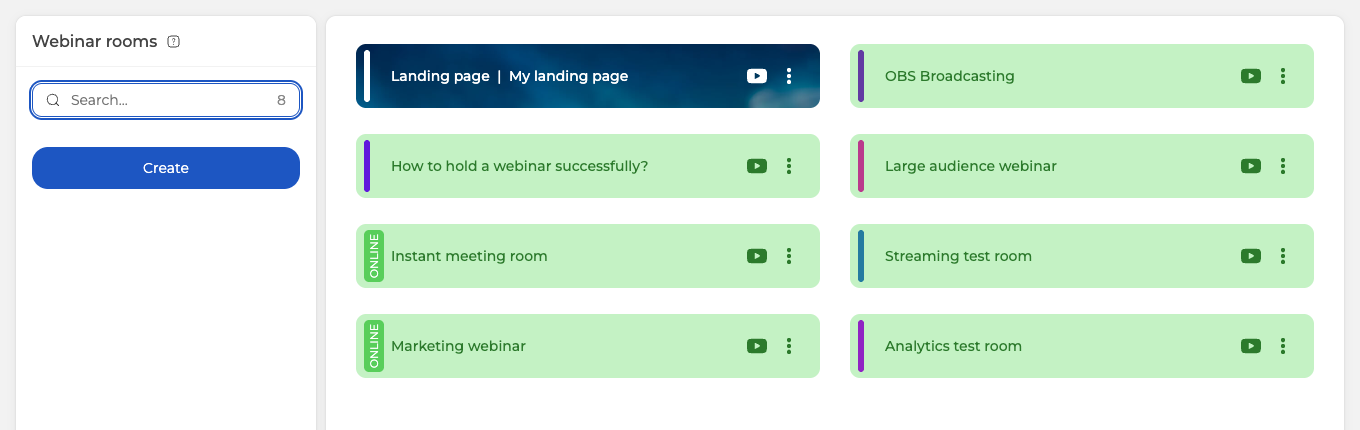
A room can hold more than one recording, and all of them are listed on the left, so click the one you want.
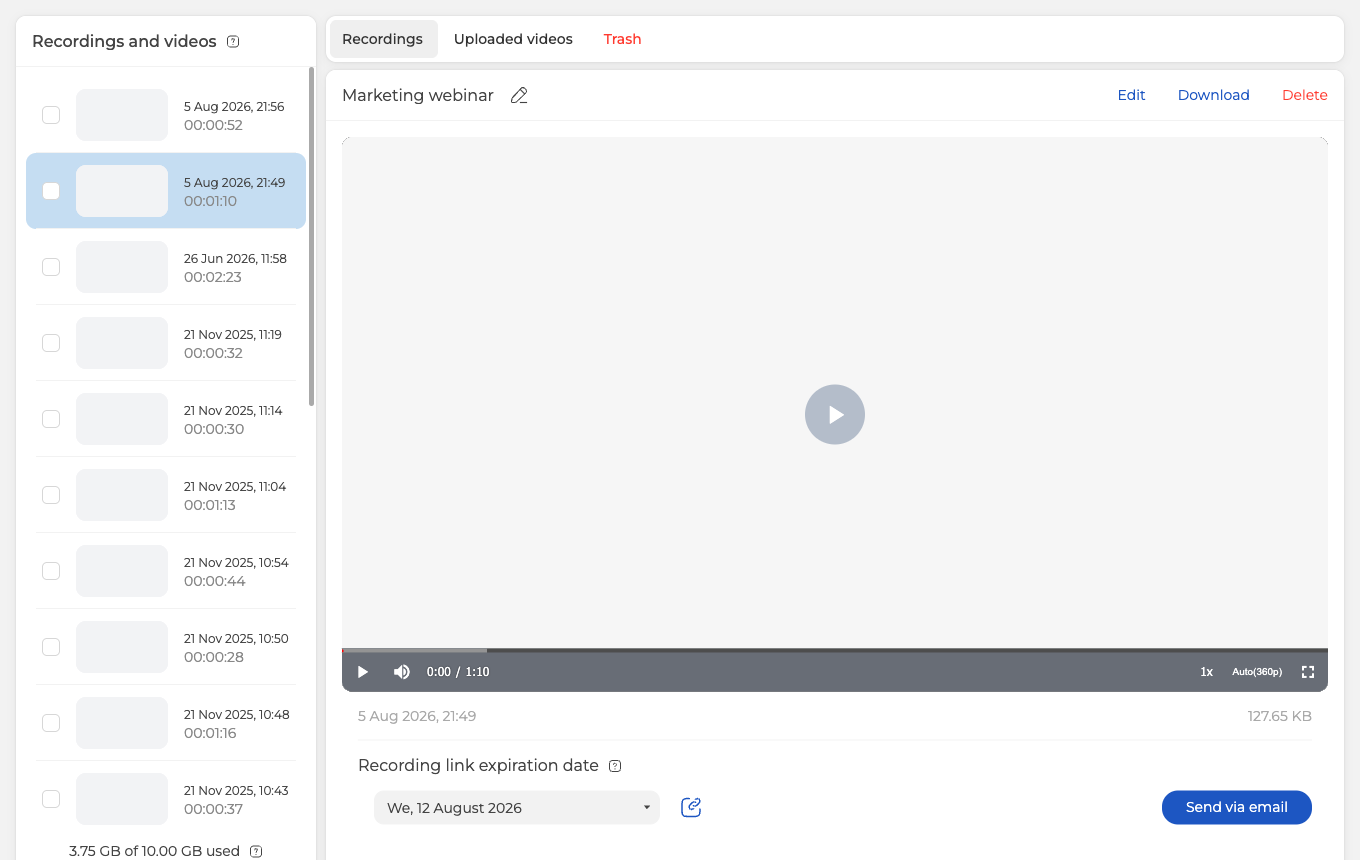
The date and the size of the file sit under the player. Under those, "Recording link expiration date" decides how long the link stays alive, a week ahead by default, and the button beside it copies the link to your clipboard as a short wbnr.im address.
Link access is limited on the free Starter plan and on daily plans. To let people watch a recording by link, you need a plan of a month or longer. Sharing a recording by link goes further into it, including what happens when the date you pick falls after your plan ends and what changing the date does to a link you have already sent.
To mail the link instead of handing it over yourself, click "Send via email". That opens your attendee list, where you tick whoever the recording is meant for.
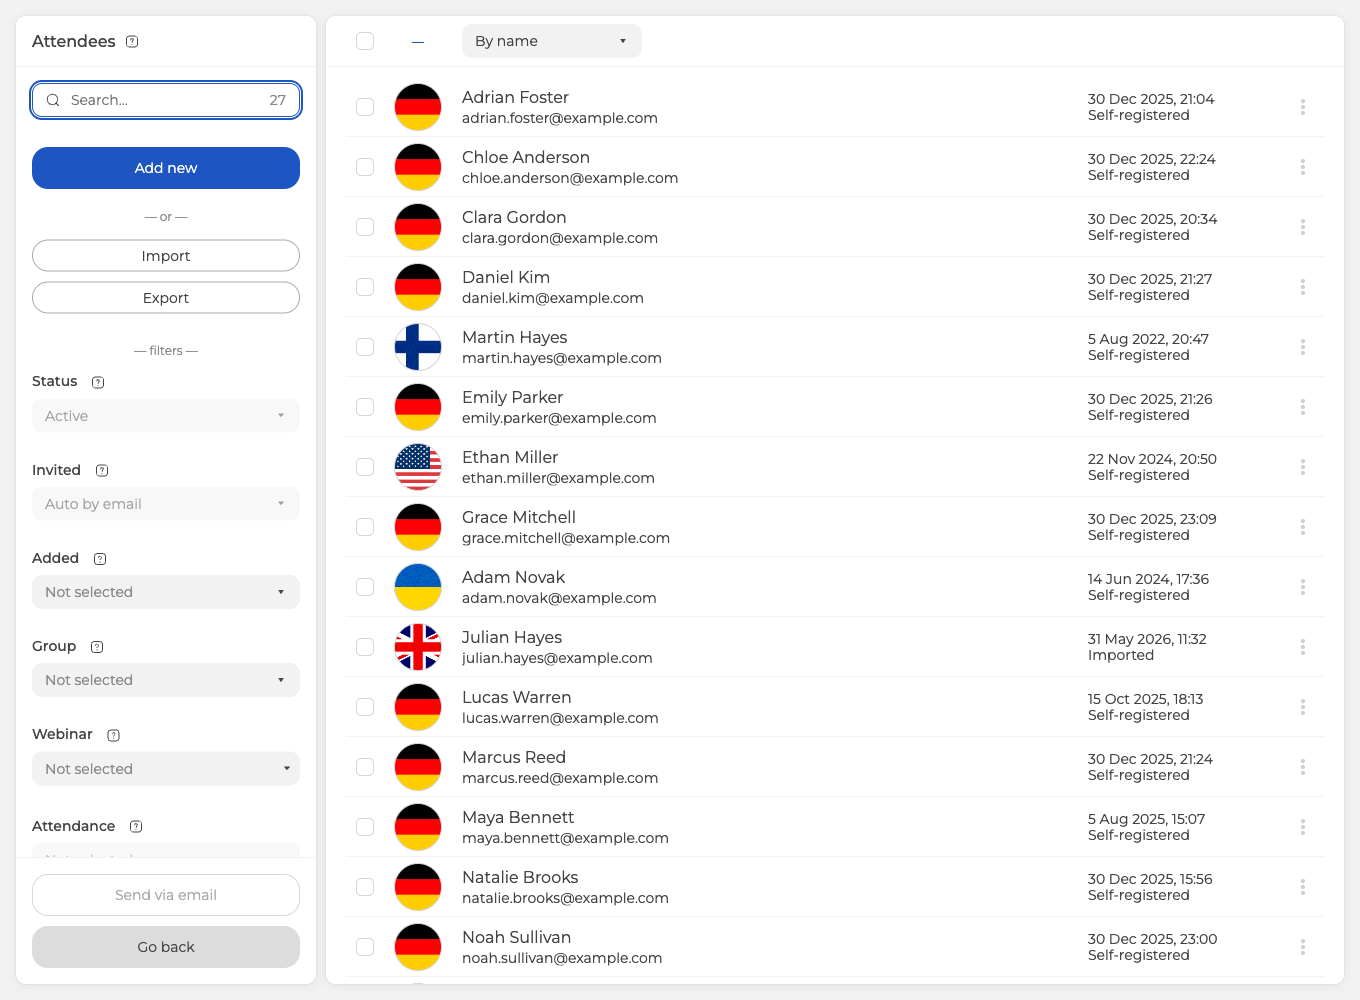
"Send via email" at the bottom of the left column does the sending. "Go back" sits directly underneath it and leaves without sending anything, so the two are worth reading before you click.
Managing a recording
The page you opened above is also where a recording is watched, renamed, trimmed, downloaded and deleted.
The player gives you the seek bar, the volume, the playback speed, the picture quality and full screen. To rename the file, click the pencil beside its name at the top and type what you want instead. Click anywhere off the field to keep the new name, because pressing Enter throws away what you typed rather than saving it.
Trimming is behind "Edit". The video opens with a yellow bar underneath it, and the handles at both ends of that bar are what you drag to cut the start and the finish.
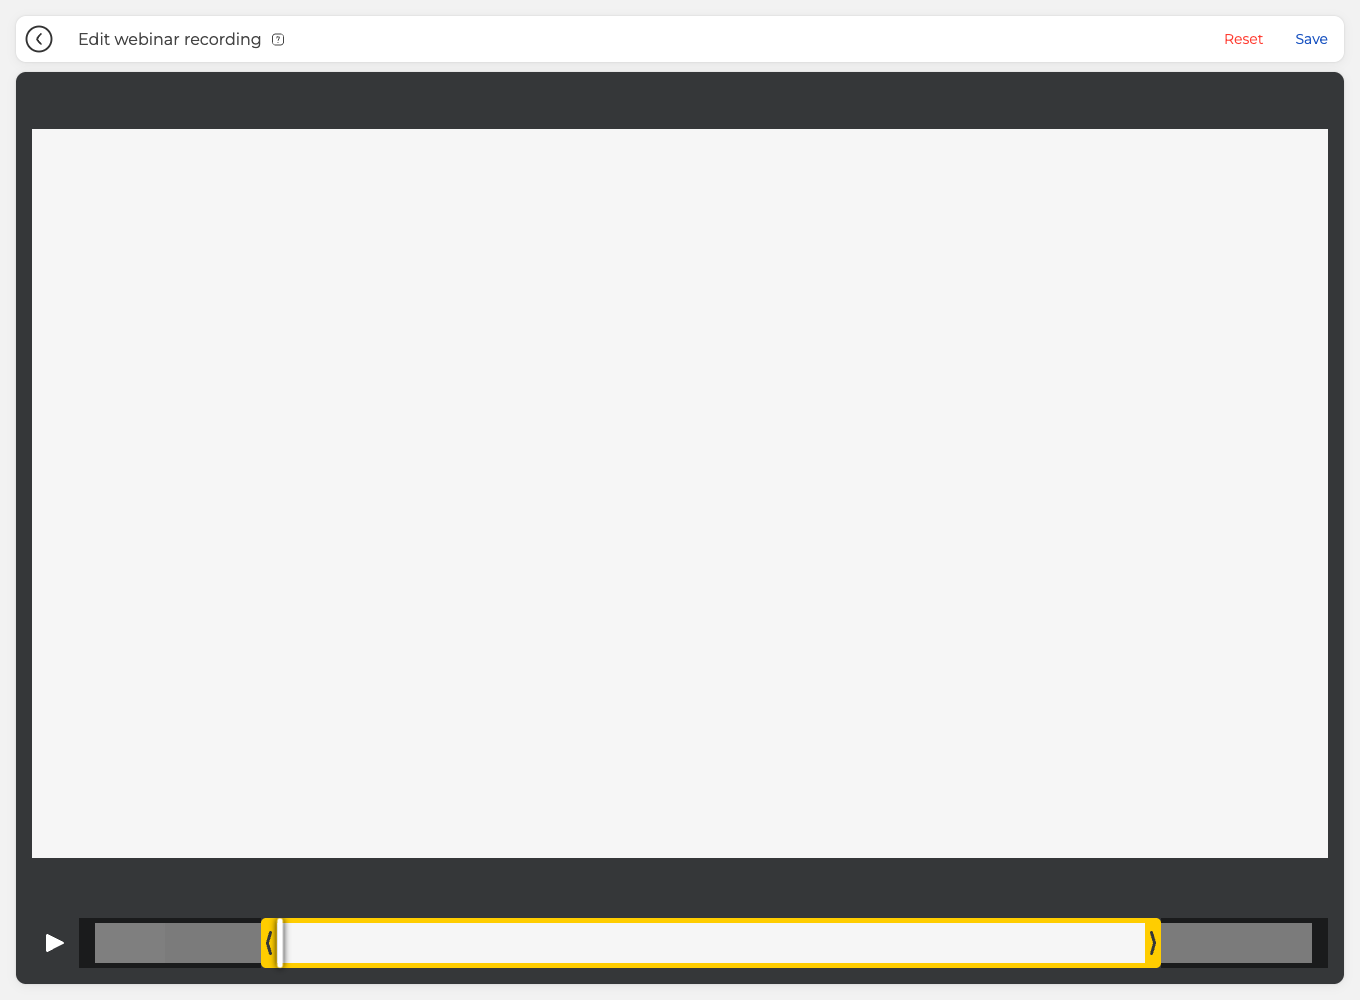
What stays in the file is the pale stretch between the handles, and the grey ends are what goes. "Save" in the top right corner keeps the cut and "Reset" puts both handles back where they started. The two stay greyed out until you actually move something.
"Delete" is in that same top right corner, and it asks before it acts. A deleted recording is not gone straight away, it moves to the "Trash" tab and waits there for seven days, and putting it back is the only thing you can do with it in the meantime.

"Restore" in the top right corner asks you to confirm as well, and the recording then reappears on the "Recordings" tab.
If a recording is missing, stops early or will not download, open the online chat and tell us the event, the date it ran and what the "Recordings" tab shows for it.
Combining several recordings into one
A long event rarely arrives as one file. The room closes the recording every time you stop it, a single recording stops itself at ten hours, and the free Starter plan stops at twenty minutes, so what you are left with afterwards is a handful of pieces. The account can put them back together into one video.
Open the recordings of the event as finding a recording describes and look at the list down the left, where every row carries a checkbox. Tick one and the buttons above the player stay as they were. Tick a second and "Edit" and "Download" step aside for "Merge". Nothing caps how many you tick, so a session that broke into a dozen pieces goes back together in one pass.
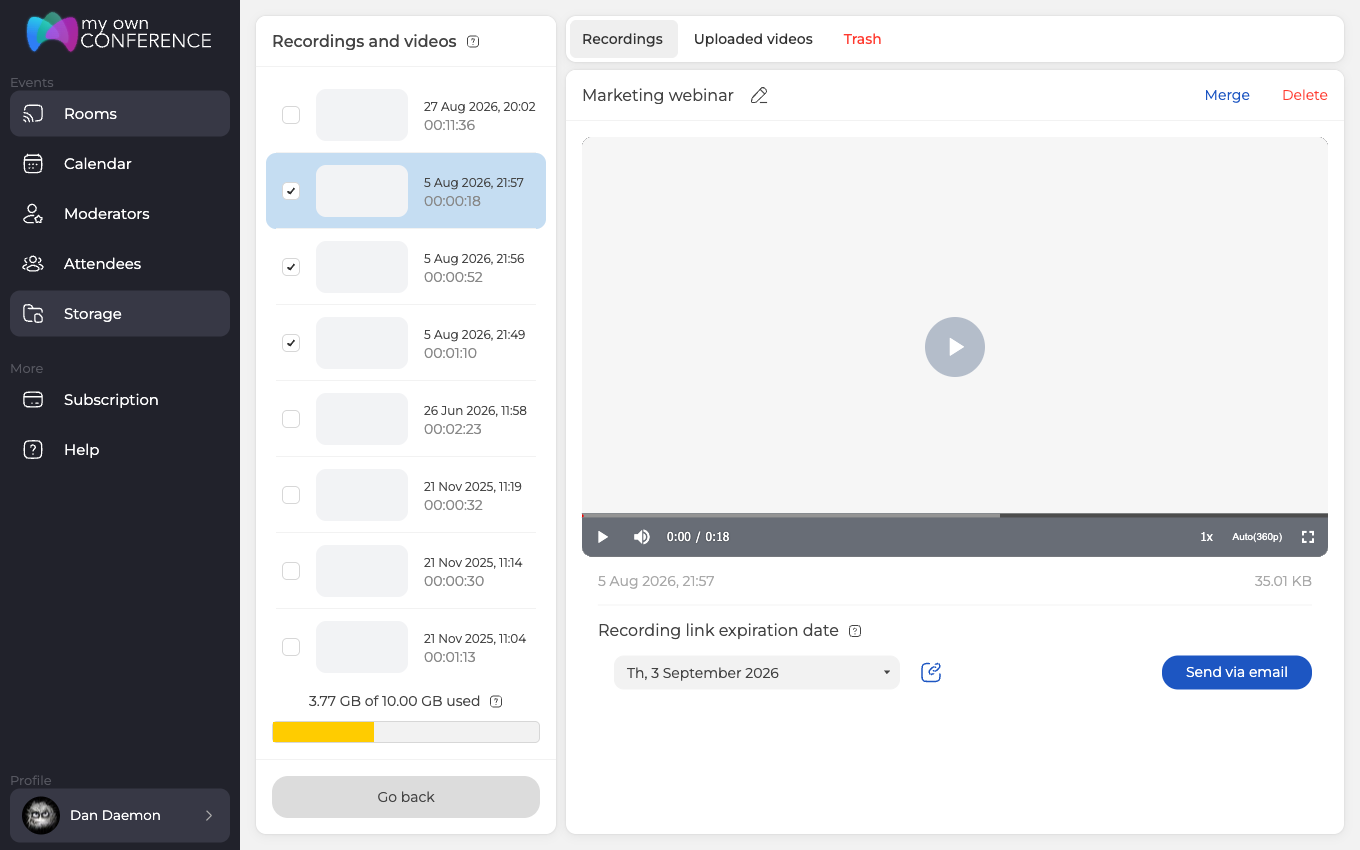
"Merge" opens a screen of its own, headed "Merge webinar recordings". The player sits at the top, and underneath it the pieces run as a strip of cards, each labelled with the recording it came from. Click a card to preview that piece in the player, and drag the cards to put them in the order you want.
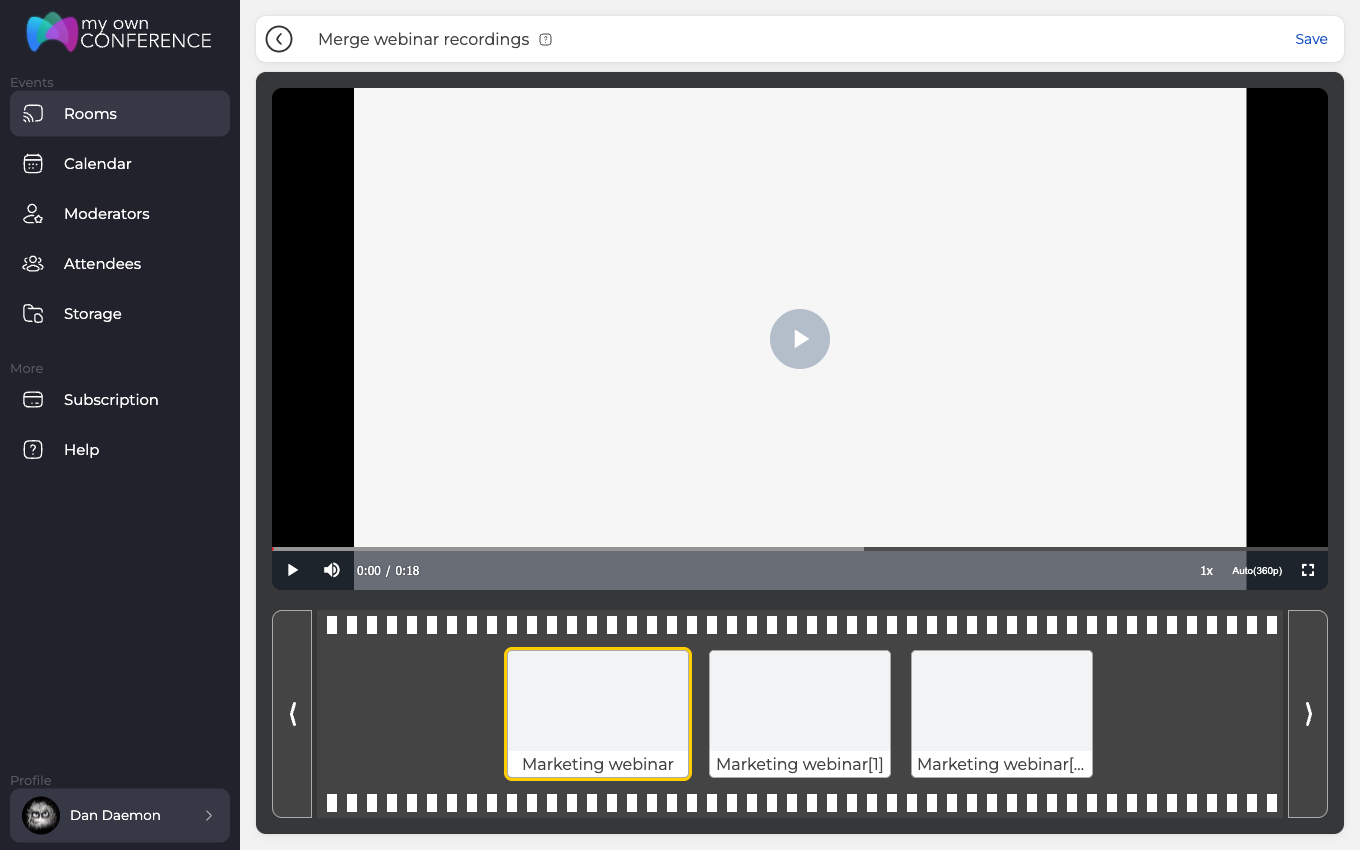
Look at that order before you do anything else, because the strip arrives in the order the list showed you, and the list puts the newest recording first. A session recorded in three parts therefore starts out back to front, with the closing stretch at the head of the strip.
"Save" in the top right corner starts the job. What comes back is a new recording rather than a changed one, so every piece you picked stays exactly where it was, and the new file turns up at the top of the list named after the word "Merged" and the moment it was assembled. The pencil renames it if that is not what you want it called.
Give it a little while to work. Every recording of that event shows "Processing..." while it runs, not only the ones you chose, and none of them can be played, edited or downloaded until the new file is ready. After that the merged recording behaves like any other, so you can trim it, download it, share it by link and delete it.
Keep an eye on space. The merged video is a genuinely new file rather than a pointer to the old ones, so it takes storage of its own on top of the pieces it came from, and there is no harm in deleting what you no longer need once you are happy with the result.
Merging stays inside one event. The "Recordings" tab of "Storage" lists everything you own and carries the same checkboxes, but no "Merge" appears there, so pieces belonging to two different webinars cannot be joined.
Frequently asked questions
Can I pause a recording and carry on with the same file?
No, there is no pause. Pressing the record button again asks whether you want to finish, and answering "Yes" closes the file, so starting the recording again opens a new one rather than continuing the old. An event you stop and restart twice leaves you with three recordings rather than one. Those three can be put back together afterwards, which the section on combining recordings above walks through.
Why can I not play a recording that has just finished?
Because it is still being converted. A new recording sits on the "Recordings" tab marked "In queue", and its date, length and size appear only once that finishes. Short recordings are ready in a minute or two, and the longer the recording, the heavier the file and the longer the wait.
Why is my recording only 480p?
Either your plan or the mode you picked. "Quality" starts at 480p and your plan sets the ceiling, so Starter and paid plans below 500 attendees reach 1080p and plans from 500 attendees reach 2160p. Choosing "Webcams and microphones only" under "Mode" also drops the quality to 480p on its own. Only camera streams reach the frame in that mode, and a camera in the browser reaches 720p at best, so anything above it would enlarge a smaller picture and add artefacts instead of detail.
How long can a single recording run?
Ten hours on any plan, and 20 minutes on the free Starter plan, at which point the recording stops itself. Starting it again opens a new file, so a long session ends up as several recordings on the "Recordings" tab rather than one. The pieces can be joined back into one video afterwards, and combining several recordings into one above covers how. Finding a recording covers what to check when a file is shorter than you expected.
Why did the new name I typed not save?
Because pressing Enter throws away what you typed rather than saving it. Click the pencil beside the name at the top of the recording page, type the name you want, then click anywhere off the field to keep it. It is worth doing, because a recording takes the name of the room it was made in, which is why a busy room ends up with a column of identically named files.
