
How to allow camera and microphone access on a Mac
On a Mac, two permissions stand between your camera and the webinar room, and both have to say yes.
The first belongs to your browser. When you click "Speak", the browser asks whether the room may use your camera and microphone. Going on air shows what that question looks like in each browser.
The second belongs to your Mac. macOS decides which apps may use the camera and the microphone at all, and your browser is one of those apps. If the Mac says no, the room cannot see or hear you, even after you clicked "Allow" in the browser.
This article is about the second permission. Where you give it depends on your browser.
- Google Chrome, Mozilla Firefox, Microsoft Edge, Opera, Brave, DuckDuckGo and other browsers get it in "System Settings" on your Mac.
- Safari is made by Apple, and it keeps these permissions in its own settings instead.
You only do this once for each browser. Your Mac remembers your choice.
Chrome, Firefox, Edge and other browsers
- Click the Apple logo in the top left corner of your screen and choose "System Settings".
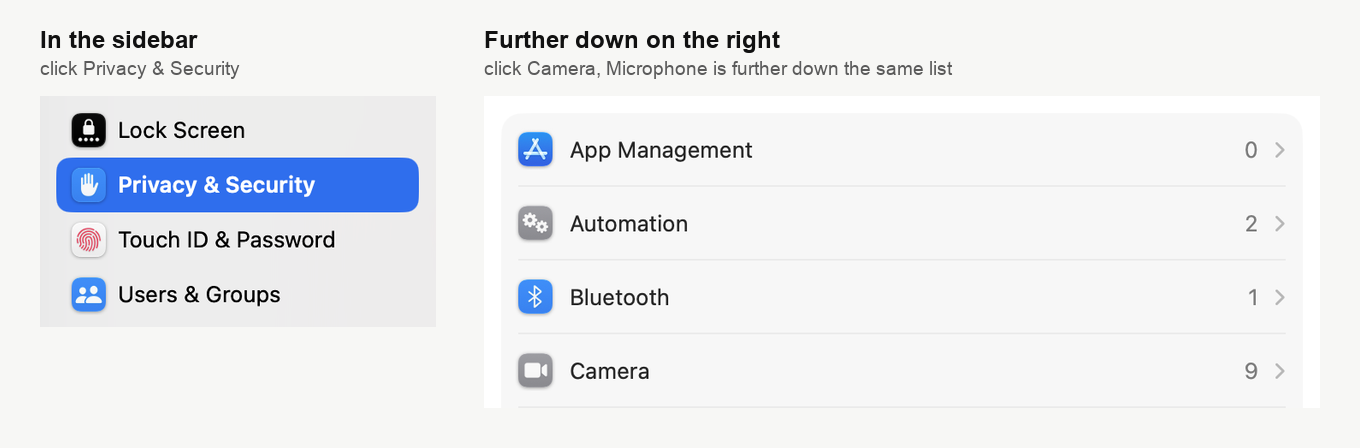
- Click "Privacy & Security" in the list on the left. On the right, scroll down and click "Camera".
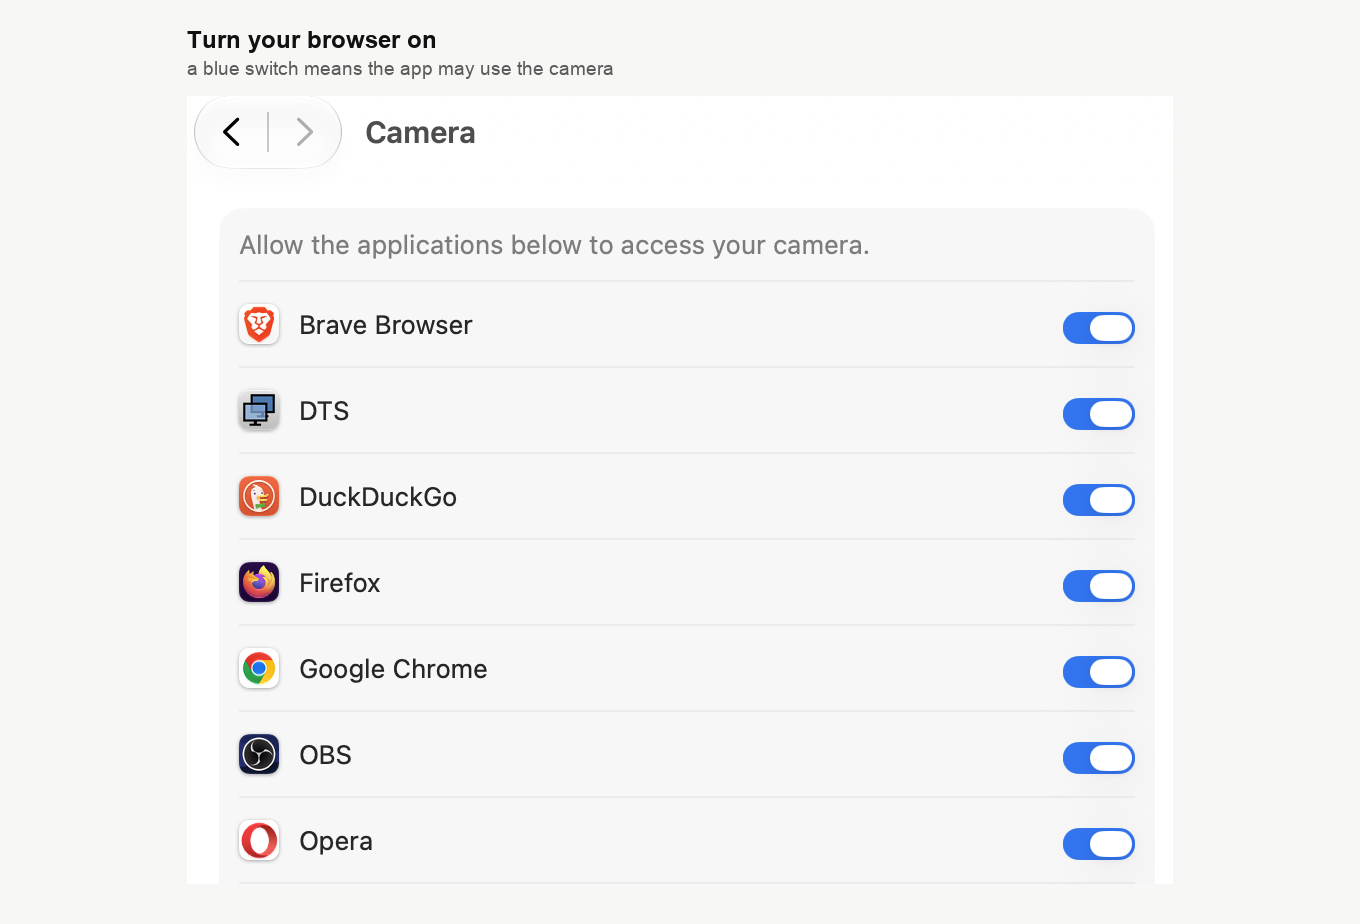
- Find your browser in the list and turn on the switch next to it. A blue switch means the browser may use the camera.
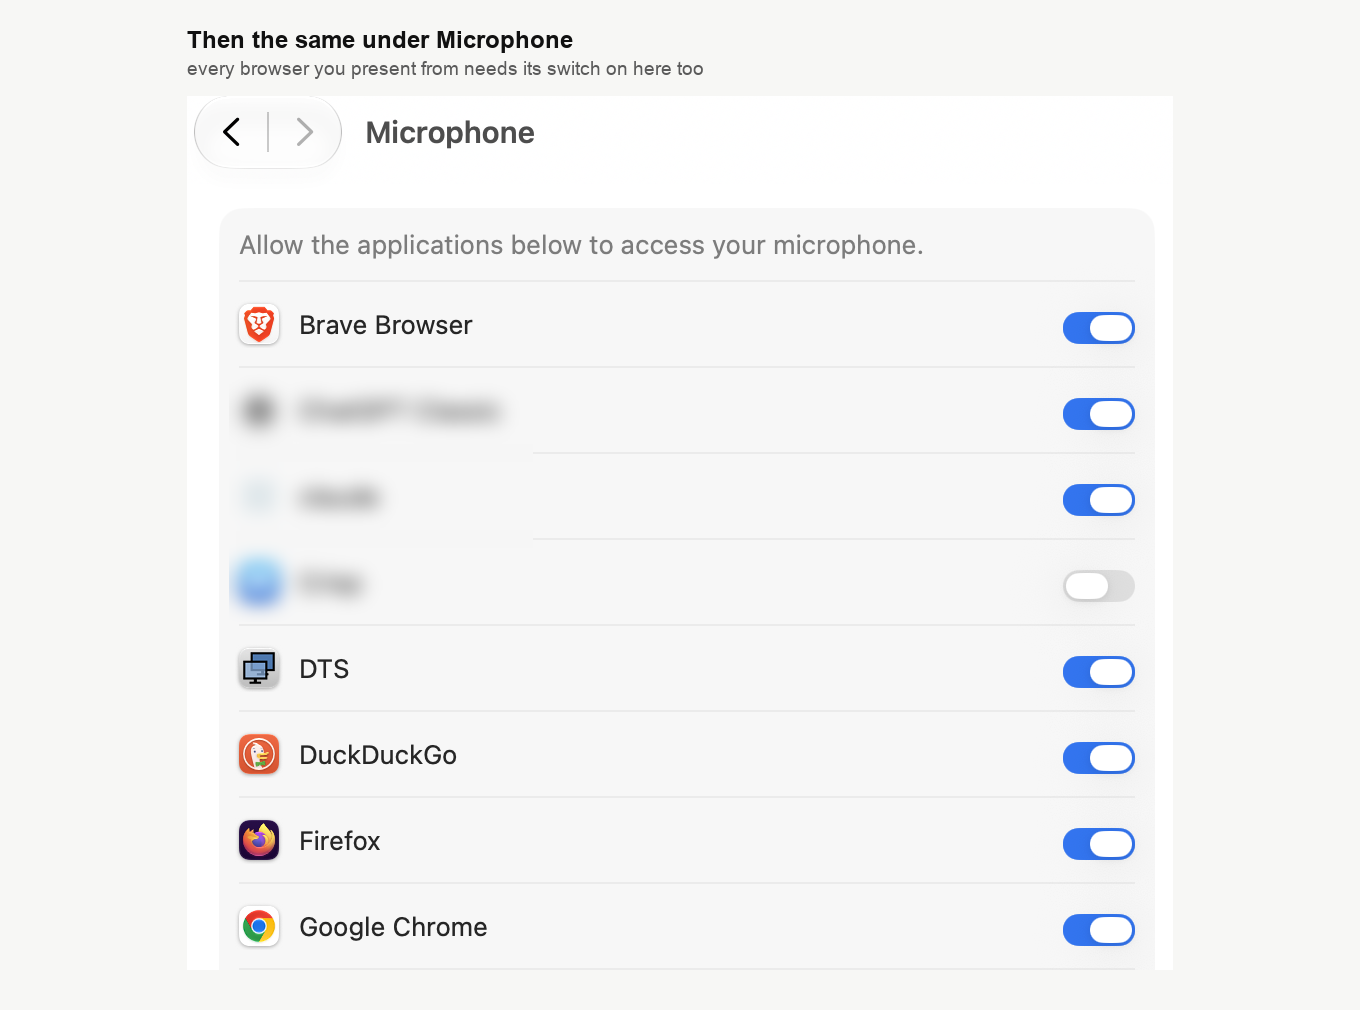
- Click the back arrow at the top of the window and open "Microphone", a little further down the same list as "Camera". Turn on the switch for your browser here as well.
- If your Mac asks for your password or Touch ID, enter it. It asks because you are changing a system setting.
- Quit your browser completely and open it again. Closing the window is not enough on a Mac, because the browser keeps running in the background. Click the browser's name in the menu bar at the top of the screen, for example "Chrome", and choose the item at the bottom of that menu that starts with "Quit". Pressing Command and Q together does the same. If your Mac offers "Quit & Reopen" instead, click that.
- Go back to the webinar room and click "Speak". When your browser asks, allow the camera and the microphone.
If your browser is not in the list
Your Mac only lists apps that have already asked for the camera or the microphone. So open the webinar room in your browser and click "Speak". Your Mac then asks whether the browser may use the camera, and after that the microphone. Click "Allow" both times. Older versions of macOS call this button "OK". From then on the browser appears in both lists.
On older versions of macOS
On macOS 12 Monterey and earlier, the same lists live in "System Preferences". Open "Security & Privacy", click the "Privacy" tab and choose "Camera" on the left. Click the padlock in the bottom left corner and enter your password, then tick the box next to your browser. Do the same under "Microphone".
Safari
Safari does not appear in the lists in "System Settings", and it does not need to. It decides for each website separately, in its own settings.
- Open your webinar room in Safari, so that Safari lists it.
- In the menu bar at the top of the screen, click "Safari" and choose "Settings". Older versions call it "Preferences".
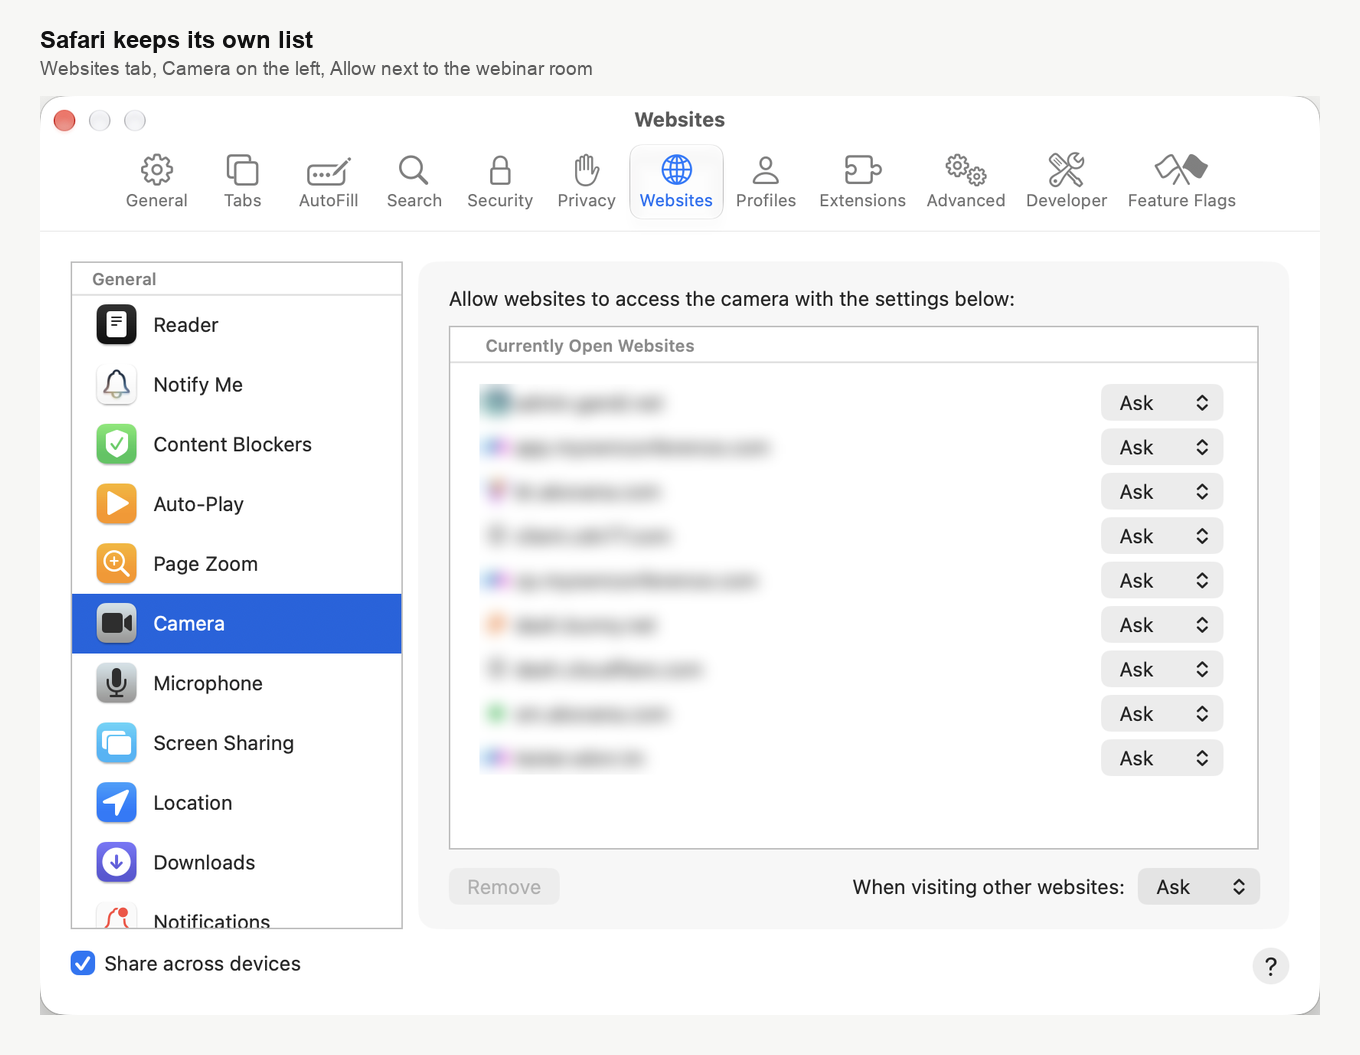
- Click the "Websites" tab at the top of the window.
- Choose "Camera" on the left. Find
www.mywebinar.comin the list on the right and set it to "Allow".
- Choose "Microphone" on the left and set
www.mywebinar.comto "Allow" there too.
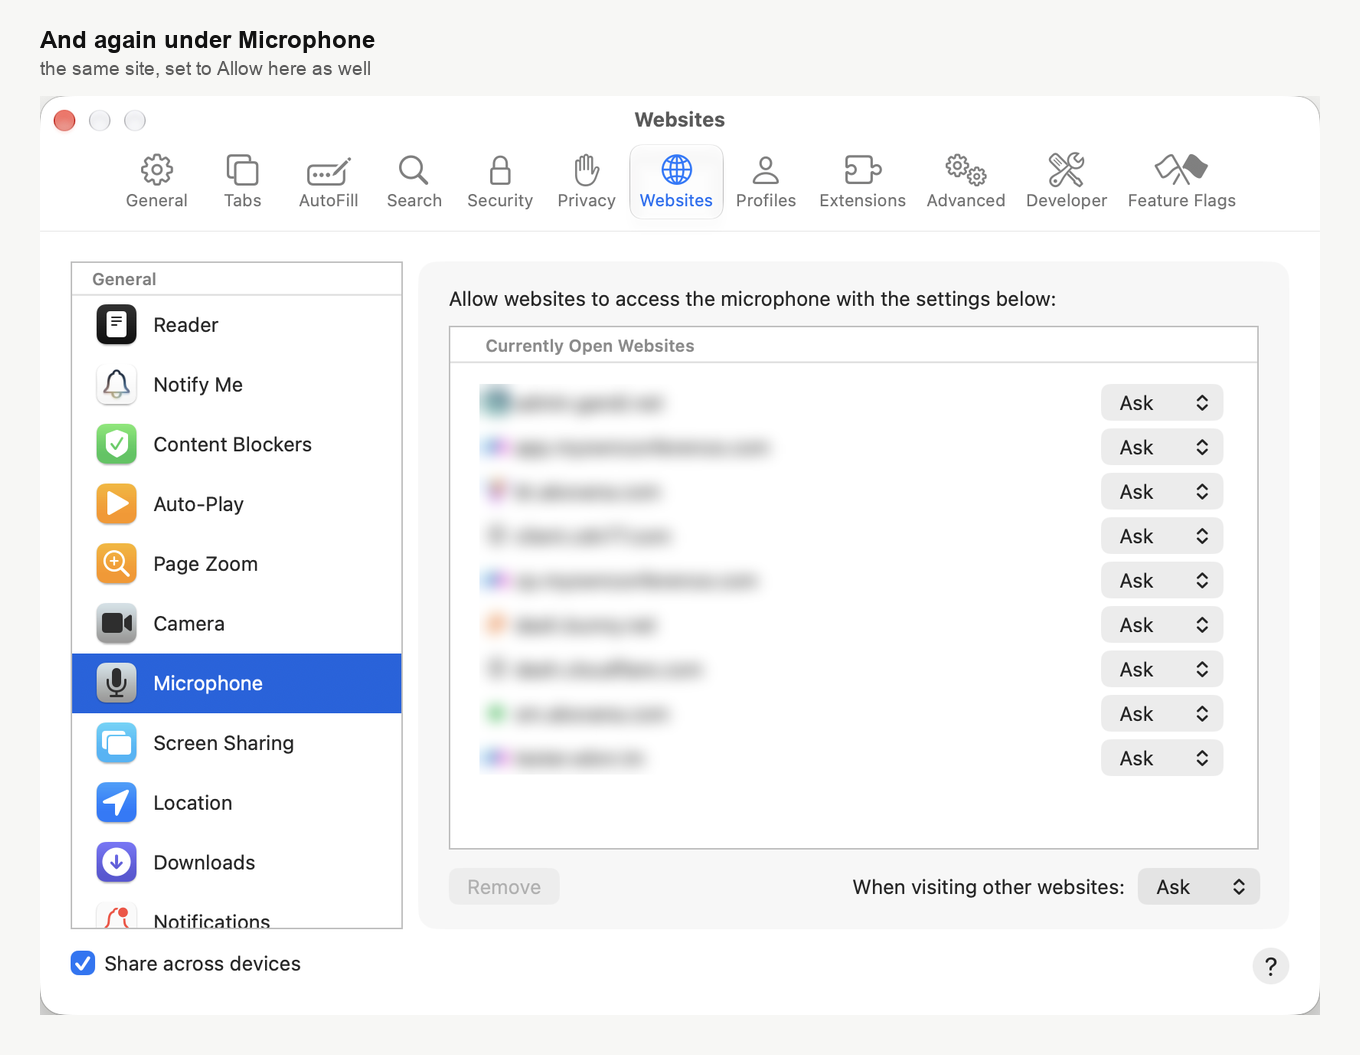
- Reload the webinar room page and click "Speak". If the room still cannot use the camera or the microphone, quit Safari with Command and Q and open it again.
If you joined through a mirror link, Safari lists the room as go.myownconference.com or go.myownconference.co instead of www.mywebinar.com. Allow the address you see in the list.
Leave "When visiting other websites", at the bottom of the window, set to "Ask". It answers for every other website, and none of them need your camera without asking first.
If you see DTS in the lists
DTS is our own app. Your room may use it to carry your broadcast over our alternative broadcasting technology, and it is also what shares your screen. If DTS is in the "Camera" or "Microphone" list, leave it switched on.
Screen sharing needs one more switch, for DTS under "Screen & System Audio Recording". How to share your screen during a webinar walks you through it.
Check before your event
Our connection tester checks your camera and microphone without putting you on air. Run it a day before you present, in the same browser you will present from.
Still not working
Going on air covers the other common causes, such as another app holding the camera. If nothing there helps, open the online chat and our support team will work through it with you.
Frequently asked questions
I clicked Allow in my browser, but the room still cannot see my camera. Why?
On a Mac your browser needs a second permission, from macOS itself. Open "System Settings", go to "Privacy & Security", then "Camera", and turn on the switch for your browser. Do the same under "Microphone", then quit the browser completely and open it again.
Why is Safari not in the list in System Settings?
Because Safari handles camera and microphone access itself, website by website. Open "Settings" in Safari, go to the "Websites" tab and set www.mywebinar.com to "Allow" under "Camera" and under "Microphone".
My browser is not in the Camera list. What do I do?
The list only shows apps that have already asked for the camera. Open the webinar room in that browser and click "Speak", then click "Allow" when your Mac asks. After that the browser appears in the list.
The switch is grey and will not move. What now?
The setting is locked on this Mac, which is most common on a work computer that an IT department manages. Ask whoever manages your Mac to allow the camera and the microphone for your browser.
Do I need to allow screen sharing for my browser too?
No. Screen sharing in the webinar room goes through our app, DTS, not through the browser. So the browser's own screen sharing setting plays no part, in Safari or anywhere else. DTS needs its switch under "Screen & System Audio Recording", and how to share your screen during a webinar covers it.
Do attendees need to do this?
Only if they are going to speak. Watching and listening need no camera or microphone. An attendee you invite on air goes through the same steps on a Mac, and inviting an attendee to speak during a webinar covers the invitation itself.
Do I have to do this before every webinar?
No. Your Mac remembers the permission for each browser, so you do it once. You only come back here if you start presenting from a new browser, or if someone turns a switch off.
