
Using virtual backgrounds on macOS
A virtual background swaps whatever is behind you for an image of your choosing, so your audience sees a clean backdrop instead of your room. On a Mac you can use one for your webinar camera, and the work is done by macOS rather than by us.
What the room does, and what it does not
Inside the webinar room, "Devices settings" in the room menu offers "Blur background", and that is as far as the room goes.
Replacing the background with a picture is a deliberate omission, and custom backgrounds on the presenter's webcam shows where the blur switch sits, when it is unavailable, and why we decided against a replacement.
On a Mac you can have the replacement anyway, because macOS can do it itself. The system swaps the background before the picture ever reaches the browser, so a webinar sees it exactly as any other app would.
Whether your Mac can do it
Two things decide it, the chip and how recent your macOS is, and one look settles both at once, which beats hunting for version numbers.
Go on air in a webinar room so that your camera is running, then click the green camera icon that appears in the menu bar at the top of the screen. That icon is only there while an app is using the camera, which is why you have to be broadcasting first.
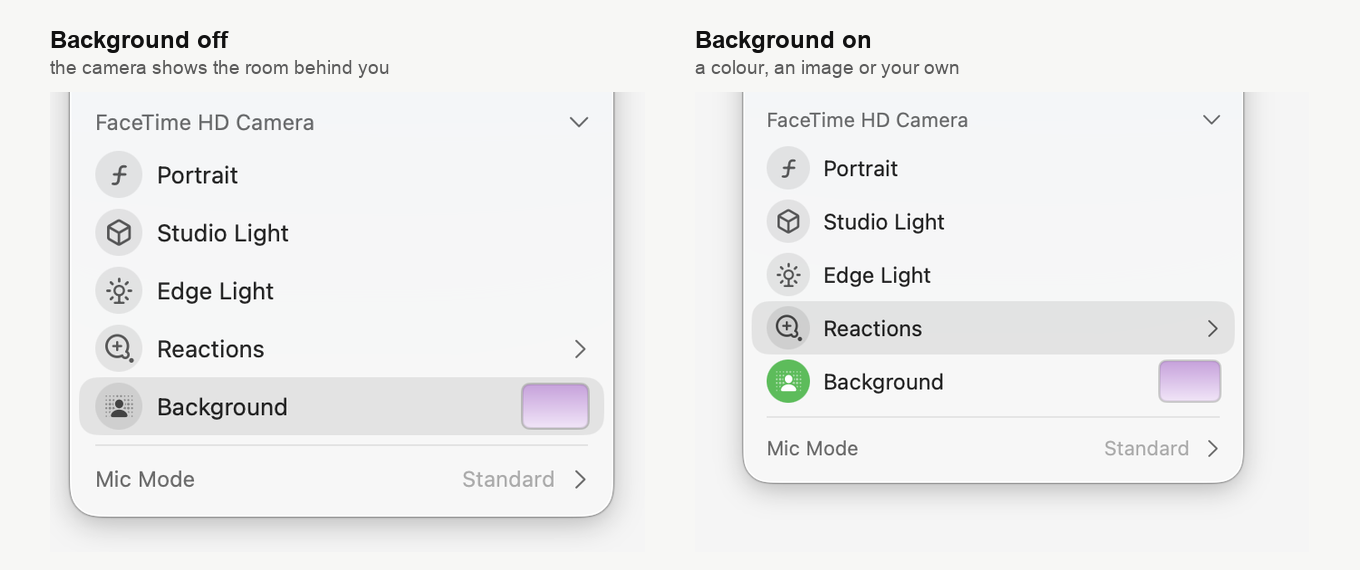
If the menu lists "Background", this Mac can replace the backdrop and there is nothing else to check. If it offers Portrait and Studio Light but no Background at all, this Mac cannot, and no setting will bring the item back. Portrait will still blur what is behind you in either case, which is the same thing the webinar room offers.
The row tells you its own state at a glance. The icon turns green once a background is in use, and the swatch beside it shows what you picked.
Turning it on
Enter the room and click "Speak" to go live. Going on air covers granting the camera and microphone permissions, browser by browser, and points at the right page for getting in.
Click the green camera icon in the menu bar, check that the camera named at the top of the menu is the one you want to use, then click "Background". A window opens with three tabs.
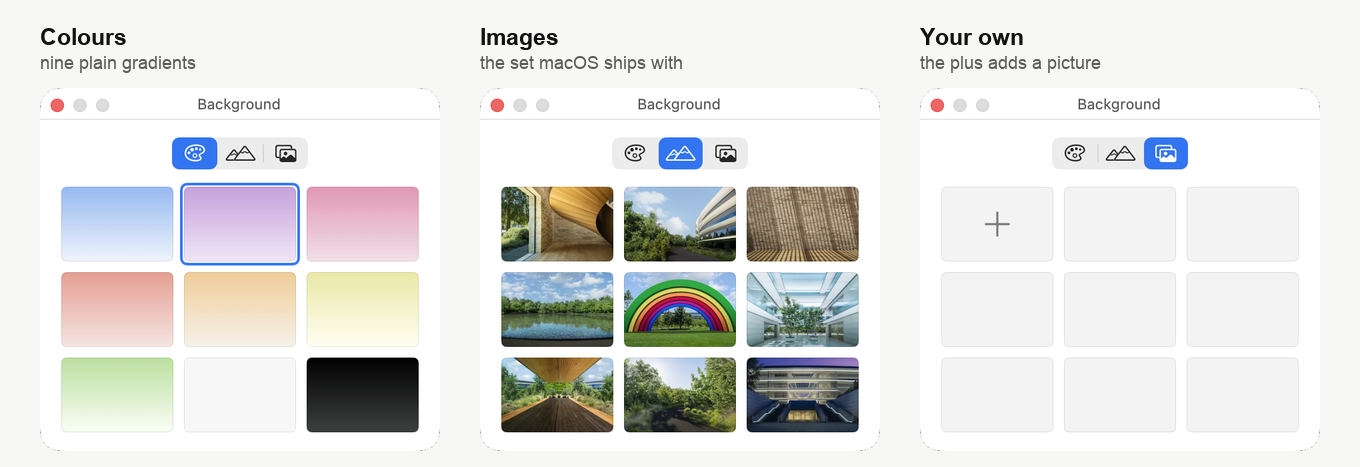
The first holds plain gradients, the second the images macOS ships with, and the third is where your own pictures go, added with the plus. Pick one and it applies straight away, so you can see the result in the preview above the menu before anyone else does.
Use a high-resolution image. A small one is stretched to fill the frame and ends up soft and blocky, which is more distracting than the room it was hiding. It is worth trying two or three well before the webinar rather than during it, until you find one that suits what you are presenting.
Getting a clean edge
The cut between you and the background is only as good as what the camera can see, so a few minutes on the room pay off more than any setting.
Light your face evenly, because the system separates you from the backdrop by what it can make out, and a dim room makes that guesswork. Avoid sitting against something busy or against a wall the same colour as your clothes. And keep your movements unhurried, since fast motion is where the edge tends to break up.
If it does not work
Start with the two requirements above. If the menu has no Background item at all, the system is the limit and no setting will bring it back, so the answer is a macOS update if one is available for your Mac.
If the room does not see your camera in the first place, that is a different problem. Open System Settings, go to Privacy and Security, choose Camera and allow access for the browser you present from, then restart the browser. Going on air covers the rest of the permission cases. How to allow camera and microphone access on a Mac shows the macOS part step by step.
If the background is there but the edge around you is poor, it is almost always the light or the backdrop rather than the Mac.
If "Background" is there but nothing changes when you pick an image, open the online chat and tell us what the menu offers and what your attendees see instead.
Frequently asked questions
Will my audience see the macOS background, or only me?
They see it. macOS swaps the background before the picture ever reaches the browser, so a webinar sees it exactly as any other app would, and the work is done by macOS rather than by us. Inside the webinar room itself, "Devices settings" offers "Blur background" and that is as far as the room goes.
Why is the green camera icon missing from my menu bar?
It is only there while an app is using the camera, which is why you have to be broadcasting first. Enter the room, click "Speak" to go live, and the icon appears in the menu bar at the top of the screen. Going on air covers granting the camera and microphone permissions, browser by browser.
My menu offers Portrait and Studio Light but no Background. Can I add it?
No, this Mac cannot replace the backdrop and no setting will bring the item back. The chip and how recent your macOS is are the two things that decide it, so a macOS update is the answer if one is available for your Mac. "Portrait" will still blur what is behind you, which is the same thing the webinar room offers.
Can I use my own picture rather than the ones macOS ships with?
Yes, the third tab of the "Background" window is where your own pictures go, added with the plus. Use a high-resolution one, because a small image is stretched to fill the frame and ends up soft and blocky, which is more distracting than the room it was hiding. It applies straight away, so it is worth trying two or three well before the webinar rather than during it.
The background works but the edge around me is messy. Is my Mac too slow?
Almost certainly not, since a poor edge is nearly always the light or the backdrop rather than the Mac. Light your face evenly, because the system separates you from the backdrop by what it can make out, and avoid sitting against something busy or against a wall the same colour as your clothes. Keeping your movements unhurried helps too, since fast motion is where the edge tends to break up.
