
OBS Studio broadcasting into the webinar room
OBS Studio can send its picture and sound into a MyOwnConference webinar room over RTMP. Your audience then sees whatever you have built in OBS, so scenes, overlays, a second camera and a mixed audio track all arrive as one stream.
OBS can also do something much simpler for a webinar, which is stand in as a webcam. That route needs none of the setup below and it sits at the foot of this page. If you are still deciding whether OBS is worth it at all, the blog weighs that up in OBS Studio broadcasting.
What this route costs you
Three things come with this route and all three are worth weighing first. One speaker may broadcast through OBS, the picture goes up to 1080p, and your audience watches you about ten seconds late, sometimes as much as twenty.
That gap is built in rather than measured, so no amount of waiting or better internet will close it. An OBS stream is cut into HLS chunks on its way to your viewers, and a chunk has to be finished before anybody can start playing it. Broadcast latency covers the browser route, where presenters stay within 100 to 600 milliseconds of each other and the audience buffer only stretches when a line is struggling.
So the delay decides most cases. Ten seconds costs you nothing in a produced broadcast that people sit and watch. It costs you a great deal in a session built on questions and answers, because your answer lands long after the room has moved on.
OBS also needs a paid plan of a month or more. "1080P OBS broadcasting" and "RTMP protocol support" come with Business and Enterprise, while the free Starter plan leaves them out and so does the one-day plan, which choosing and paying for a plan sets out.
Put the room into RTMP mode
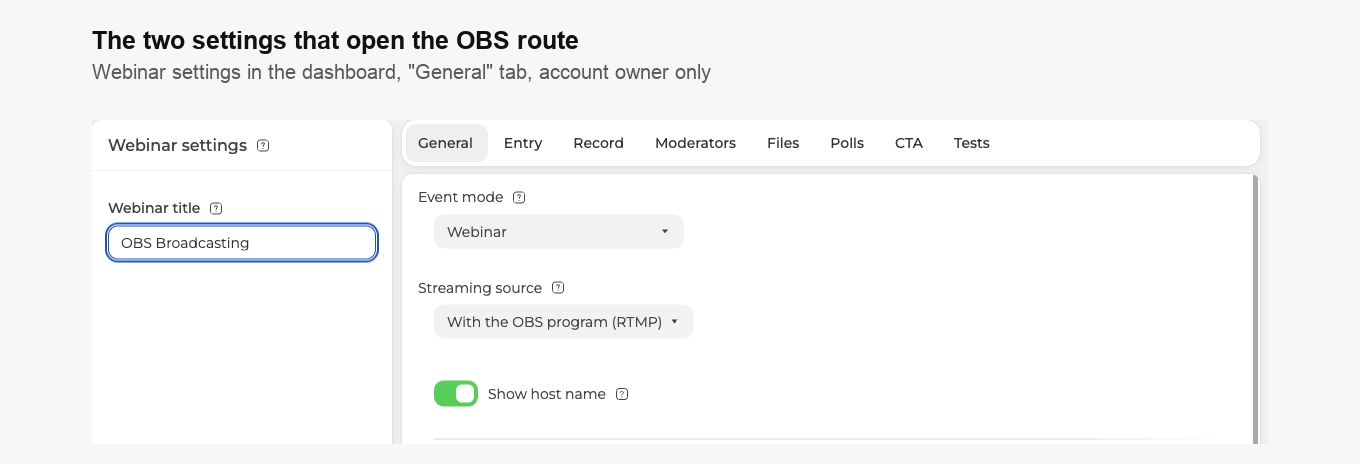
Both settings live in the dashboard and both belong to the account owner. On the "Webinar rooms" page, which is the one behind "Rooms" in the sidebar, click the three dots beside your room, choose "Settings" and stay on the "General" tab.
"Event mode" has to read "Webinar". While it is set to "Meeting", the OBS option below is greyed out and will not take a click, and nothing on screen says why.
Then set "Streaming source" to "With the OBS program (RTMP)".
Now switch to the "Moderators" tab of the same settings, headed "Webinar presenters", and tick whoever is going to run OBS. Only ticked moderators get a link for this event, and the OBS details turn up beside that link.
The account owner is the exception. That row carries a crown instead of a checkbox, and it is the one row that never receives OBS details. So if you run the account on your own, add an entry for the stream itself before going further, since a name on the default "Moderator & speaker" permission is all the form asks for. Moderator and presenter management goes through that form.
Collect the server address and the key
Go back to those same three dots beside the room and choose "Links" this time. Under "Links for moderators" every invited moderator has a row, and in an RTMP room each row except the account owner's carries a small "OBS" block with two buttons in it. One copies the "Server" address, the other copies the "Stream key". Both go straight to the clipboard, so there is nothing to read off the screen and retype.
Three things about those two values are worth knowing before you use them.
The key is a credential rather than a link. Anybody holding it can broadcast into your room as that speaker, so keep it out of chat messages, shared documents and screenshots.
The server address is handed out fresh on every load. Reload the links page and you are given a different host from the same pool. Copy it shortly before you go on air rather than reusing one you saved a month ago.
Each speaker gets a key of their own, and only one of you can be on air through OBS. A key belongs to a person rather than to the room, so where several presenters are ticked, settle between you whose key is being used before the day.
Point OBS at the room
In OBS open "Settings" and go to "Stream". Set "Service" to "Custom...", which is what makes the "Destination" fields appear underneath.
Paste the address into "Server" and the key into "Stream Key". Leave "Use authentication" clear, since we hand out no separate user name and password for this. Click "Apply".
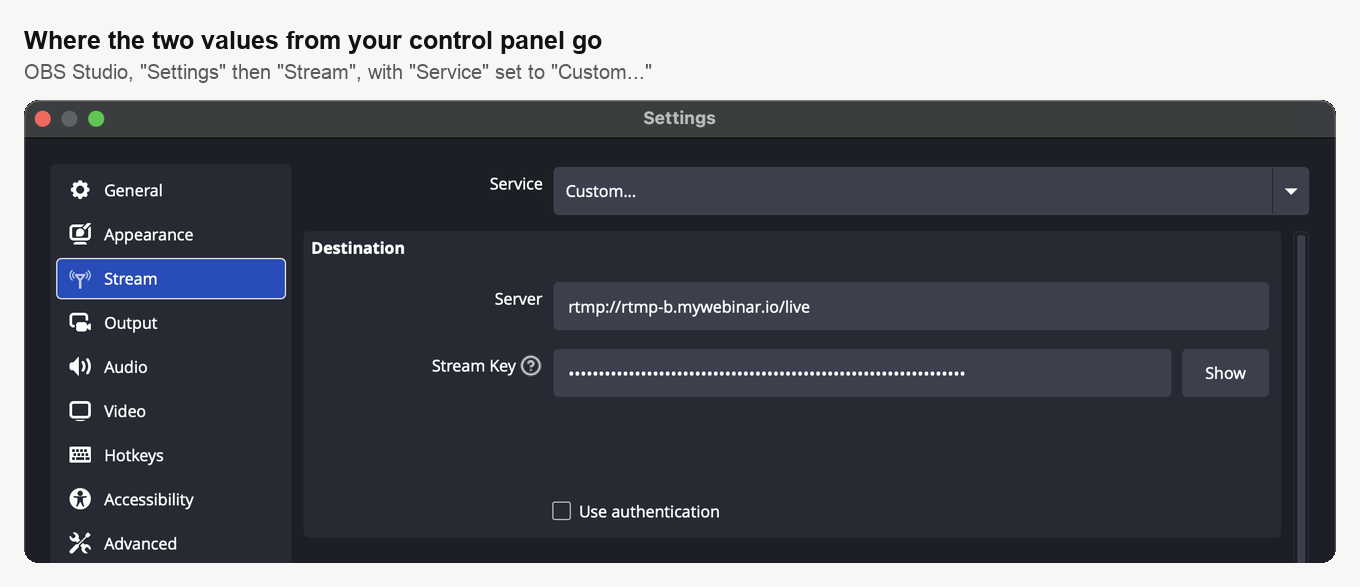
OBS keeps the key behind dots and puts a "Show" button beside it. That is worth remembering the first time you share your own OBS window with anybody.
Set the picture and the sound
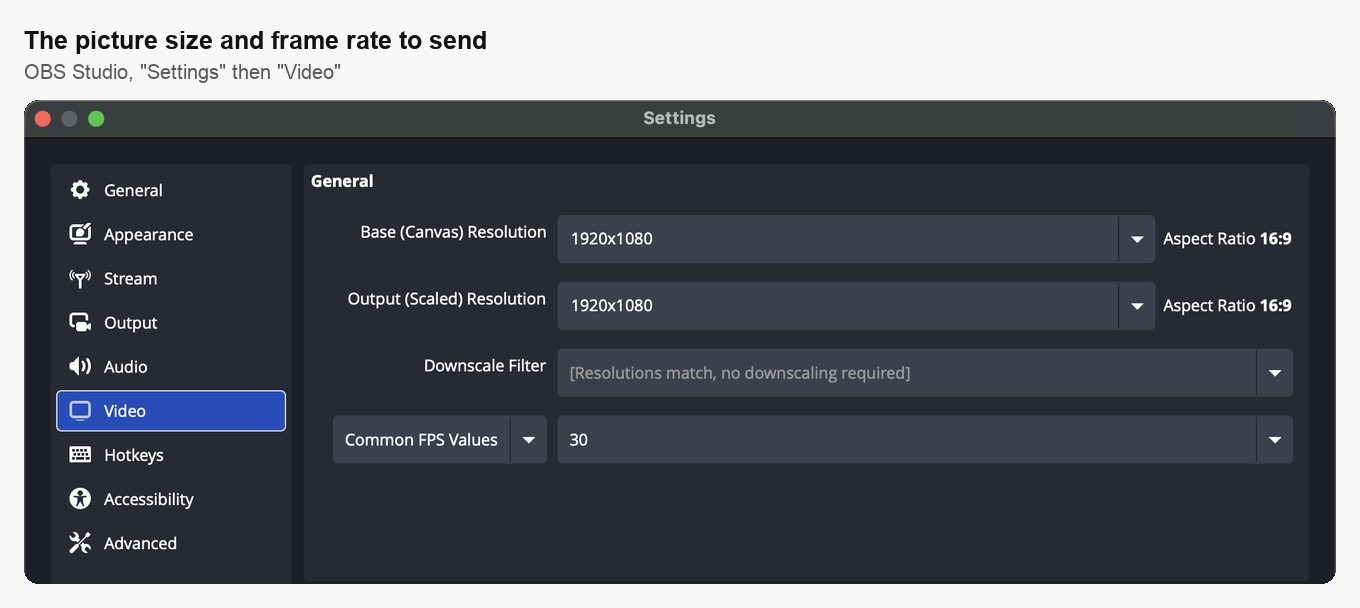
On the "Video" page set both "Base (Canvas) Resolution" and "Output (Scaled) Resolution" to 1920x1080, then choose 30 under "Common FPS Values". Matching the two resolutions leaves OBS nothing to rescale, and it says so in "Downscale Filter".
The "Output" page sets the quality behind that picture. Switch "Output Mode" to "Advanced", because only that mode shows the keyframe setting, and stay on the "Streaming" tab.
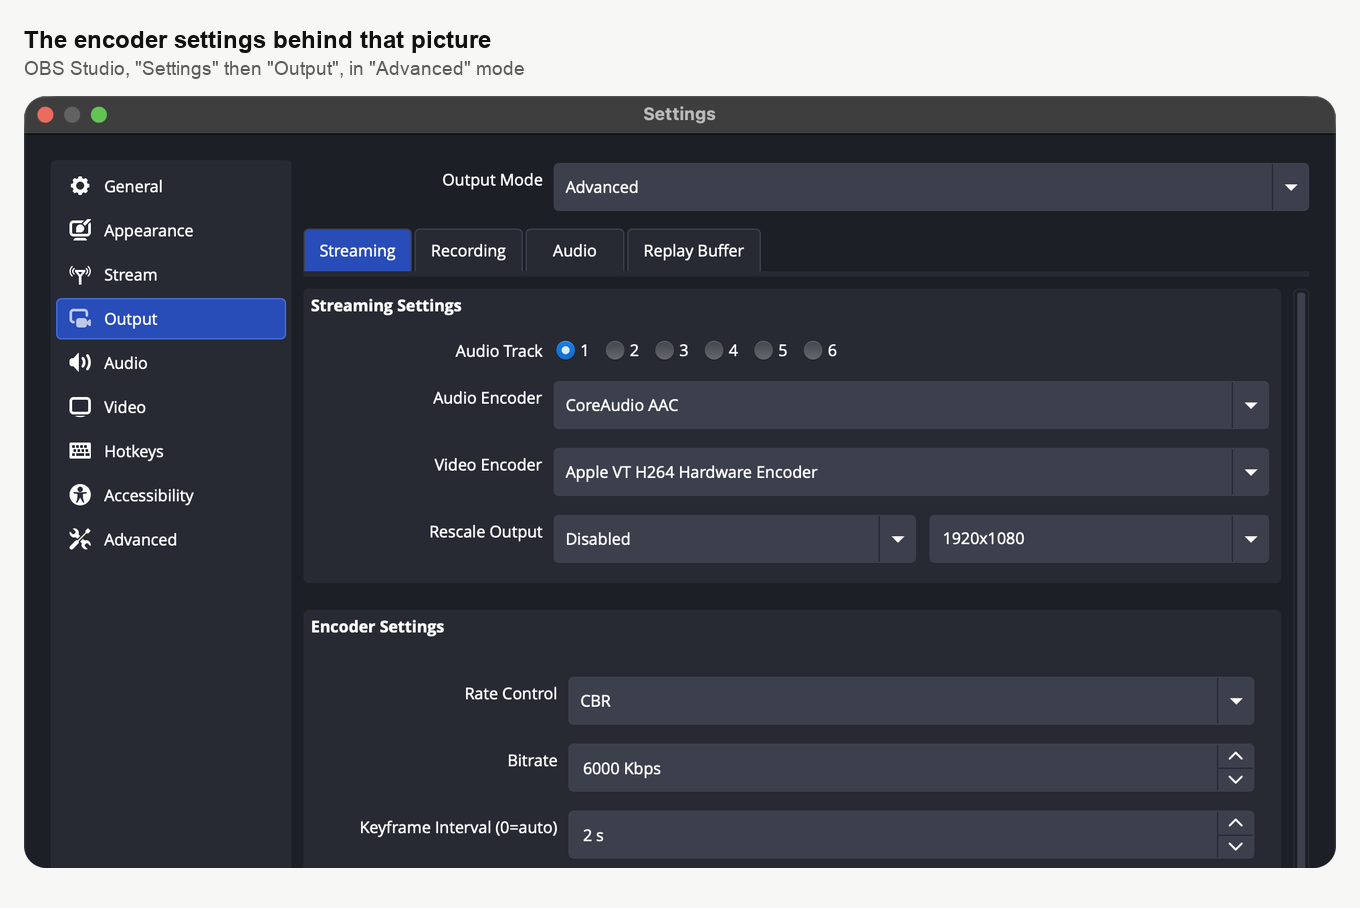
Set "Keyframe Interval (0=auto)" to 2. Left at 0, OBS with the x264 encoder sends a complete frame only once every 250 frames, which is about eight seconds at 30 fps. Whenever your connection cannot keep up, OBS drops frames and then sends no picture at all until the next complete one. Your viewers would look at a frozen image for up to eight seconds, and the stream would also take longer to appear after "Start Streaming". At 2 the same drop costs them two seconds at most.
For "Video Encoder" take your computer's hardware encoder if it has one, which is "Apple VT H264 Hardware Encoder" on a Mac and NVIDIA NVENC or Intel QuickSync on Windows. The software x264 works too, but on a busy computer it falls behind, OBS starts dropping frames and its status bar reports "Encoding overloaded!".
Keep "Bitrate" no higher than about 70% of the upload speed you measured. 6000 Kbps carries a 1080p webinar and already means 6 Mbit/s leaving your connection without a pause, so a slower line needs a lower figure. Raising it past 6000 buys you nothing, because the room caps you at 1080p. Wi-Fi drops frames far more readily than a cable, so plug in on the day if you can.
If your line rises and falls, tick "Dynamically change bitrate to manage congestion" under "Network" on the "Advanced" page of the settings, and OBS lowers the bitrate instead of dropping frames. OBS itself warns that a sudden heavy slowdown can still add some delay for viewers and that the bitrate may take a few minutes to climb back.
The browser route asks for 1.6 to 3.2 Mbit/s of upload, which internet speed for the webinar room sets out presenter by presenter, so measure your line before the event rather than during it. The sound stays at 160 under "Audio Bitrate" on the "Audio" tab of the same page.
Sound is the part people lose. The "Audio Mixer" panel lists every channel OBS is actually sending, and a source missing from that strip is a source nobody will hear. Look at it while there is still time to fix it.
Choose what to show
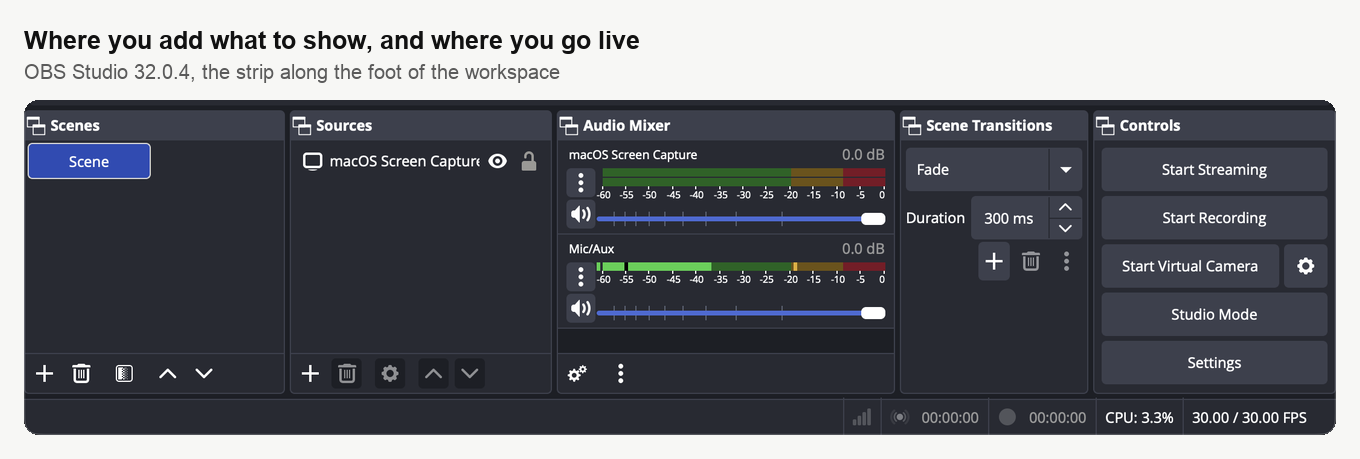
What you broadcast goes in the "Sources" panel, and the "+" button below it opens the list OBS offers. A webinar usually wants the screen or a single window, your camera on top of that, and sometimes a still image standing in for the camera. The screen source is named for the system you are on, so it reads "macOS Screen Capture" on a Mac and something else on Windows. Go by what your own list says.
A whole screen sends everything on it, including notifications and anything else you have open, so pick a single window when you have the choice.
Once a source is in the list, drag its corners in the preview to size it and put it where you want it. The camera usually sits in a corner over the screen capture.
Go on air
Enter the room the usual way, through the "Sign in" link on your own row of that same links page. The room itself has no control that starts an OBS broadcast, so the switch is "Start Streaming" in the "Controls" panel of OBS.
The status bar along the foot of the OBS window then reports the frame rate it is really achieving and how long you have been live. Frames starting to drop there point at the connection first.
Using OBS as a webcam instead
"Start Virtual Camera", in that same "Controls" panel, does something quite different. Rather than pushing a stream to us, it makes OBS look like a camera to the rest of your computer, and the webinar room then finds it in the ordinary camera list beside your real hardware.
Because the room only ever sees a camera, that route travels through the browser like any other one. It keeps the normal delay of well under a second, it leaves "Streaming source" alone, and it works on any plan. What you give up is the ceiling, since the room offers a camera at 180p, 360p or 720p and nothing above that.
Choosing it is the same as choosing any camera, which setting up and using an external USB camera covers. It is also the usual way to put a background behind yourself that the room cannot produce on its own, and how to use a custom background for your webcam goes through that.
If something goes wrong
If OBS cannot reach the server, copy the "Server" address from the links page again, since a fresh one is handed out on every load.
If OBS connects and the room shows nothing, check that "Streaming source" is still on "With the OBS program (RTMP)" and that the key you pasted came from the row of the person who is meant to be broadcasting.
If the picture turns up long after "Start Streaming", or keeps freezing for several seconds at a time, check "Keyframe Interval (0=auto)" and "Bitrate" on the "Output" page first. The OBS status bar shows when frames are being dropped, and those two settings are what stop it.
If none of that settles it, open the online chat and tell us the room name and what the OBS status bar says.
Frequently asked questions
I run the account on my own. Why is there no OBS block on my row?
Because the account owner's row never receives OBS details, and it carries a crown instead of a checkbox. Add a separate entry for the stream itself, since a name on the default "Moderator & speaker" permission is all the form asks for, then tick it on the "Moderators" tab and the buttons for the "Server" address and the "Stream key" appear on that row. Moderator and presenter management goes through that form.
Can I broadcast through OBS on the free plan?
No. "1080P OBS broadcasting" and "RTMP protocol support" come with Business and Enterprise, while the free Starter plan leaves them out and so does the one-day plan. If you need OBS without changing plan, "Start Virtual Camera" makes OBS look like a camera to the rest of your computer and works on any plan, though it gives up the ceiling, since the room offers a camera at 180p, 360p or 720p and nothing above that.
Will a faster connection cut the ten second delay?
No. That gap is built in rather than measured, because an OBS stream is cut into HLS chunks on its way to your viewers and a chunk has to be finished before anybody can start playing it. If the delay is what hurts, the browser route keeps presenters within 100 to 600 milliseconds of each other, which broadcast latency sets out.
Can two of us broadcast through OBS at the same time?
No, one speaker may broadcast through OBS. Each ticked presenter gets a "Stream key" of their own, because a key belongs to a person rather than to the room, so settle between you whose key is being used before the day. Treat that key as a credential too, since anybody holding it can broadcast into your room as that speaker.
Can I save the server address and reuse it next time?
No, copy it fresh before each event. The address is handed out anew on every load of the links page, so reloading gives you a different host from the same pool, and one you saved a month ago may no longer answer. If OBS cannot reach the server, copying the "Server" address again is the first thing to try, and if that does not settle it, open the online chat with the room name and what the OBS status bar says.
