
Webinar room presenter guide
The webinar room opens in a browser tab, and there is nothing to install. On the free Starter plan you can run real webinars for up to 5 attendees, so it is a safe place to work through the controls below before an event that matters.
This page is the map. Each area gets enough to act on, and a link to the article that goes deeper.
The parts of the room
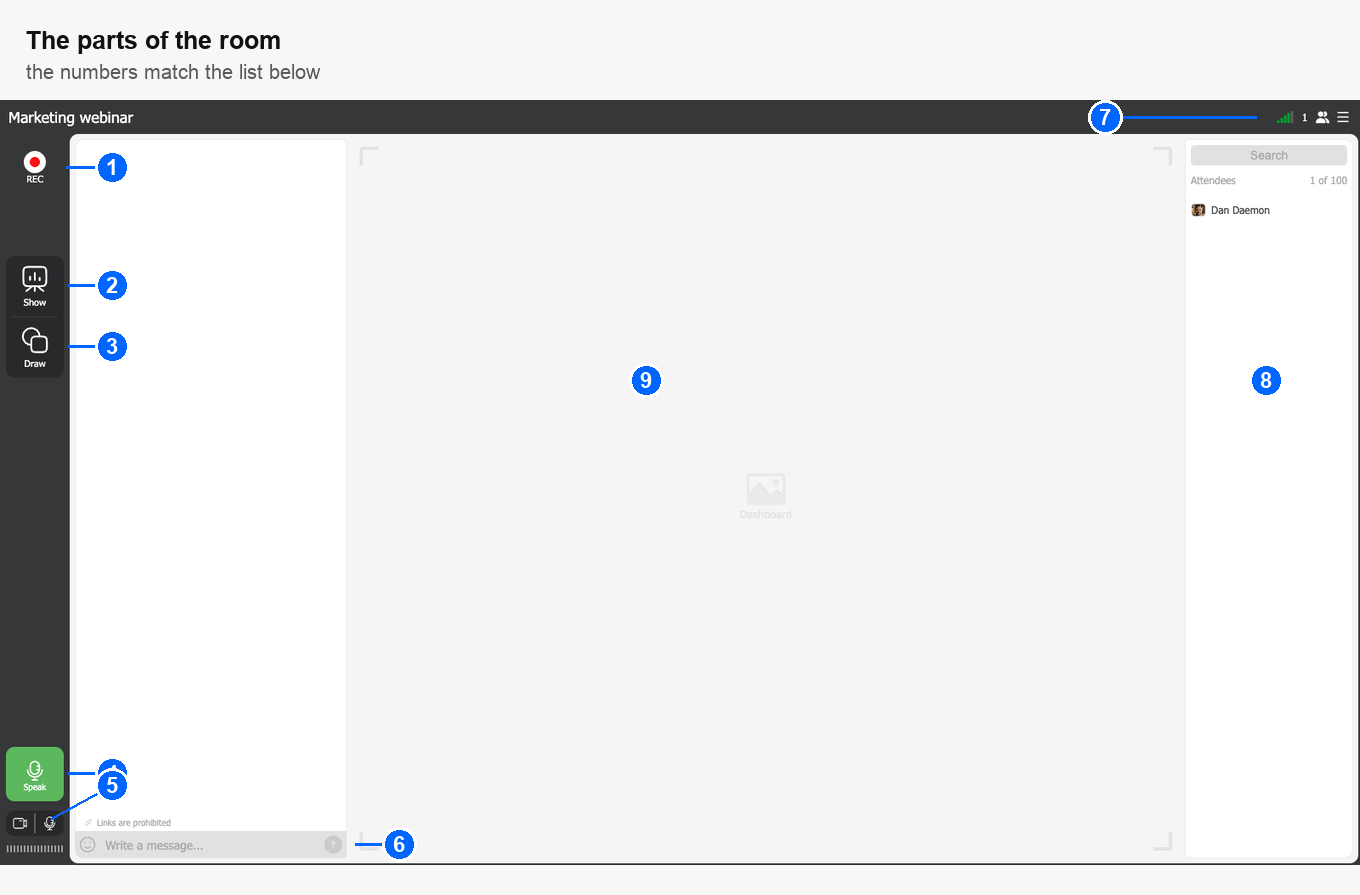
- "REC" starts and stops the recording.
- "Show" opens everything you can put on the working area.
- "Draw" turns the working area into a whiteboard, and it is where the pointer lives too.
- "Speak" puts you on air.
- The camera and microphone switches, with the level meter under them.
- The chat box. The line above it tells you what the current chat settings allow.
- The header, holding the connection meter, the attendee count and the button that opens the room menu.
- The attendee list, which the people icon in the header opens and closes.
- The working area, where your slides, video and shared screen appear.
Getting in
If the account owner invited you as a presenter, you have a personal login link. Click the button in the invitation email and the room opens in a new browser tab. You are inside at that point, but not yet on air. The room shows you to nobody until you press "Speak", and that is the step most first-time presenters go looking for.
On the way in the room offers to check your equipment and your connection, which runs through your internet speed, the ports and protocols the room needs, and then your webcam, microphone and speakers. Take it the first few times. There is a switch under the test that stops us offering it on future visits, and you can run the same check outside an event with our connection tester.
Going on air
Click "Speak". That opens your microphone and camera and puts you on air. If nothing happens, the cause is almost always a browser permission rather than the room, and going on air works through the cases. On a Mac, macOS keeps a permission of its own as well, which how to allow camera and microphone access on a Mac covers.
The camera and microphone buttons under it switch your picture and your sound off without taking you off air, and the bar below them shows your microphone level.
The room menu
The button in the top right corner opens the menu, and it has four groups.
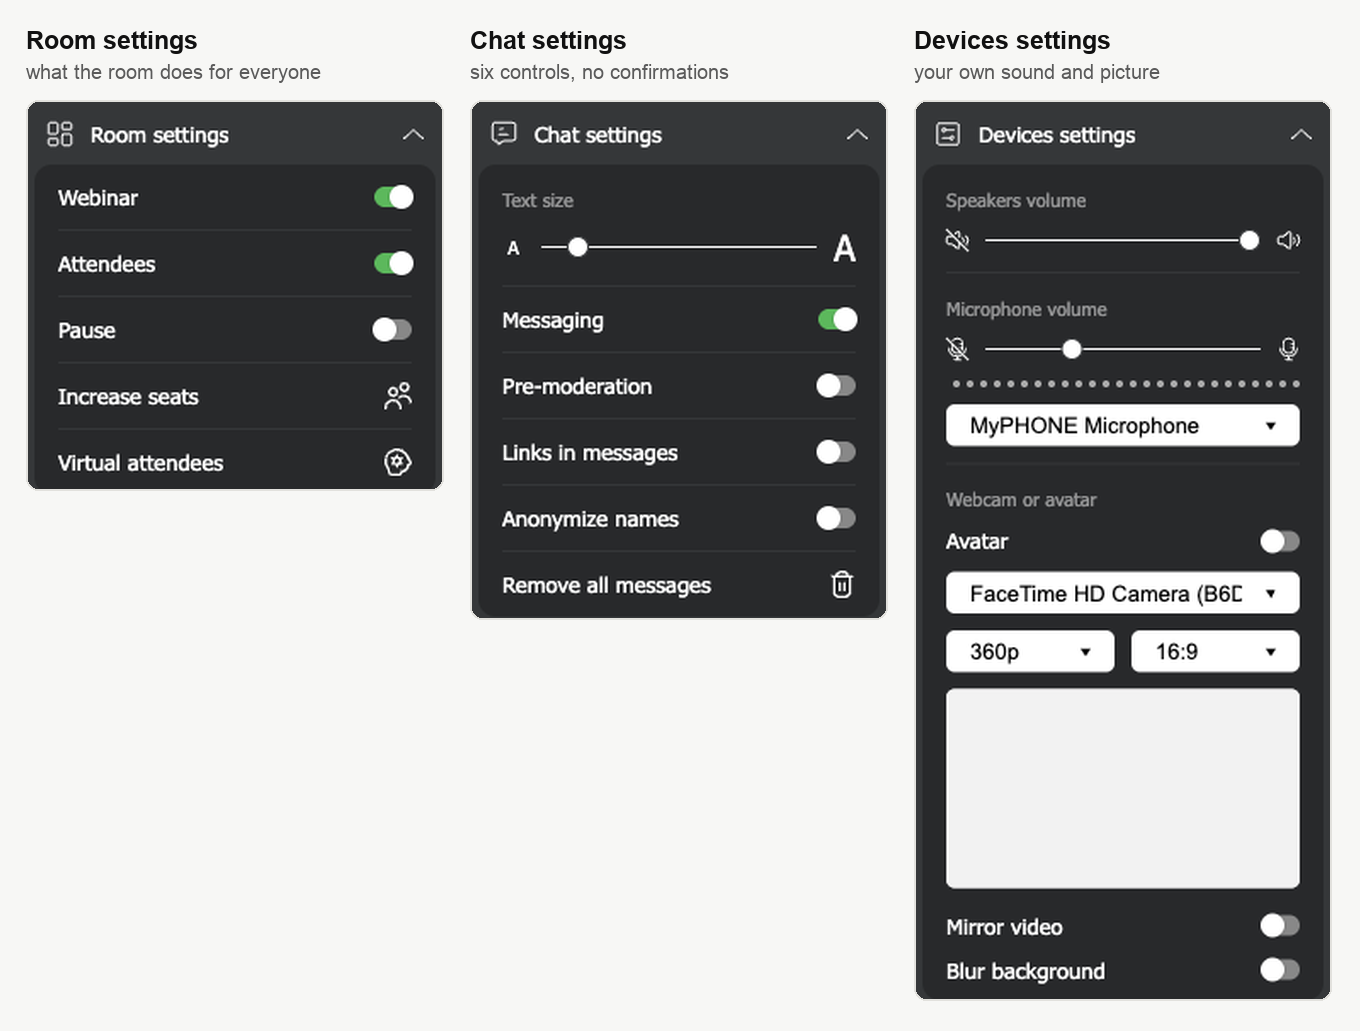
"Room settings" holds what the room does for everyone in it. The first line shows the event mode, "Webinar" or "Meeting", and it is a label rather than a switch. The mode is chosen in the dashboard while the event is being planned. Changing it there once the webinar is running does move the room across, but everybody in it has to reconnect, so it is not something to try mid-session. "Attendees" shows and hides the attendee list. Then come "Pause", "Increase seats" and "Virtual attendees", each covered below. A sixth entry, "Full screen mode", appears between "Pause" and "Increase seats" while a slide, a video or your screen is on the working area, and disappears again when you stop showing. Full-screen mode covers what it costs your audience.
"Chat settings" holds six controls. "Text size" changes the chat text in your own browser and nothing for anybody else. "Messaging" is on by default, and switching it off greys out the attendees' chat box while you and the other presenters keep writing. "Pre-moderation" holds every attendee message until a moderator releases it. "Links in messages" is off by default, and off means links are prohibited. "Anonymize names" shows attendees to each other by their initials. "Remove all messages" wipes the live chat for everyone the moment you click it, with nothing asking you to confirm. Chat moderation goes through all six with what each one looks like from the audience's side.
"Devices settings" holds your own sound and picture, in that order. The speakers slider is yours to set. Under it the microphone slider carries a level meter, and on the default browser route the room sets that level for you, because the browser's echo and noise handling depends on it. The slider becomes yours only when the room broadcasts through our own app instead of the browser, which the owner switches on beforehand under alternative broadcasting technology, and audio quality for webinars explains what changes along with the echo that comes with it. Below that sits "Webcam or avatar", where you pick the camera, the resolution (180p, 360p or 720p) and the proportions (4:3 or 16:9), with a live preview. "Avatar" disconnects the camera and shows a picture instead, which you can upload, crop or replace. "Mirror video" flips your own preview. "Blur background" softens whatever is behind you on the browser route. Custom backgrounds on the presenter's webcam explains why blur is as far as the room goes and what the app route does not carry yet, and on a Mac virtual backgrounds on macOS gets you a replacement anyway.
"Help center" holds "System test" and "Documentation". Under the groups sit the room language, "Quit" and a "Download" entry for our broadcasting app.
The language setting changes your browser only. Attendees and the other presenters keep the language they came in with.
Showing things
Everything you can put in front of the room lives behind "Show" in the left rail.
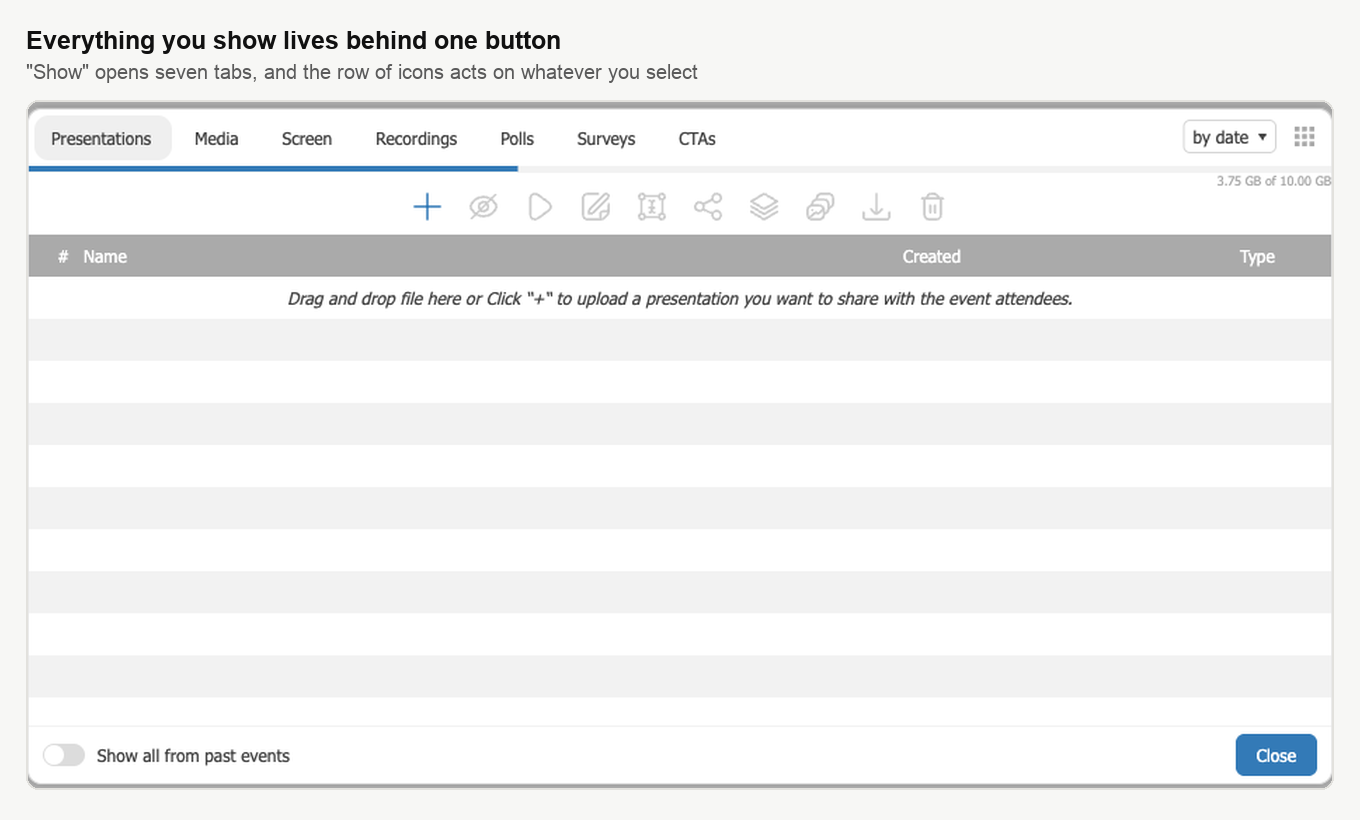
Seven tabs sit along the top, and the row of icons underneath acts on whatever you select. Double-click a row to start showing it. The same row restricts access to a single file, sends it to the chat so your audience can take it away, renames it, duplicates it, downloads it and deletes it.
- "Presentations" takes your slide decks. Drag a file onto the list or click "+". Accepted formats are in our guide to file formats, and the size and slide limits in uploading a presentation. Every upload is processed before it can be shown, and a big file takes longer, so load your materials the day before rather than minutes before.
- "Media" takes MP4, MOV and MP3 files up to 4 GB, and YouTube or Vimeo links. Live streams behave the same way as recorded video, which YouTube live stream playback covers.
- "Screen" shares a monitor or a single window through our app, and how to share your screen during a webinar covers the whole of it, from installing the app to why you will not see the shared picture in your own room. If you want the reasoning behind the app, we explain why screen sharing needs our software.
- "Recordings" is where finished recordings land.
- "Polls" and "Surveys" are the two ways to ask the room something. A poll is one question with up to ten answers. A survey is a longer set, with a time limit, scoring and shuffled questions if you want them. Polls and tests covers building both in the dashboard before the event, which is the calmer way to do it.
- "CTAs" puts a call to action in front of the room, either a text announcement with a button or a banner in JPG, PNG or GIF. Call to action buttons has the rest.
The counter in the corner shows how much of your storage is in use. "Show all from past events" at the bottom brings in the files from your other events.
A launched poll or survey opens on top of whatever else is running, so you do not have to stop your slides to ask a question. The window stays until the attendee answers. Results wait in the room until you clear them or delete the poll, and they show both the share for each answer and how each person voted.
Recording
Click "REC" at the top of the left rail. To stop, click the button again and confirm.
The file then goes off for conversion, which needs nothing from you. How long it takes depends on the size of the recording and how busy the server is, though in practice it usually finishes well inside the length of the webinar itself.
A single recording tops out at 10 hours and then stops on its own. For a longer event, stop and start again. The pieces arrive as separate files that all carry the room's name, so rename them while you still remember which is which.
Length and quality both depend on your plan. Starter caps a recording at 20 minutes and 1080p, and plans from 500 attendees go up to 2160p. Recordings use your storage, so delete what you no longer need. Recording a webinar has the rest of the settings.
The attendee list
The people icon in the header opens and closes the list, and the count beside it tells you how many are in the room. It shows who has asked to speak or to ask a question, and it is the quickest way to find one person.
Clicking a name opens a strip of actions beside it.
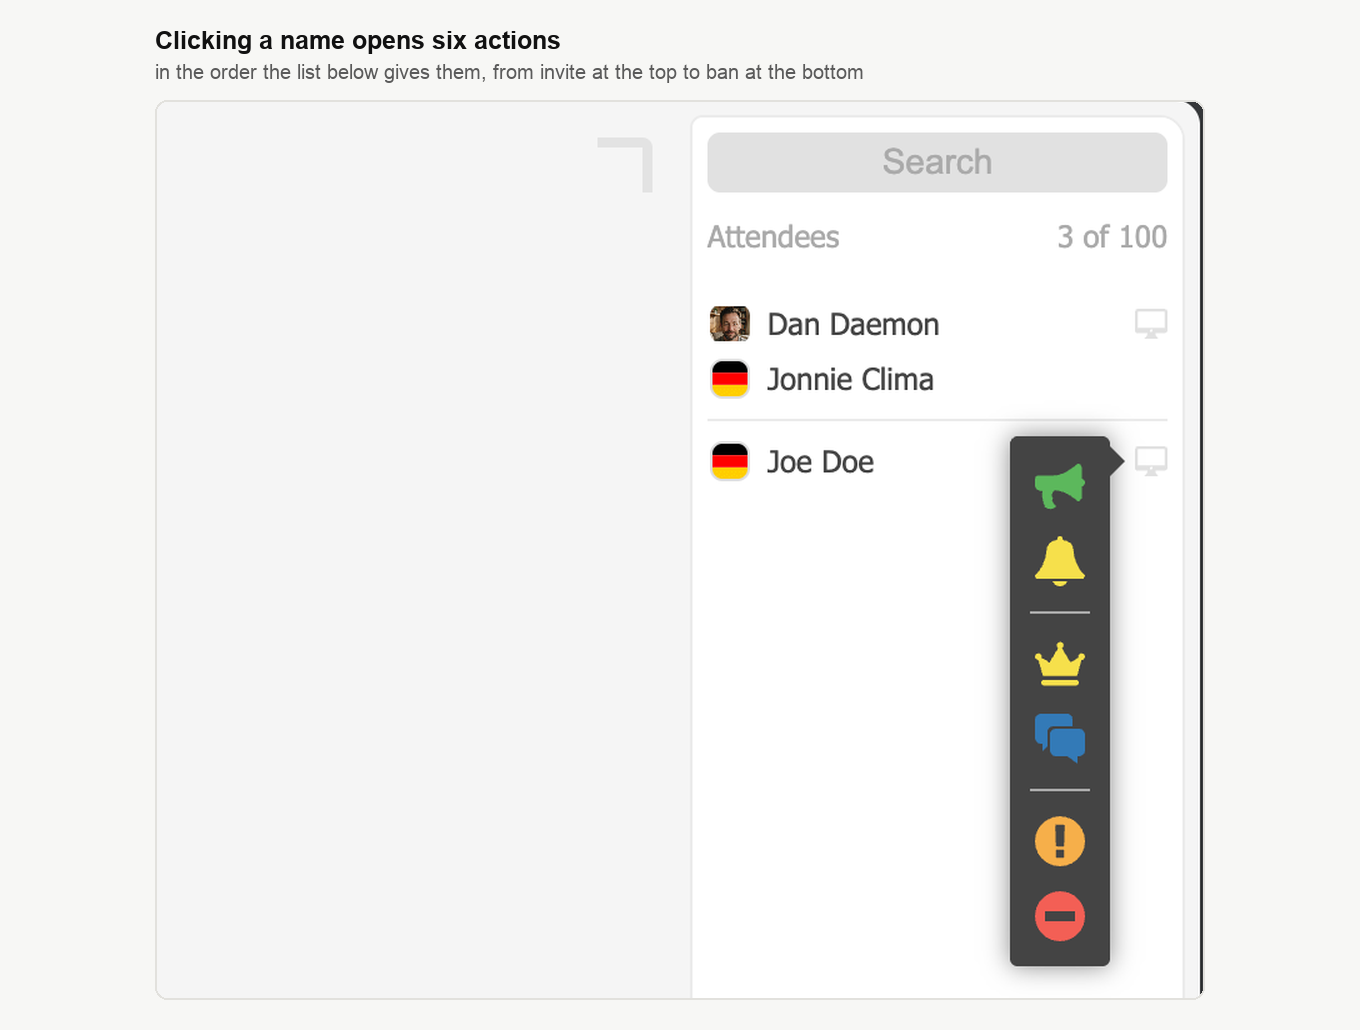
- "Invite to conversation" lets that attendee speak with their camera and microphone. Inviting an attendee to speak covers both confirmations and what they see.
- "Draw attention" plays a sound for that one person.
- "Appoint as a presenter" promotes them for the rest of the event.
- "Send message" opens a private line to them.
- "Reject attendee" blocks them temporarily, and its "Block until event ends" option keeps them out for the rest of the event.
- "Ban attendee" bars them permanently. It is not an IP block, there is no blocked list to edit in the control panel, and it is lifted only with the
attendeesUnbannedcommand of the public API, which takes the attendee's email address.
The same strip appears above a message in the chat, and chat moderation goes through it in more detail.
Pausing the event
"Pause" in "Room settings" holds the event without ending it, which is what a coffee break needs. Quitting and coming back is the heavier option.
Before the break starts the room asks how long you expect to be away, whether it locks "for attendees" or "for everyone" with the presenters included, and what comment your audience should see while they wait.
Buying seats during an event
If more people turn up than your plan covers, open the room menu, expand "Room settings" and choose "Increase seats". The free Starter plan has the option too.
Confirm the purchase, then choose a payment method and follow the instructions. Your browser opens the payment page in a new tab, and the window closes once the payment goes through.
One purchase adds exactly 100 seats, and the room grows within a few seconds. Those seats last until the webinar ends, after which the capacity drops back to what your plan provides. Whatever you stack up, no room on the platform goes past 5,000 attendees.
Extra seats during a webinar goes deeper, including why the purchase covers only the webinar you bought it in.
Virtual attendees
Sometimes fewer people turn up than you expected, and "Virtual attendees" in "Room settings" lets you show a fuller room than the real one. The window sets how many, the split between men and women, whether the names are local or mixed, whether they carry surnames, and how many come from your own country.
Planning an automated webinar covers preparing them in the dashboard ahead of time, including importing a whole list of names at once.
Leaving
"Quit" disconnects you and closes the session, and an exit screen appears. If you left by accident, the same link you came in with takes you straight back.
Getting help
"Help center" in the room menu holds "System test" for your hardware and connection, and "Documentation" for our guides.
The online chat button sits in the corner of the page, in the control panel and in the webinar room alike. Our guide to the support team lists the other places you can open it from.
Frequently asked questions
Do I need to install anything to present?
No. The webinar room opens in a browser tab and there is nothing to install. The one exception is screen sharing, which goes through our own app, and how to share your screen during a webinar covers it from installing the app onwards. The room menu also carries a "Download" entry for our broadcasting app.
Can I switch the room between Webinar and Meeting once it has started?
You can, but not from the room. The first line of "Room settings" shows "Webinar" or "Meeting" as a label rather than a switch, and the mode itself is chosen in the dashboard while the event is being planned. Changing it there once the webinar is running does move the room across, but everybody in it has to reconnect, so it is not something to try mid-session.
Do the extra seats I buy during an event stay afterwards?
No. One purchase adds exactly 100 seats and the room grows within a few seconds, but those seats last until the webinar ends, after which the capacity drops back to what your plan provides. "Increase seats" sits in "Room settings" in the room menu, and the free Starter plan has the option too. Whatever you stack up, no room on the platform goes past 5,000 attendees.
I banned the wrong attendee. Can I undo it?
Not from the room. "Ban attendee" bars someone permanently, it is not an IP block, and there is no blocked list to edit in the control panel, so it is lifted only with the attendeesUnbanned command of the public API, which takes the attendee's email address. If you only need someone out of this event, "Reject attendee" is the temporary one, and its "Block until event ends" option keeps them out for the rest of the event.
Why did my recording stop on its own?
Two limits do that. Starter caps a recording at 20 minutes, and a single recording tops out at 10 hours and then stops on its own. For a longer event, stop and start again, and the pieces arrive as separate files that all carry the room's name, so rename them while you still remember which is which. Recording a webinar has the rest of the settings.
